
Athleisure has been on the rise for several years now, so it’s no surprise that there are now trends being seen within the trend itself. This season, the ’80s are coming back full swing, but luckily it’s happening in a not-so-neon way. We’re seeing the baggy sweatshirt silhouettes over fitted bodysuits and leggings both for casual wear as well as to the gym. Luckily, the Bixa Sweatshirt free sewing pattern can have you on your way to the perfect workout wardrobe in terry, fleece, or ponte with just a few easy adjustments!


Purchase Materials Used Below:
- 1.5 yards Mellow Rose Bamboo Stretch French Terry
- MDF095 – The Bixa Sweatshirt Sewing Pattern (free download below!)
Alternative Recommended Fabrics:
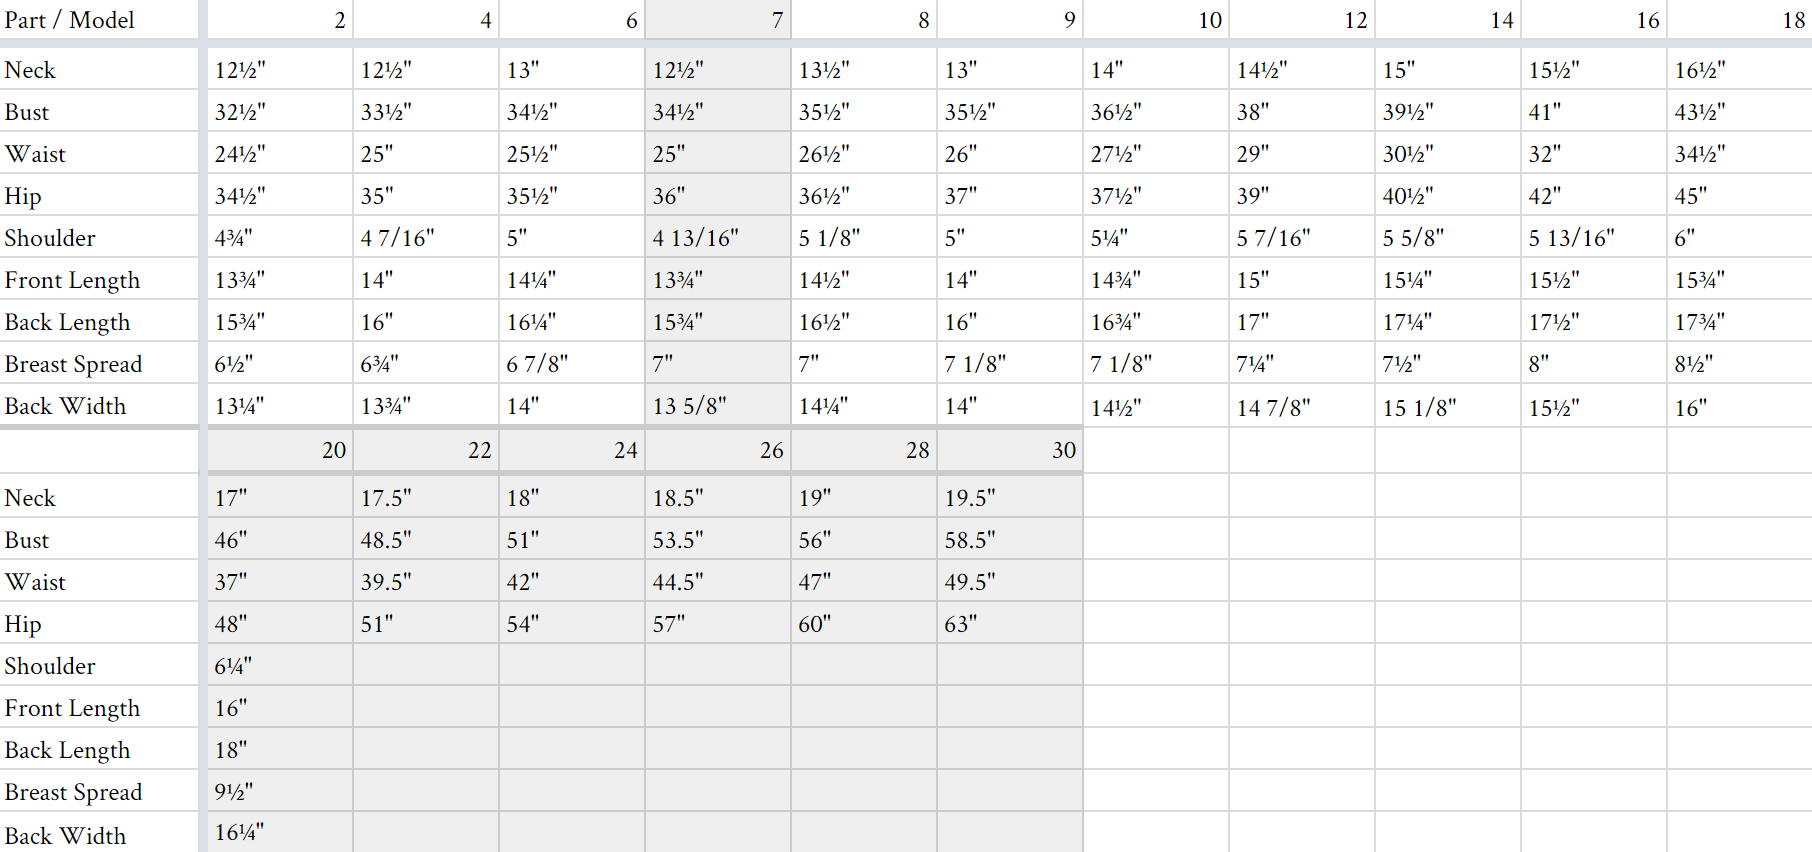
All seam allowances are 1/2″ unless otherwise stated. See chart below for sizing specifications. Note, this specific pattern is available up to a size 30.
As you can see from the pattern flats above, our version of the Bixa Sweatshirt had a few edits.
To start, I skipped the overlay piece from version B of the original pattern. For a simpler, flare sleeve, I combined the Upper Sleeve with the Lower Sleeve of version A. As you can see, I flipped the Lower Sleeve upside down to make it flare toward the bottom. No overlapping of the pattern pieces was necessary, since it gave me some extra length to make up for the lack of cuff by not erasing the original seam allowance.
Note: if you’re using a size larger than 10, you make need to true your curve from the top of the sleeve inseam down toward the flare. You can easily freehand this like I did below, or use a French curve for some extra support or to add some extra volume!

To make the V-neck shape, I made a mark 1.5″ from the shoulder edge as well as 3″ down from the center front, followed by 2.5″ down from the center back. An easy straight edge to connect my two marks on each piece had me in business!

The final change I had to make was to the Collar/neckline binding. Since my new neckline was much larger than the original pattern, the Collar piece needed to be elongated. Luckily the width was perfect, so I only needed to do a bit of math for one of the dimensions.
The new neckline measured in at about 31.5″; and you always want your neckline binding on a knit garment to be about 10% shorter than the neckline itself so it lays flat rather than stick up strangely. This brought my new Collar length in at 28″.

3 comments
I love the new neckline on this! I’m definitely going to mix that with the original sleeves. Thanks for the idea.
Where are the sewing instructions??????
Hi, there! Instructions for the Bixa Sweatshirt can be found here. 🙂