Today in Mood DIY we’ll be drafting a simple bodysuit with an empire waist and plunging front and back neckline. Whether you’re looking to beat the heat or for something to wear to the gym, this bodysuit is the perfect afternoon project.

What you’ll need:
- Approx. 1 1/4 yd 4-way stretch fabric (such as jersey, spandex, or tricot; you’ll want to use a fabric with strong elasticity, rather than an extremely soft, loose jersey)
- (A note on calculating yardage: measure yourself from crotch to underbust, then double this number. That is the length of fabric that you will need. Allow a little extra if you’re print matching or if your fabric has a nap/one-way design. If your body circumference is greater than the width of your fabric [our fabric was 45″ wide], you will also need additional yardage.)
- 3 size 1 snaps
- All-purpose polyester thread (Not cotton!)
- Lightweight machine needles (Ball point, for jerseys; Stretch, for most high-stretch fabrics)
- Sharp, fine hand needle
- Pattern paper (any large paper will do)
- Measuring tape
- Straight edge
- Fabric pencil or chalk
- Pencil
- Calculator
Optional but useful items:
For this project, we’re going to do a little pattern drafting. Fear not! This bodysuit only has two pattern pieces and no tricky armholes, so even if you’ve never drawn a pattern before, you’ll be able to dive right in.
Step 1: Measuring
To begin, we need to take measurements. Lots of measurements. Then do some math. (Didn’t think that’s what you were signing up for, did you? The unfortunate reality of pattern making is that once you get past the fun designing part, you have to figure out how big all of your pieces are. So, pattern drafting=math.) To make life a bit easier, I’ve prepared this worksheet:

Not sure how to measure? No problem. Click here to view a handy chart, illustrating where each measurement should be taken. You will note that rise is absent from the diagram. To measure rise, measure from waist to crotch (dead center, where the inseams of your pants meet).
Write all of these measurements on your sheet.
Now, fire up your calculator. Where indicated on the worksheet, take your measurements and multiply them by .85 to find our negative ease.
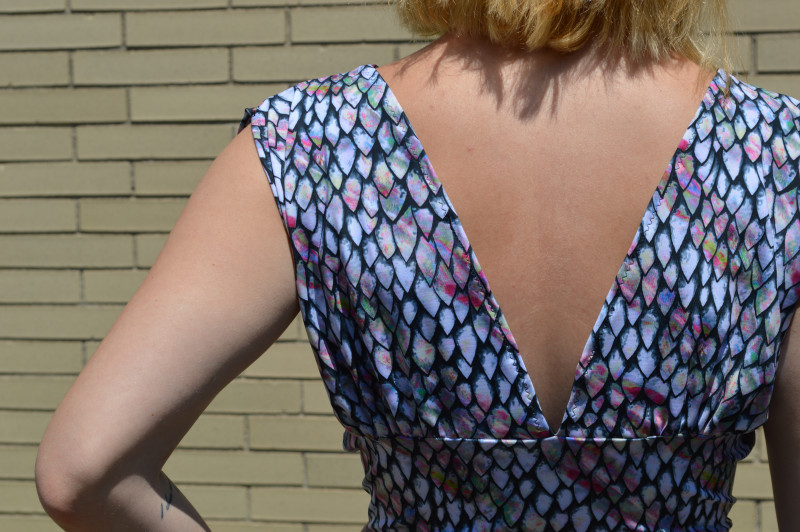
Say what?! Negative ease. In all garments, additional space is provided so that your body has room to swell and bend. If you were to put on a garment that is exactly the same measurements as your body, you would find it impossible to move. With stretch fabrics, however, we have to take negative ease, meaning, we will subtract from our body measurements, in order to provide a snug fit. The percent by which you reduce your measurements will depend on how stretchy your fabric is. Many sewers will tell you, never go beyond 10% negative ease. In my experience, when using a very stretchy 4-way stretch fabric, 10% will not produce a truly snug fit, so here I’ve used a 15% reduction. (The garment in our featured photo was sewn with 10% negative ease. You can see how it is a contoured fit but not skin tight, as one typically expects from a leotard or bodysuit.)
Multiplying by .85 gives us 85% of our original number, so fill those numbers in, where blanks are provided. (Obviously, here you’ll use a different number if you’re using a different percentage of ease for your own fabric.) Lastly, we need to divide a few of our measurements by 4 so that we’ll get our pattern dimensions, so do that where indicated (bust, underbust, waist, and hip).
Step 2: Drafting the Pattern
The Body
Now it’s time to start drawing. Take your paper, pencil, curve, and square (or plain old ruler). First, we’ll draw the pattern piece for the body. Important note: we are marking actual body size, without seam allowances. You will add seam allowance at the end, before cutting your paper.
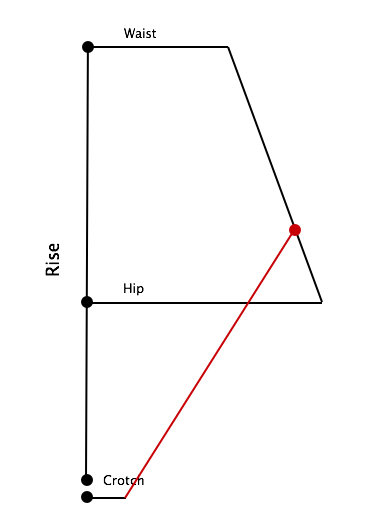
You can start drawing willy-nilly in the middle of your paper if you don’t mind a little waste, but these instructions will help you minimize waste. Working up the longest edge of your paper, make a mark 1″ from the bottom (the short edge). Now, take your front rise measurement and mark that up from this mark. At this upper mark, square across your 1/4 waist measurement. 7″ below your waist line, square across your 1/4 hip measurement. Like so:

If you want the crotch of your bodysuit to be sewn shut, then go ahead and draw a 1.5″ line across at the bottom mark. (Which, obviously, is your crotch.) If you want a snap crotch (which is what we’re making), mark a half inch down and then draw in the 1.5″ line. (This gives us a half inch of overlap, to accommodate the snap closure.)
Use your ruler to connect the ends of the waist and hip lines.


Measure along this line from the waist and mark your side to leg opening measurement. Now, draw a line connecting this leg opening mark to the end of your crotch line.
Our next step is to shape the leg opening. Find the center of the leg opening line that you just drew. Make a mark 2″ in from there. Using your french curve (or free hand), draw an arc through this mark from the leg opening to the crotch.


Now we’ve got a leg hole!
Optional alteration: As you see, our leg opening is the same front and back. If you want the back leg opening to be lower, for comfort or if using the bodysuit as outwear (leotard or swimsuit), here is a simple way to drop it. Take your finished, cut-out pattern piece and lay it on a fresh piece of paper. Find the center of the leg hole and make a mark 1″ in. Draw a new arc connecting the ends of the opening, through this mark. Ta-da. Rear leg hole. Cut this out of your paper as a block, trim along the arc, and tape onto the back of your main pattern piece. Now you’ve got a separate pattern piece for front and back, simply by taping or removing this small addition when cutting your fabric.

The highlighted orange line is our new rear leg hole.
The final step for the body is to extend to underbust, which is much simpler. From your waistline, mark the waist to underbust measurement. At this mark, draw a line for your 1/4 underbust measurement.
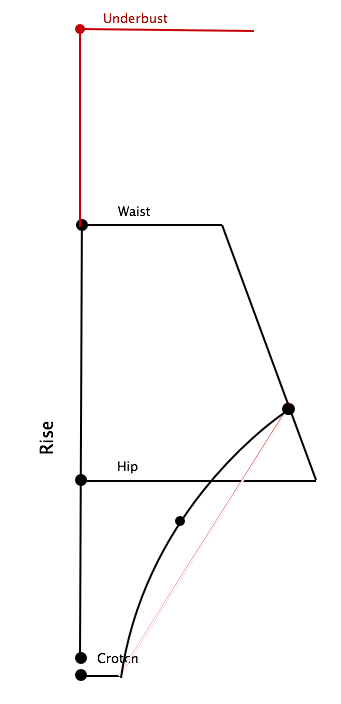
Connect the line to the waist. See how the waist is a sharp angle? Our last step is to smooth that out into a more organic curved shape, as you see in the photo below.

Everything look good? Cut out your pattern piece with a 1/2″ margin (except on the center edge, which will be placed on the fold). This is our seam allowance.

The bracket on the left side indicates that the pattern piece is to be cut on the fold of your fabric.
Ta-da! You’ve finished the body.
The Top
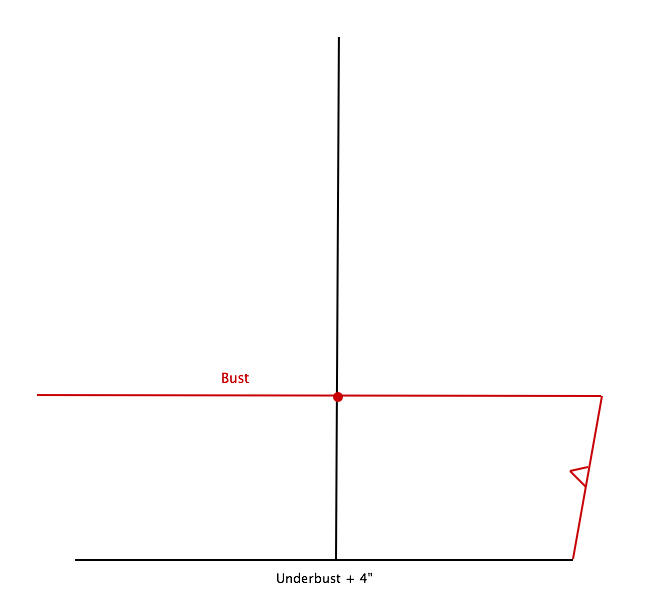
The top is a bit simpler. Draw a line equal to your 1/4 underbust + 4″. We’re adding 4″ to both our underbust and bust measurements, in order to create a full cup that will be gathered to fit the waistline. In the center of this line, square up a perpendicular line equal to your underbust to shoulder measurement.

Working up from the underbust line, mark in your bust point. At this point, square across your 1/4 bust + 4″ measurement. Connect your underbust and bust lines. This is your side seam. Draw a notch in the center of this line so that later, when sewing, we’ll know it’s our side seam.
Our finished shoulder is 2.75″ wide, so at the top of the central line, center across a 2.75″ line. (If you want your own shoulder to be narrower or wider, just change this measurement accordingly.) On the same side as the side seam, connect the bust and shoulder lines.

On the opposite side, draw a gentle curve connecting the shoulder, bust, and underbust lines.


Along the underbust line, we need to make a couple of marks for gathering, so that each piece is identical. We want the gathers to be placed closer to the front than the side, so about 2″ from the curved side (our center front/back), make a large dot. Make a second dot about 3″ from the side seam. Later, we’ll do our gathering between these two dots.
One last step! Along the straight/side line of our top, measure 2″ down from the shoulder. Connect this mark to the other end of the shoulder line. This shortens the armhole to eliminate gaping.


As before, cut around your pattern piece with a 1/2″ margin, to add seam allowance.
Congratulations, you’ve just drafted a pattern! Have a lie down. Next, we cut our fabric.
Step 3: Cutting
For our bodysuit, we’re using a fantastic performance tricot in this amazing dragon feather print (as I’m calling it). It’s a compression fabric, so it has a lot of stretch, but it’s thick and sturdy. (The gentle compression makes it SUPER flattering. It will smooth out all your lumps and bumps! We’re in love with it here.) It also has UV protection and aloe vera microcapsules, so it’s a great choice for a swimsuit or athletic clothing.
Fold your fabric lengthwise, bringing both of your fabric’s selvedge edges together. Be sure that the fabric is laying flat and smooth. (Your cut ends may not line up exactly. This is normal.) Does your fabric have a print? Check whether it has an obvious top and bottom. Our print definitely has an obvious direction, so make sure that the top edges of all your pattern pieces are placed right side up!
Place your body piece against the folded edge and trace around it with your chalk. Place your top piece next to it, being sure that the center line of your pattern piece is parallel to the selvedge. (This places our pattern along the fabric’s lengthwise grain. It is very, very important to be on grain.) If your top pattern piece does not fit exactly next to the body piece, slide it up until it fits. Trace it with your chalk. Remove the pattern pieces and place them a second time, the same way. Trace and cut all of your pieces. (Always place/trace all of your pieces before cutting. You want to make sure it all fits on your fabric.) You should have 2 body pieces and 4 top pieces.

Don’t forget to transfer your markings to your top pieces. Cut your side seam notch, and either notch or chalk the indicators for gathering.
Step 4: Sewing
Now we assemble everything! When sewing a stretch fabric, you need to use a stretch stitch. This is a zig-zag stitch. Your machine may have a special stretch-stitch setting. (On our house Mood machines, it’s stitch #4). If not, a regular zig-zag will be fine. Do a test stitch on a scrap of fabric and find the stitch length and width that you want. You want a short, narrow stitch that creates a clean line when the seam is opened.

When you do a test, is your fabric puckering, as in the photo below?

Don’t worry, there’s an easy remedy–use a 3-stitch zig-zag. It’s the one that looks like this: ![]()
This stitch is especially handy for sewing hems on stretchy garments, because it holds the fabric flatter than a conventional zig-zag.
Once you’re ready to go, start by pinning the sides of your body together, then stitch, with a 1/2″ seam allowance. Remember, we’re working with 1/2″ seam allowances throughout.

Along the leg openings, turn under 1/2″ and sew down flat. Lastly, turn under the seam allowance on the short crotch ends and sew down.

Boom, there’s your body. Now we’re going to prepare the top.
We’re going to begin by making gathering stitches. Change your machine to a straight stitch (this will be #1 on most machines) and increase your stitch length to the longest setting. Between the two dots along the underbust, sew a straight line 1/8″ from the edge of the fabric. Do not back stitch at either end. This is very important. If you back stitch, the fabric will be locked into place and won’t be able to slide along the thread to create the gather. (At Mood U, one of the questions we hear most often from beginners is, “Should I back stitch?” The answer is “Yes, always–EXCEPT when doing gathers!) Sew a second line just above the previous line, about 1/4” from the fabric edge. Do this on all 4 pieces.

Next, take two pieces and sew them together at the side seam. (Repeat for the other 2.)

Sew the same two pieces together at the shoulder. Turn under your 1/2″ hem around this newly created armhole and sew flat. Do the same along the front/back center edges (unless raising neckline; see option below).
Optional neckline alteration: If you want your neckline to be less plunging, decide how much you want to raise it–let’s say, 3″. Take your two halves of your top and sew together at the center front 3.5″. Now you may hem the remainder of the front and back edges.
Optional addition: If your top is fitting as snugly as we hope, you won’t have any gaping and the shoulders shouldn’t be prone to slipping off. However, if you do encounter slippage, or if you want the added security, then when hemming, you may add clear lingerie elastic around the neck and arm openings. This will give you some additional traction.
Fitting tip: Gauging the correct negative ease for your fabric can be tricky the first time you sew with it. If you find your neck or armholes are gaping, you can fix this by pinching out any excess fabric in the side seams and in the shoulder seams, sewing to the desired point, and trimming off the excess.
Huzzah! Your top is prepared. We’ll sew it onto the body, and we’re nearly done.
Take your body and fold it in half. Notch or otherwise mark the center front and back.

Here I’ve cut a notch and placed a pin at the center, to make it more apparent.
Place the top against the body, matching the side seams. Pin up to the beginning of your gathering stitch. Match your center front/back edge up to the center marking you just made on the body, and pin this down, up to the other end of the gathering. Finally, we’ll pull the gathering stitches to fit the body, adjusting the gathers evenly along the entire length.

Sew it all together, and voila, you’ve got your very own, custom-fit bodysuit! You may sew a half of the top at a time, or pin all and sew all the way around in pass.
Pro-tip: When sewing over thick areas on stretch fabrics, such as over the gathering or over seams, you might find that some of the bulk is getting stuck under the sewing machine foot, stretching, and causing skipped stitches. Here’s a simple way to counteract this: every inch or so, lower your needle into your fabric and lift the presser foot. Now released, the fabric will rebound. Lower the foot and continue sewing. This is also a good strategy for getting over thick seams.
Step 5: Sewing the Snaps
The hard work is over. All we need to do now is sew on the snaps. Take your hand needle and some thread and relax in a comfy chair. You will place 3 snaps on the wrong side of one crotch half and the right side of the other half.

Also take care that you’re not so preoccupied with daydreams of sandwiches that you sew half of your snaps on upside down. Never sew on an empty stomach, kids.

Now, put on your bodysuit and do a little dance, because you’re done and you’ve earned it!


4 comments
Love this article!! It’s something that is really useful….I would really like to see more like this.
I didn’t think I could, but it worked out perfect after the second time. More please
Thank you
This is wonderful. Thank you. I once had a vintage bodysuit pattern and regret the day that I Iost it. Now I can make it again! I hope to see an article like this with pants!
[…] and me!) are making made-to-measure leggings. If you’ve been hoping for another tutorial like last week’s bodysuit post, you’re in luck, because we’re going to draft our own pattern again. If you found the […]