From colorful pastels last year to a more natural vibe this year, some version of faux fur is always on trend. This tricky fabric can be a bit intimidating for some sewists, but with the right tools and techniques, we can make it a breeze! Let’s take a look at some tips and tricks to add some classic coziness to your fall and winter wardrobe.


Purchase Materials Used Below:
- 3-4 yards Loden Green Cotton Canvas
- 2.5-3.5 yards Brown and Beige Striped Faux Fur
- 1-2 pkg Brass/Black Heavy Duty Snaps
- 1 Mood Exclusive Italian Black and Silver T8 Open End Metal Zipper – 27.5″ (shortened)
- 1 Mood Exclusive Italian Large Silver Flat Trapezium Metal Zipper Pull
- 1 pkg Nickel Grommets
- MDF035 – The Kerria Anorak Sewing Pattern (free download below!)
Alternative Recommended Fabrics:
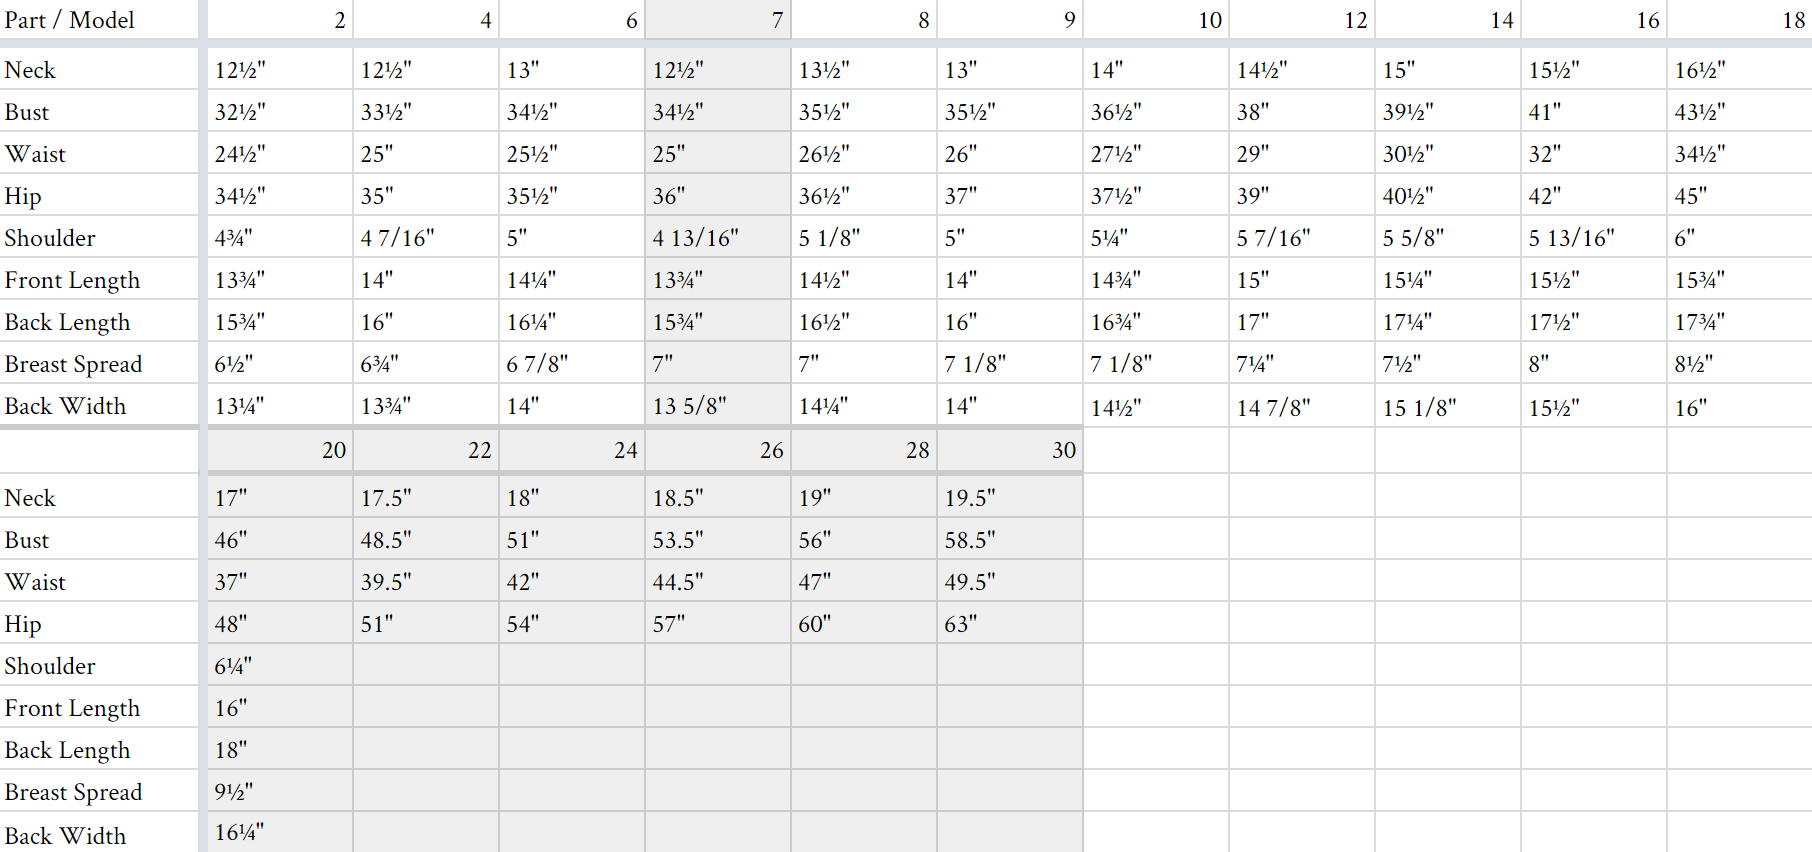
All seam allowances are 1/2″ unless otherwise stated. See chart below for sizing specifications. Note, this specific pattern is available up to a size 30.

Before starting a faux fur project, do a quick round of maintenance and cleaning of your machine. (For reference, check out this video and free maintenance sheet!) Throughout your project, keep an eye on the bobbin area of your machine and be sure to do a full cleaning when you're done as well.
Identify the Direction (or Nap) of the Fur
Most fur has a very clear nap, meaning the fibers are meant to lay in a single direction. Before cutting anything, give your faux fur a quick comb and mark the direction of the fur on the backside of the fabric. You’ll want to lay your fur face down and make sure that all of your pattern pieces are placed in the same orientation in relation to the nap.
Mark Your Pattern Pieces Instead of Using Pins or Weights
With the fur face down, place all your pattern pieces on the wrong side of the fabric and outline them with a marker or tailor’s chalk. Be sure to transfer any notches or notes.
Skip Scissors & Use a Razor or X-ACTO Knife
Cutting faux fur with regular scissors will result in fur cut short, looking like a bad hair day. Instead, cut from the back of the fur, snipping only the backing with a craft knife. Gently pull the pieces apart, snip any backing fibers that still hold together, and give each of your pattern pieces a quick comb.
Use Clips Instead of Straight Pins
With such thick fabric, pins will warp your pattern pieces and, ultimately, your seams. Instead, opt for some Wonder Clips to hold pieces together as you sew. When clipping, be sure to brush fur away from the seams to minimize the amount getting caught while you sew.
Know Your Faux Fur Seams
For long faux fur, a hinge seam using a wide zig-zag stitch will do the trick since the long fibers will hide your sewing. Shorter faux furs can be joined with a regular seam, but I’d recommend shaving or trimming the fur in the seam allowance to reduce bulk. Whichever seam you go with, I recommend the widest stitch length, a heavy duty needle, and a walking foot for any faux fur.
Continuously Comb Your Faux Fur
After each seam is sewn, comb the fur to pull out anything that may have gotten sewn into the seam.

4 comments
I don’t understand why so much faux fur is needed. In the picture, it looks like only the hood and hood lining are made of fur. Is the 2.5-3.5 yard estimate for a whole jacket lined with it?
Hi there! Yes, the entire jacket is lined with faux fur. For just the hood lining, you’d likely only need a half yard or so.
Hi I am really sorry if this sounds daft but I have downloaded the pattern but there are no instructions with it
The original Kerria Anorak instructions can be found here. 🙂