
With adorable puff sleeves and a tie-front bodice, The Bluebell Dress incorporates several of this season’s cutest trends. Made here in a Mood exclusive printed voile, transform this pattern’s garden party vibe with a velour for Fall or even a stretch sequin fabric for a night out! Its open, geometric neckline is perfect for showing off some statement jewelry; and I can easily see the Bluebell as the next LBD in my wardrobe, paired with some rhinestone tights. How will you be styling this new pattern?


Purchase Materials Used Below:
- 4 yards Mood Exclusive Parfumerie Gardens Cotton Voile
- 1 yard 1/4″ Red Single Face Satin Ribbon
- 1 yard 1/4″ White Elastic
- 4 yards Optic White Mercerized Cotton Shirting
- MDF149 – The Bluebell Dress Sewing Pattern (free download below!)
Alternative Recommended Fabrics:
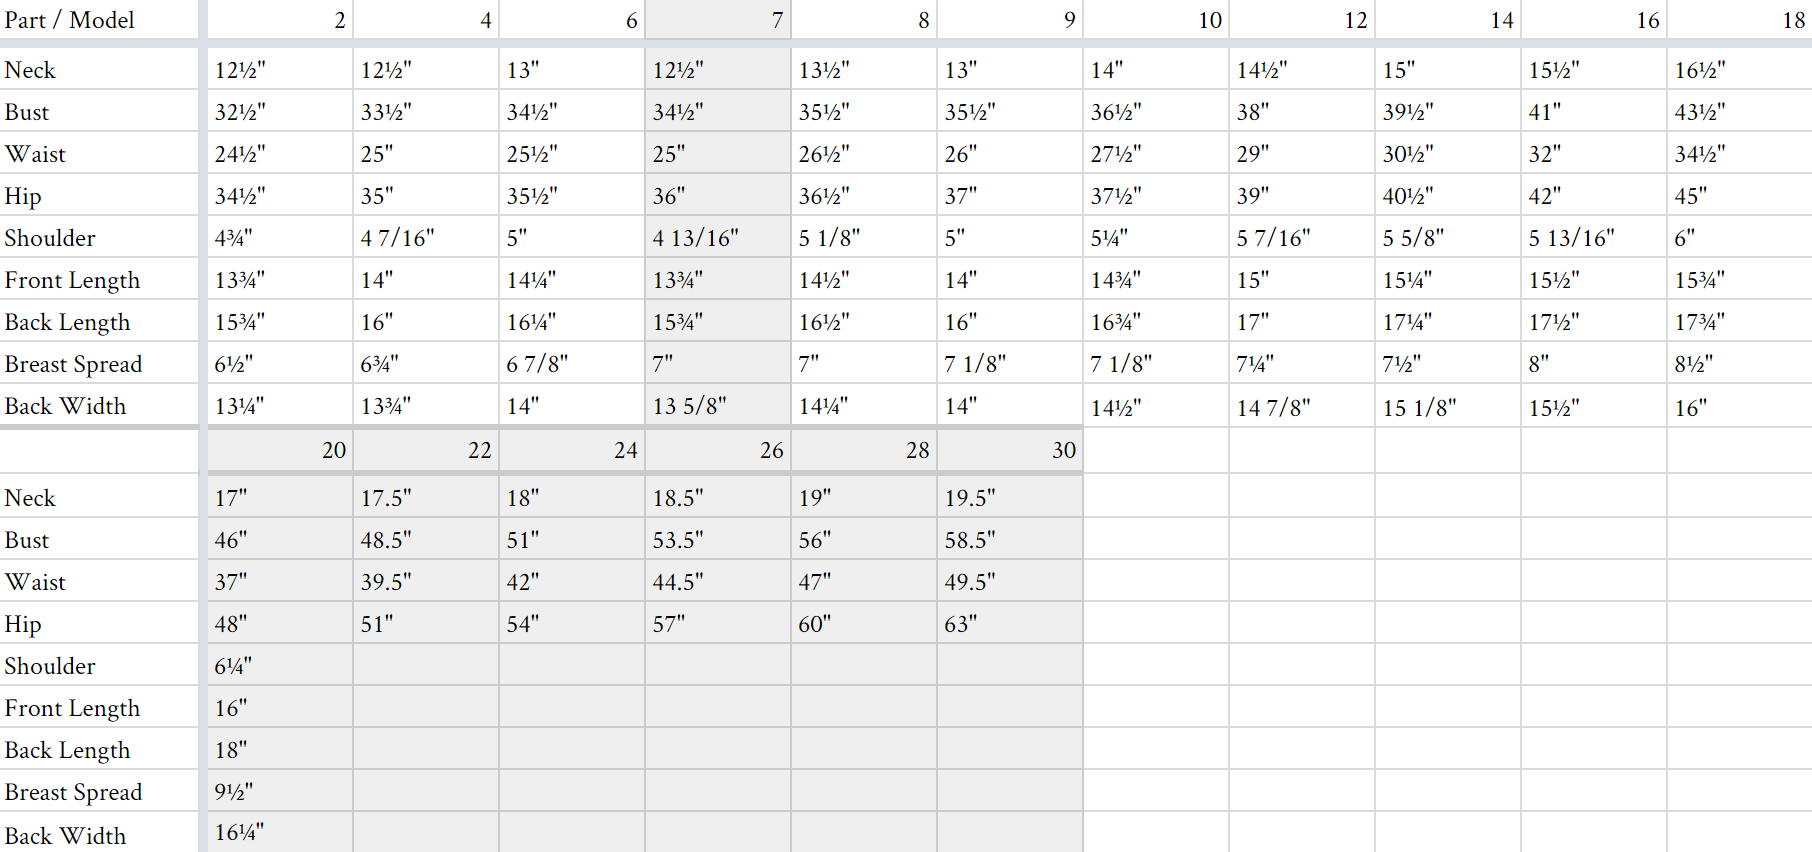
All seam allowances are 1/2″ unless otherwise stated. See chart below for sizing specifications. Note, this specific pattern is available up to a size 30.
Since I used a voile for this dress, I chose to line the bodice and skirt with a basic cotton shirting. Rather than make two layers of the dress and sew the lining into the main layer toward the end, I sewed the bodice lining along with the voile as if the were one fabric, like you can see below.
To do this, begin by attaching the front panels and back of your dress at the shoulders and side seams using a French seam. This will hide the raw edges of your fabric inside the seam.

Next, hem the lower edge of your bodice that angles down toward the waistline of your garment.

Sew the center back seam of your main skirt layer and lining layer separately, so you’re left with two skirts. Again, use a French seam here.
Starting at the center back, pin your bodice to the waistline of your skirt, fabric faces together like you see below. Once they’re in place, pin your skirt lining on top so your dress bodice is sandwiched in between your main skirt and skirt lining. Sew around the waistline, sewing all three layers together.

Trim the seam allowance around your waistline, turn the garment so it’s right-side-out, and sew along the waistline again, sewing your skirt layers together and forming a sort of French seam (as you can see below) where you can now lace your elastic through. Be sure your elastic is cut to 2″ less than your waist measurement.

Next, form each of your sleeves by sewing the inseam and then set them into the armscyes of your dress bodice. Evenly gather them into your sleeve cuffs to finish.

Hem each of your skirt layers separately with a 1/4″ rolled hem. For the neckline of your bodice, roll your main layer and lining together into a single 1/4″ rolled hem like you see below.

Lastly, roll the center front edges of your bodice inward 1/2″ twice, like you see in the lower left-hand image, and edge-stitch to create a small casing for your ribbon. Lace your ribbon through both sides of your bodice from the bottom up, and tie together at the top to complete your dress!


Will you be giving The Bluebell a try? Let me know in the comments what kind of fabrics you’ll be trying out!

38 comments
I’m excited to try this pattern – it’s adorable! I have tried to download it twice, but both times I have been sent a pattern for the Vallea Tunic rather than this dress.
Sorry! I looks like it was a glitch in our system this morning – it should be all fixed now!
I’m going on a trip soon hoping i can make this before it!
Hi, thank you for this nice dress pattern! It will be my very first sewing project, so i have a question that might sound stupid.
I have size 4, how many yards of fabric i need? How do i calculate it for future projects?
Hi Sara, we’re sorry for the delay in responding to your question! We get dozens of comments and questions each day, and so many questions get buried and, unfortunately, unanswered. We are now focusing user support on patterns 2 years and newer. We hope this will prevent questions on our more current patterns from going unanswered. Although this is late, we wanted to respond in case anyone else has the same question: you can find out how much fabric you will need by viewing the “Shop This Look” widget in the top right of the blog post. Happy sewing 🙂
Unfortunately, I can’t seem to download this pattern. I’ve gotten the Valea Top twice, now. Great top, and I look forward to making it up, but I’d love to have the pattern for The Bluebell Dress (the idea of making in in velour was just too good to pass, and I think I have some black crepe for a more formal look, too.
Looking forward to maybe sewing this up, once y’all fix the link. Thanks for all the great ideas!
Sorry about that – it should be fixed now! I love the idea of making this a more formal option. Be sure to tag us on Instagram so we can see how it comes out! 🙂
Want to make one for my graddaughter.
This print is SO fantastic with this pattern.
Hello! I’ve just downloaded this lovely pattern and am wondering if the sizing guide is modern size? I normally wear size 2 modern and size 12 in vintage. Any advice would be greatly appreciated.
Thanks!
Hi Elsa! You can find a size chart in the post above. 🙂
Hi! If an opaque fabric was used, would the lining still be necessary?
Hi Julia! You can likely skip the lining if your fabric is opaque enough.
Where can I get some of this lovely fabric? It is very beautiful!
You can find our full list of supplies above, but if it’s the voile you’re looking for, you can find it here!
Hello! I would like to know if the seam allowances are already included in the pattern or should I add when I cut? Thanks!!
Already included! 🙂
Lovely pattern – do you ever think you would make bigger sizes?
Hi SJ! This pattern is available up to a size 30 – unfortunately that’s the largest size we currently make.
hi! i love this pattern and am using it for a project , i have to list at least 8 skills that this project uses thanks for the help!
Read carefully! I went ahead and started French seaming my lining to my fashion fabric piece by piece. I mean it’s all beautifully finished! but my joining seams are a tad bulky now
This might just be me but I found the top part of this pattern to be very small. I cut out the 4/6 size which is what most of my measurements, including bust, aligned with but the top was entirely too small. the straps were too short, the torso was too short, and it was way too tight around my bust. Will try again but lengthen the bodice and generally just cut out a bigger size.
Also – if you aren’t doing a lining, then you need to go your own way when prepping/installing the elastic. The pattern is written with lining in mind so just a cautionary note if you’re not using lining, you’ll need to reconfigure a few things.
Love the design overall. Hoping with some tweaks I’ll be able to put this together in a wearable way! Also had fun doing french seams!
Ended up making this again after lengthening the straps and sleeves and generally enlarging the bodice and it is so cute. My “lining” layer on the skirt was tulle and i cut it a few inches longer than the main skirt fabric so a little tulle stick out the bottom. It also makes the skirt fuller. I love it! And its so quick to sew together too
You are the best
Hello! I was wondering how many skirt pieces I needed to cut out (not including a lining) because either I measured it wrong or something but the skirt is def way too small for me to fit in, even tho I didn’t read ahead and added seam allowance onto the pattern (which apparently already has allowance included)
Hi, Jenna! You should have two skirt panels cut on the fold – so one half-circle for the front and one half-circle for the back. 🙂
Thank you so much! Turns out I only had one panel and was super confused lol
Is there a hack to make this sleeveless? Can I just leave the sleeves off and finish the seam allowance around the edge, making any necessary fit adjustments?
Hi Whitney, we’re sorry for the delay in responding to your question! We get dozens of comments and questions each day, and so many questions get buried and, unfortunately, unanswered. We are now focusing user support on patterns 2 years and newer. We hope this will prevent questions on our more current patterns from going unanswered. Although this is late, we wanted to respond in case anyone else has the same question: yes you could make this sleeveless! We recommend making a muslin first, to ensure a proper fit before using your fashion fabric.
This is absolutely adorable, although at 63, I’m going to have to close up the midriff opening somehow – no one wants to see that… trust me. Love your fabric choice as well.
Thank you so much for giving me the opportunity to create a new favourite piece to my wardrobe. I learned so much in the process. 🙂 Adjusting the pattern to my body took an eternity – mainly because it was my first time working with a pattern. The instructions could be a bit more detailed, but in the end everything worked out fine and I am suuuuper happy with the result! Just changed the skirt to a half circle skirt in midi length. Perfect for spring an summer – especially with a light and flowy, floral viscose. Again: thank you so much!
Hi Lisa,
We’re sorry for the delay in responding to your question! We get dozens of comments and questions each day, and so many questions get buried and, unfortunately, unanswered. We are now focusing user support on patterns 2 years and newer. That being said, we’re so glad you enjoyed our pattern and thank you for your feedback!
Thank you so much for this pattern ! I made it in pastel pink to go see the Barbie Movie, and wore the skirt with a little petticoat which really gave it fifties dress impression. It was perfect ! Thanks once again for making this pattern and the instructions, its a really cute dress.
That sounds marvelous!! 🙂
Hi, I am unfortunately unable to download this, maybe there is an issue with the link?
Hi Catherine,
If you’re still having trouble you can email info@moodfabrics.com and they’ll send the pattern directly to you!
Thank you so much!
You’re welcome! Happy sewing! 🙂