
With all of the incredible designs walking the runways with gorgeously exquisite crosses and beaded religious symbols, it was only a matter of time until we tried our hand at a full ecclesiastical jacquard à la D&G. In the wake of this year’s Met Gala, religion has been at the forefront of fashion, and in the season of the holidays it seems to be ramping up even more. Whether you want to stand out at your holiday party or play it a little more classic, The Ercilla Suit delivers. Push its potential and dress to the nines with a vibrant, metallic jacquard, or keep it more subtle and sophisticated with a sleek suiting.


Fabrics & materials used:
- 5 yards True Red Ecclesiastical Jacquard
- 1 yard 3/4″ Silver Circular Rhinestone Trim
- Dritz Cover Button Kit 3/4″
- Red 9″ Invisible Zipper
- 1 yard Black Water Jet Loom Interlining and Fusible
- MDF105 – The Ercilla Suit Sewing Pattern (free download below!)
First, let’s start with the pants. With the faces together, place the pocket facing atop the front panel of your pants and sew along the edge that will become the pocket opening. Flip the facing towards the wrong side of the pants and press the seam, like you can see in the top right image below.
Next, you’ll want to sew the actual pocket to the facing. Since I didn’t line these pants, I chose to use French seams, like you can see in the two bottom images below. If you also choose French seams, be sure to press your pocket flat after sewing.
Next, the pants start to go together rather quickly. Attach your two front panels at the rise, and repeat with both back panels. Combine the front and back of your pants beginning with the inseam. Regardless of what type of seams you’re going with, I recommend pressing them flat after each step.
Once your inseam is complete, sew up the entirety of one outer seam on your pants. Interface all 4 of your waistband panels and sew two of them together along the same side seam that you just closed on your pants.
Aligning those seams, attach the 2 sewn panels of your waistband to the top of your pants.
On the open side of your pants, add an invisible zipper, making sure to leave about 1/2″ at the top of your waistband for seam allowance. Once the zipper is inserted, sew up the remainder of your open pant leg.
Take the last 2 panels of your waistband and sew them together on one of the side seams. With the faces together, align the side seam with the waistband layer that’s currently attached to your pants and stitch along the top edge of the band.

Finish up your pants by folding the waistband facing down inside your garment, tuck in the raw edges 1/2″ and slip-stitch around it. Lastly, hem the bottom of your pants to the desired length and they’re ready to wear!


Next up is the blazer. Begin by interfacing at least two of your Center Front/Lapel pieces that you intend to use as your facings. If you’re working with a very lightweight fabric or suiting, you many want to interface all four.
Take the two facing pieces and attach them to the Side Front panels, fabric faces together like you see above. Do the same with your two Back panels, sewing up the center back seam. Attach the front and back along the side seams. (Note: for a more fitted silhouette, you can follow the guidelines on your pattern piece to add darts to the back of your jacket.)
The neckline and shoulders has a lot of steps all at once, but don’t be afraid – it’s not too tricky. Begin by sewing your two Center Front/Lapel pieces at the center back seam, like you see in the top left image below. Press the seam flat.
Next, attach the front and back of your garment at the shoulder, sewing from the shoulder towards the neckline and stopping 1/2″ from the neckline of your back panel.
In the seam allowance of your front panel, clip from the corner of the shoulder directly in towards the end of your stitching line like you see in the lower left image above.
Lastly, match up the center seams of the back panels and lapel, and sew along the back neckline to match up your seams and the shoulder corners as you see in the bottom right image.

Add your sleeves to your lining, make sure all your seams are pressed open, and set this layer aside for the time being.
To get started on the outer layer of your blazer, interface the two pocket welts and then fold them in half along the length, like you see above.
Place your pocket and pocket lining together, faces touching, and sandwich your pocket welt in between along the angled top edge. Stitch along the top edge, and fold the lining toward the back of the pocket and press flat, with the pocket welt along the top.

Lay your pocket on top of your Side Front panel, with the fabric faces of both facing upwards. Stay-stitch along the three raw edges of the pocket.
Here, combine your outer blazer pieces the same way you put your lining together. Once you’ve completed both layers of your jacket, pin the self to the lining with the faces together. Match up your center back seams and be sure you don’t accidentally catch any of your sleeves. Sew around its entirety.

Lastly, pull your garment right side out through one of your sleeves. Press around the neckline and hem of your jacket and slip-stitch the lining at the bottom of your sleeves.
All it needs now is some buttons and a little bit of sparkle on the pockets!

For the trim on my pockets, all I did was tack it on the top and bottom of each circle with some invisible nylon thread. Super easy!

How will you be styling your suit – full brocade or a more subtle suiting? Let me know your plans in the comments!

65 comments
I really love the silhouette of this suit set, I will have to make time to make it upcoming for some new work clothes
I loved this pattern. Just what I was looking for for my NYE look. I used a metallic fabric and beaded fringe to the pockets.
how do I know which size to use for the pants? Is the hip measurement enough?
You’ll want to look at both the hip and waist measurement for the pants.
Can you tell me what cup size the bust is drafted for please as most things I have to do a FBA of 4-6 inches.
Thank you
Hi Wendy, this pattern was drafted for a B cup. 🙂
Thank you, I have to do a big FBA up to a G cup.
Patterns are wonderful.
I absolutely love this suit and have been admiring and studying the process for a number of days! Are the half inch seam allowances included in the pattern or should I add to each piece?
1/2″ seam allowance is already included. I’m glad you love the suit! 🙂
How much fabric would we need just for the pants without the blazer? Super excited to make these! Thanks!
2 yards should do it! 🙂
Could you make this suit jacket out of a Ponte De Roma?
Yes, certainly! Although, you may want to size down to account for the stretch in the ponte.
I love this pattern so much! I wonder if thick spandex fabric would look good on this…
Thank you so much for your guide and pattern! 😀
Hi Bea – that could look really cool! You may want to size down at least once though, to account for the stretch.
Thank you, ma’am!!
Hi, I love this suit but I was wondering how many yards I would need for just the jacket?
Hi Leah – about 2 yards. 🙂
Do i have to put 1/2 Inc extra or is it already included in the patterndesign?
1/2″ seam allowance is already included 🙂
How much lining fabric do we need?
Hi Becky! I used 5 yards for a size 10, but I also got a bit extra in order to pattern match.
Thanks for the pattern, this was such a great introduction to making pants and jackets, since I hadn’t made either before!
I used a pink sparkly fabric and posted my results here: https://decadenthex.wordpress.com/2020/06/24/first-suit/
Very nice work! AD, you did a great job!
Just finished the pants and love them! They were a bit large for me (I’m a size 12, and used size 12/14), but increasing the seams to 5/8″ took up the extra ease. I used lightweight corduroy.
Hiya im a size 18 US, how much yardage would I need for the whole suit plus lining fabric?
Hi Jeannine! I think you’d be okay with 5.5 yards for the suit – maybe a bit extra if you’re working with a directional print. If you’re lining just the jacket, 3 yards would likely be more than enough. 🙂
Hey, I was wondering whether you had any insight into how much fabric I might need for just the jacket. I’m a size twelve, I believe. Thanks!
(The width as well as the length would be appreciated!)
Hi Erik! I’d recommend 2.5-3yards of a 55″+ wide fabric for the jacket alone.
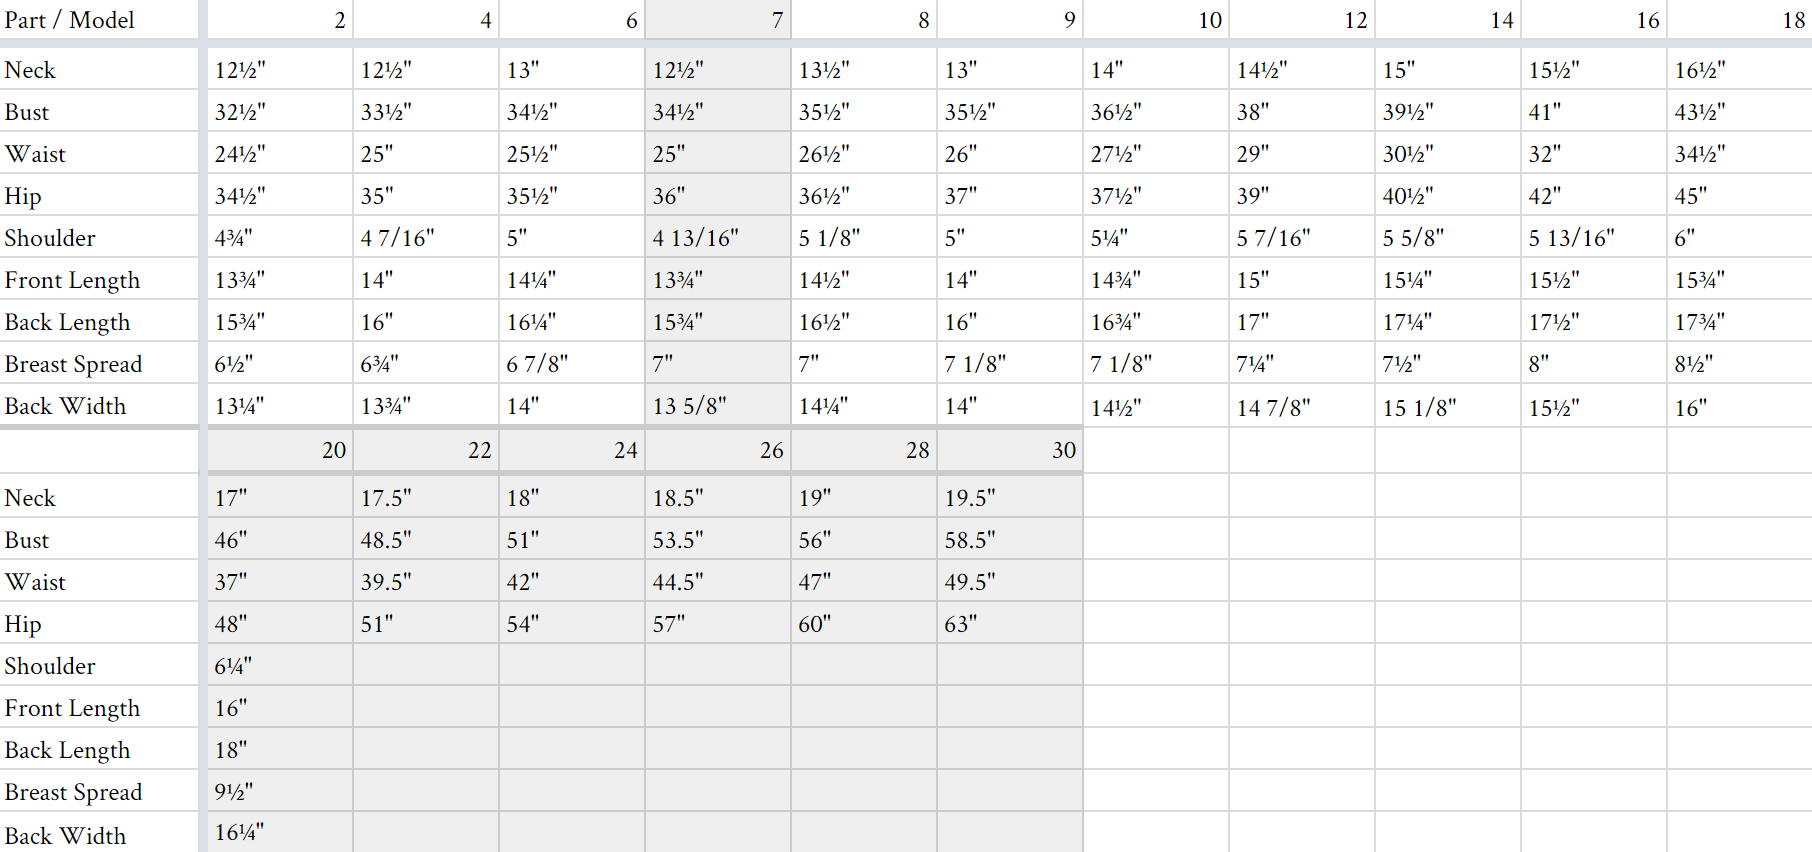
Are the measurements in the sizing chart body measurements or measurements of the finished garment?
Hi, Laura! They are body measurements.
I will sew the pants 🙂
Would linen work?
Hi Alisa! Yes, a medium to heavyweight linen will work for these pants. 😀
Hi,
Could someone help with with the best place to add length for the pants? How far up from the hem? I don’t want to add it all at the bottom because it tapers, but don’t know if the leg will get distorted farther up. My daughter wears a 35 – 36″ inseam and I have to add quite a bit. Also, are there finished measurements for these garments? I’m doing size 12/14.
Thank you!
Hi Cristina! If you’re making a big adjustment then lengthen at two points: mid thigh and mid calf. If it’s a minor adjustment, just choose one point to lengthen at.
Super patron!
La veste est ajustée comme il faut, on est cependant à l’aise de bouger
Le pantalon est bien taille haute, je dois seulement ajuster la largeur des jambes
Merci. J’adore
Hello, I just wanted to say this is a fantastic pattern, though I did not make the trousers. The Blazer was excellent and the sizing is perfect, just if you use the darts I recement adding about an inch extra to be able to button it comfortably. In the end, it’s a fantastic pattern.
bonjour, je n’arrive pas à télécharger le patron, que dois je faire svp ? merci
envoyez un e-mail à info@moodfabrics.com pour le patron!
Thank you for this basic suit pattern! I have a medium weight Ponte fabric I want to use to make the blazer. The fabric is firm and not drapey. Do you think I could make it unlined?
Hi Daphne! You could definitely make this unlined. 🙂
Ooo I have some shimmery lemon yellow fabric that I think would look amazing for this suit!
I wish y’all had a difficulty rating system for your patterns. I started this not realizing that I would have to learn how to do an invisible zipper on a french seam and it may be a bit beyond my skill level.
Hi Atlas! It helps to take a look at the Shop This Look and/or Purchase Materials Below so you can see everything that was required to make the pattern. I also suggest looking at the instructions and images first, so that you can get a better idea of the techniques used to sew the garment. 🙂
Oh for sure. I looked ahead and thought that since I had done a zipper and had done french seams it would be easy. The two together is a completely different process. Did you know there are only two youtube videos on how to sew an invisible zipper on french seams? XD I did manage to do it, but oof! A tutorial would have been helpful.
Hi Atlas! Oh my goodness, I didn’t realize that there were barely any videos about that on youtube. That’s a great idea though! I’m going to add this to the list of future tutorials! 🙂
Just finished this suit for some new work clothes, I added 2 hooks/ eyes to the top of the pants waistband and replaced the buttons on the jacket with hooks and eyes and I love it!
Hello MOOD! I have a question, I would like to add lining to the pants as well because I want to use sequin fabric and it’s itchy on the wrong side, should I just cut the patten pieces out of the lining too as they are or should I modify the pattern a bit for the lining material? Thank you!
Hi Orsolya! I would just cut the pattern pieces out as-is, using the lining fabric!
Thank you! In the end, for the front parts I put together the pockets with the leg and cut out the lining based on that whole piece, because I did not see reason in cutting out the pocket parts again from lining fabric. Maybe it can help to others as well. 🙂
Hello there,
Is the pattern supposed to be printed on US-letter sized paper? I’m based in the EU and can only print to DIN A4. Does anybody maybe know a solution to that problem? I would really like to sew this beautiful suit.
Thank you
Hi Isalind, our patterns are formatted for US Letter & A4! Just make sure to print at actual size, or 100%. 🙂
Hey there, I wasn’t sure about that. Thank you!
Hi! I want to use this pattern to make a capsule wardrobe for work. I’m a size 12 in the bust but a 20 at the waist. I’m worried that if I make the jacket in a 12 I won’t be able to button it, but if I size up that it will be too bulky up top. Any suggestions?
Hi Sarah! I love the idea of making a capsule wardrobe for work. Your question is a very common issue, and it’s easy to fix! Cut out your largest size (sz 20). Mark the points on the pattern where your size varies, so, mark size 12 at the waist, 20 at the bust, etc. Once you get your marks on the paper, blend between the sizes! I would strongly recommend making a muslin first, to ensure you’ve got the best fit!
Hello, How much hem allowance are included in the jacket (main shell and sleeves and trousers ? you did mention there is ½” seam allowance but I you didn’t mention how much hemline is included in the pattern if there is any. Thanks a lot .
Cheers
Hector
Hello, this would also remain the same at 1/2″
Hi, I was wondering, can I make the blazer without a lining? If so, would the steps the the same?
Hi Christina, you can make this without a lining! Just make sure the seam finishes look nice.
Such a classic! What height was this drafted for? I’m on the petite side so I sometimes have to shorten patterns.
Hi Guen, Hi Elise, we’re sorry for the delay in responding to your question! We get dozens of comments and questions each day, and so many questions get buried and, unfortunately, unanswered. We are now focusing user support on patterns 2 years and newer. We hope this will prevent questions on our more current patterns from going unanswered. Although this is late, we wanted to respond in case anyone else has the same question: Unfortunately we don’t have finished garment measurements for our older patterns. The pant legs are designed to fall to your mid-calf.
Just wanted to say thank you for this awesome pattern. I just finished the third version of the pants (the last one with a stretchy fabric, which made it confy like sweatpants while still looking more „put together“). Although I prefer a front over a side zipper, so I added that (including the tiny flap you need for a neat look and some buttons). I get so many compliments for these pants and I love wearing them.
Hi Annie, we’re so glad you are loving this pattern! If you share on socials, use the hashtag #MadewithMood to be featured on our social channels!
Thanks! This pattern looks great, thinking about using the smallest size for a jacket for my son.
Just a simple request to help the non-USA folks: adding the measurements in cm as well as inches in the size table would save a lot of converting in google!
Hi Elisabeth, thank you for your feedback! This has been a popular ask as of late, and we are working to make sure our newer patterns have these measurements! Happy sewing 🙂