
Any place or thing in the universe can be up to 104% perfect. That’s how we got this newest free sewing pattern based on Janet’s iconic outfit from NBC’s The Good Place. Envelop yourself in Janet’s sunshiny personality as well has her adorable vest and skirt with this cosplay and be sure to visit our Onella Blouse post for details on her shirt and screen accurate fabric!


Purchase Materials Used Below:
- 5 yards Purple Stretch Polyester Crepe
- 2 yards White Warp Fusible Interfacing
- 7 Black Plastic 4-Hole Buttons
- MDF168 – The Janet Cosplay Sewing Pattern (free download below!)
Note: This post features pattern and instructions for Janet’s vest and skirt. For details on the shirt and screen accurate fabric, visit our Onella Blouse pattern!
Alternative Recommended Fabrics:
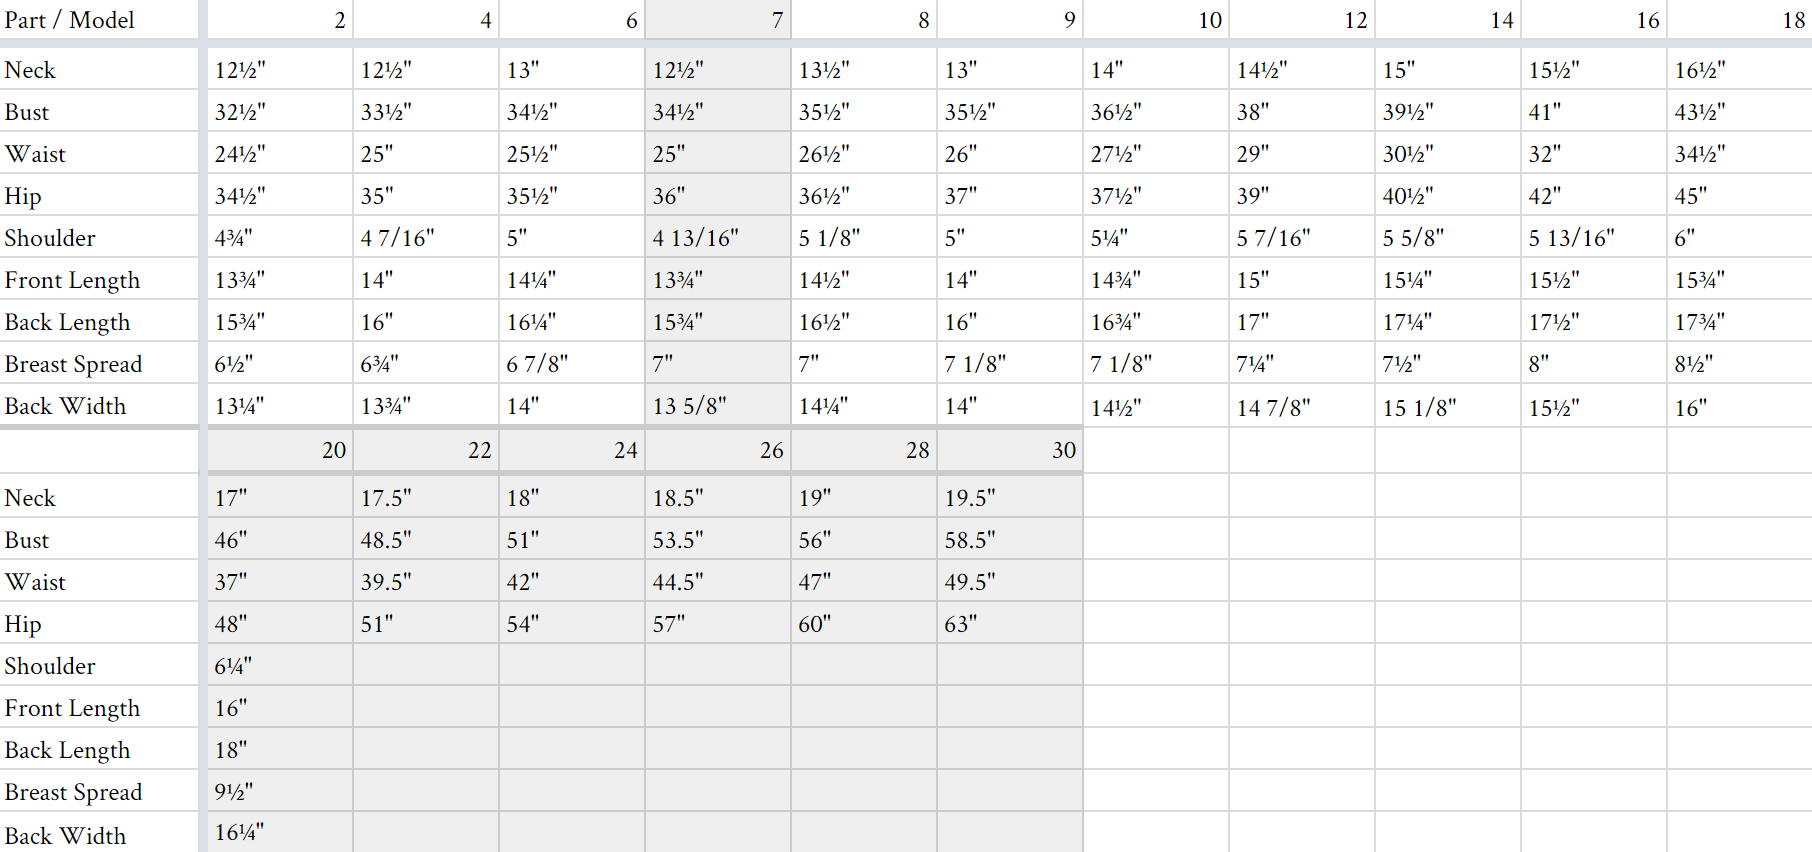
All seam allowances are 1/2″ unless otherwise stated. See chart below for sizing specifications. Note, this specific pattern is available up to a size 30.
Note, this downloadable pattern features printable pieces for Janet’s vest only. Her skirt was made using the 1/4 and Midi options on Mood’s Circle Skirt Calculator. For a printable pattern of her shirt, visit our Onella Blouse!
Below we’ve labeled some key points on the front pieces to take a look at before starting to sew!

Before you start sewing, I recommend interfacing all of your main vest pieces. This will make them a bit more crisp and clean when your vest is complete!
Sew your vest lining as you sew your main vest layer.
Begin sewing your vest by adding your back darts, making sure to follow the guidelines on your pattern:


Sew your vest pieces together at the vertical seams, right sides together, with regular seams:
- Sew the back pieces together at the center back.
- Sew the back to the side front, along the side seams.
- Sew the side front to the front, along the princess seams.
When complete, clip your seam allowance at the curves, press your seams open, and repeat with your lining layer.
Insert your welt pockets into the main layer of your vest, following the marks on your pattern. If you’re unfamiliar with how to sew a welt pocket, visit this tutorial!

Next, sew the front and back of your vest together at the shoulder seams, like you see above. Clip the seam allowance in the corner at a 45 degree angle toward your stitching. Repeat with your lining.
Like you see below, sew along the center back seam of your vest lapel and then press your seam open. Align the lapel seam with the center back seam of your vest and sew along the neckline, meeting your shoulder seams at either end. Repeat with your lining again.

To complete your vest, pin your lining to the main layer with the faces together. Sew around the outside of your garment, leaving a few inches open near the back to pull it right-side-out. Press, slip-stitch your opening closed, and edge-stitch around the entirety of the vest.
Add on your buttons and corresponding buttonholes and your new costume is ready to wear!
44 comments
The recommended 5yards for the purple polyester crepe Janet Cosplay- Is it just for the vest or for both vest and skirt?
Both the vest and skirt! 🙂
What is recommended amount just for vest?
Hi Tanner,
We’re so sorry for the delay in our response! 2 yards of fabric would be enough to just make the vest. 🙂
When you put the lining and the vest together, did you sew the armholes, too? Or were they done after the vest was turned right side out?
Hi, Chris! I did them after I pulled it right side out. 🙂
I’ve seen videos in the past that show the lining sewn to the fashion fabric everywhere EXCEPT the side seams, then you pull everything through that side seam space and voila! (slip stitch the side seams shut) I think that’s right, anyway…
Hi Jen, it’s possible either way. This is just more of a beginner friendly method. 🙂
5 yardas para que talla sería? Gracias
Hola Felipa, para mantener nuestros patrones libres, no podemos proporcionar requisitos de yardas exactos. Nuestros patrones más nuevos tienen estimaciones, que se encuentran en el cuadro Comprar este look en la esquina superior derecha. Tendemos a pecar de cautelosos con nuestras estimaciones, para tener en cuenta impresiones direccionales y/o errores. Para obtener estimaciones de yardas más exactas, sugerimos medir su patrón.
Hello
Wondering if it’s possible to make this with fabric other than stretch?
Hello Cindy, this patten can work with non-stretch fabrics as well! You just need to match your measurements with our size guide to find the right size since it is a tailored fit.
Hi! What are the dotted lines of the pattern of the front piece? When I see dotted lines I think darts, but that doesn’t seem right. Thanks!
Hi Kelly – that’s the sewing guide for the faux notched lapel. 🙂
Newbie here, could you kindly explain how the faux notch lapel is sewn? I tried lining up the dotted lines together to sew and it ended up being just a straight line and doesn’t have the lapel look
Hi Nunya! The lining and outer fabric need to be sewn together right on the dotted line, all the way to the dot. After that, cut along the dotted line in the center, stopping before you get to the dot. Trim the SA, clip the corners, and turn right side out. That should do the trick!
Hi Courtney, really cute outfit. Could you please tell me where the pattern for the skirt is please I can only see a vest pattern.
Thanks Penny
Hi Penny! The skirt is made using our Circle Skirt Calculator. There’s information about the fullness and length I chose in the post! 🙂
Finally published my blog on making this! https://seamsgeek.blogspot.com/2019/12/janet-cosplay-part-ii-janet-from-mood.html
I’m going to use the pattern for another project. How much fabric to just make the vest?
Hi Toni – you’d need about 1.2 yards for the vest alone.
Does all your patterns include the stated seam allowance? I’m a total newby and I can’t seam to find it..
Yes, a 1/2″ seam allowance is already included 🙂
Hi, Mood appears to be out of the purple stretch crepe, and it’s listed as not reorderable, it’s a close out. It does list other fabric types that would work, is there something to keep in mind? I’m guessing since the crepe was stretch, we’d want suiting or twill etc that has stretch? Does it need to be 4 way stretch? Thank you!
Hi Sheri! Stretch is not actually required, I just chose that fabric because the color was fairly spot on. I’d recommend a suiting or twill with some give for extra comfort though.
OMG I love it! Just finished watching this series on Netflix. This outfit is exactly like the career wear my Mom made for herself in the 80’s! Hoping she didn’t pitch them because I definitely need the sewing community to see them!
hy
I cant seem to find the pattern for the skirt? where do i find this
Hi Eveline! Her skirt was made using the 1/4 and Midi options on Mood’s Circle Skirt Calculator.
Hi! For the pocket/pocket welt, it says to follow the marks on the pattern, but I’ve been looking at the pattern pieces and I’m not seeing the marks that you are referring to. Could you tell me which marks I should be looking for?
Hi Becca! You’re correct, there are no pocket markings on the pattern. Pocket placement is the sewist’s preference! Just decide where you’d like them to be and mark your pieces accordingly. Happy sewing!
the instructions really need to say this! I thought maybe the lines that show which type of dotted line to follow for your size might be an indication of where the welts go, but now I’m not so sure. i think i might have to find another vest pattern (in my stash) that actually has welts to get some guidance on where to put them on this 🙁
Hi Jen! I used this pattern a few months ago and chose to center the welts on the princess seam, and I lined them up with the second to last button.
Ive never sewn clothes before and I just sat 9 hours straight sewing this… only the buttons left.. definitely a bit difficult for a beginner but mostly time consuming. Found a great sew-along on YouTube as well. Pattern was super easy to print and assemble
Where would I find the yardage requirements for Any of Mood patterns?
Hi Jessica,
In order to keep our patterns free, we cannot provide exact yardage requirements. Our newer patterns have estimations, which are located in the Shop This Look box in the top right corner. We tend to err on the side of caution with our estimations, to account for directional prints and/or mistakes. For more exact yardage estimates, we suggest measuring your pattern. 🙂
Is there a video / YouTube on step by step to sew the Janet Coplay vest with pockets? I have the free pattern but no sewing instructions.
Hi Donna, in order to keep our patterns free, we unfortunately don’t offer video tutorials at this time. But never say never! 😉
Definitely love a free pattern. Also love it when I see Mood devotee make their own sew-alongs/pattern reviews on YouTube. Donna, maybe you should make one!
I wish there were more picture for the following part “Align the lapel seam with the center back seam of your vest and sew along the neckline, meeting your shoulder seams at either end.”
My lapel and neckline shapes are really awkward and I don’t know how to line them up to sew down
I love this vest, but I am lost with the measurement for the shoulders. My measures don’t correspond at all with your numbers. What do you mean by shoulders?
Hello there!
Thanks for visiting the Mood Sewciety Blog! We’re proud to have released over 350 free sewing patterns, and we hope you’re enjoying them.
Behind the scenes we’re a dedicated team of three, and we want to be able to offer top notch support. We have exciting plans for our patterns on the horizon, and as we continue to grow, we’ve decided to focus our sewist support on patterns from the last 2 years. If this pattern hasn’t been recently reduxed or updated, we won’t be able to respond to technical questions on these older posts.
If you come across any pattern errors, rest assured our team is on it – just let us know!
Don’t miss out on our Mood Sewciety Facebook Group – a fantastic space for fellow sewists to connect, share wins, and tackle challenges together.
Thank you for your understanding and happy sewing!
I would do the pockets before sewing the fronts to the back, that way the project is still much easier to handle. I’ve noticed before that the sewing order in these mood projects is sometimes a bit funny and not all that beginner friendly. I mean I don’t have a lot of sewing experience but even to me it seems easier to sew in the same order pros do in youtube.
Hello!
Thank you for your feedback.
Thank you so much for your free sewing pattern :-))))