
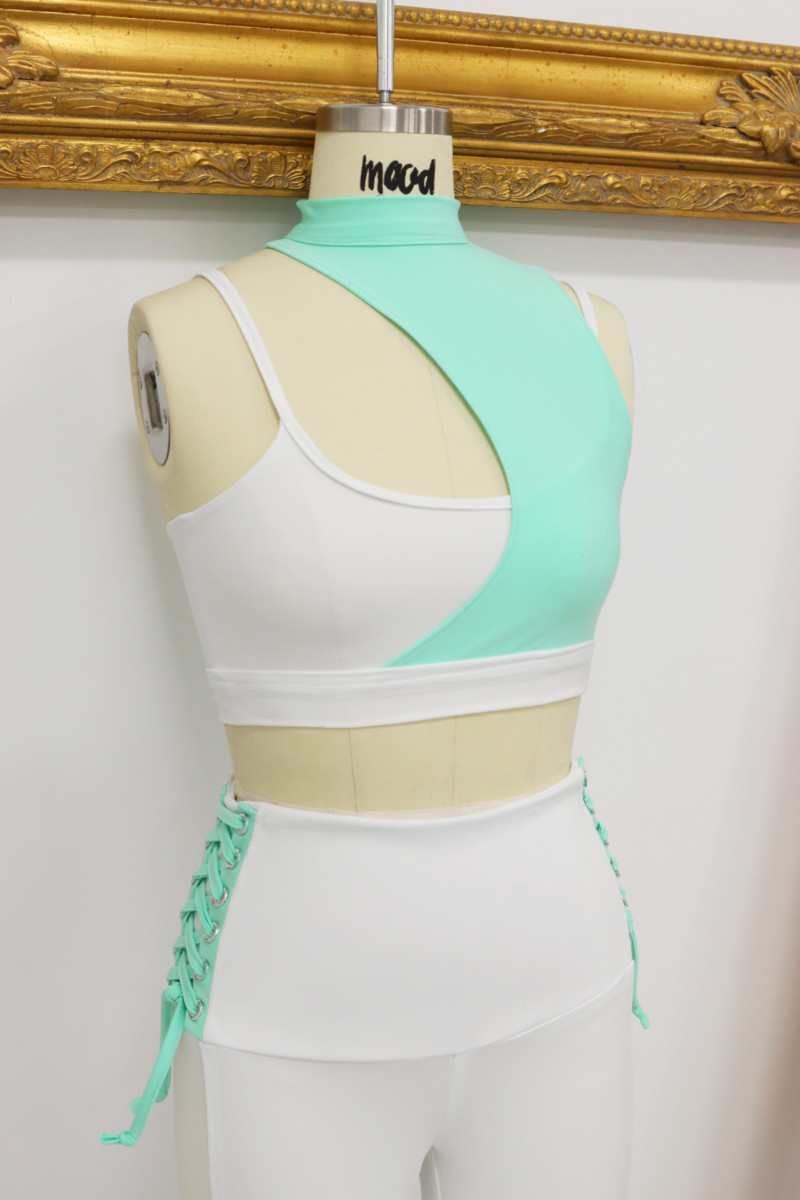
This season’s athletic wear is all about being seen and making a statement. Colorblocking and two-toned color pallets are right on trend! The June Bralette free sewing pattern is packed with style and has just the right amount of edge! If you are looking for a quick sewing project that challenges your creativity then look no further. Try styling your new bralette with any one of our free legging patterns for the ultimate workout ensemble. Moods UV Protection tricot is perfect for this top. You could also try a 4-way stretch French Terry and Ponte knit which make great options as well.

Purchase Materials Used Below:
- 1 yard of Mint UV Protective Compression Swimwear Tricot with Aloe Vera
- 1 yard of White UV Protective Compression Swimwear Tricot with Aloe Vera
- 1 spool of Creme de Mint 100m Gutermann Sew-All Thread
- MDF305 – The June Bralette Sewing Pattern (free download below!)
Alternative Recommended Fabrics:

Here’s how to sew: Note: Make sure you adjust your machine to sew with a straight stretch stitch. All seam allowances are 3/8″ with the exception of the neck binding on the inner bralette.
Step 1: Pin the outer layer of your bodice together at the shoulder and side seams then stitch. Finger press your seams open and finish with a double topstitch.
Step 2: Fold the neckband in half and stitch along the edge. This seam will now become the center back seam of the neckband. Finger press the seam open and fold the neckband in half once more with the right side facing out. Align the notches of the neckband to the opening and pin the neckband in place. Once you’ve stitched the outer layer of your neckband in place, turn under the remaining side, pin, and stitch.
Step 3: Using a rolled hem at 3/8″, turn back the remaining raw edge of your bodice and stitch. Set the outer layer aside as you work on the bralette underlayer.

Step 4: Now, let’s work on the bralette. Pin the together and stitch at the side seams. Finger press the seams open and finish the seams with a double topstitch. Use a rolled hem at 3/8″ and stitch starting under the arm and continuing all the way along the back and to the other side. Fold the binding lengthwise so that both edges meet in the middle. Beginning at the center neck, stitch and encase the raw edge of the neck opening with the binding. Continue stitching the binding along the length as it becomes the straps. Use a double backstitch to tack the straps in the back where indicated.
Step 5: Join both the outer and inner layers together by aligning the notches along the bottom edge and pinning them in place. Use a basting stitch to hold them together as you prepare the waistband. Pin the front and back waistband together at the side seams and stitch. Press open the seams with your finger and use a double topstitch to finish. Pin the waistband along the bottom edge and stitch it in place as you did the neckband. Turn under the remaining side and finish with a topstitch.


14 comments
Lepretre
I love this top. I am so much more motivated to work out when I can wear unique, edgy tops like this.
would also make a gorgeous swim top. maybe using a cute knit mesh/lace as the outer layer?
Absolutely loved this! I’m remaking it, but making the under layer slight higher for more modesty, I will say though the straps are pretty long, easy to adjust but one thing to look out for 🙂
Thank you so much for your free patterns, I love them!! Would you guys be able to post VIDEO instructions with patterns in the future or pictures of every step? A lot of the steps for this pattern are very confusing because the pictures aren’t zoomed out enough or there aren’t pictures of each step. I’m going to try to figure it out on my own but I am VERY new at sewing so it might not turn out too great haha anyway, it would be super super helpful in the future if there was a video to go along with it so I wouldn’t have to reread each step a ton of times and try to visualize it to figure it out. I really hope that’s something you guys can do because it would be a game-changer for me 🙂 ANYWAY thank you for the instructions that you did provide because I’m sure I can figure it out eventually and who doesn’t love FREE patterns!! Thank you
Hi Bayleigh! I’m so glad you’re enjoying our free patterns. Unfortunately, in order to keep our patterns free, we cannot release video instructions at this time.
Me encanta la costura gracias por este trabajo de apoyar y ayudar
Thank You so much for sharing!!!!
Hi, thanks for this pattern! It looks great!!
One question I’m confused about. It looks like you’re using a straight stitch which is then reinforced with a double topstitch on stretchy tricot. Isn’t this going to make it easy for the seams to rip? Particularly the neck and waistband which will have to stretch when taking off and on. I have a serger so may use that instead but was wanted to check on this to make sure I’m not missing something in the instructions.
Hi Lucy! We used a stretch stitch for this garment. It closely resembles a straight stitch, until you get up close 🙂
Awesome pattern! I just made it in a size 6 (UK 10). My machine doesn’t have a stretch stitch, so I used a zigzag stitch and topstitched the shoulder&side seams flat to give it more strength. Also, perhaps because my material is less stretchy, I had to widen the neckline and the neck band, as well as having to cut out two of the binding. (I solved the problem of having a loose neck band by elasticating the back but a more elegant solution would be to incorporate it into the design and have it overlap with Velcro closures).
I will definitely make this again in different colours! Just the underneath layer is an excellent bralette, perfect for pyjama sets.
I used this pattern for a dance costume and it turned out great! Love having access to unique patterns.
Me encanta eres muy carga
Excelente