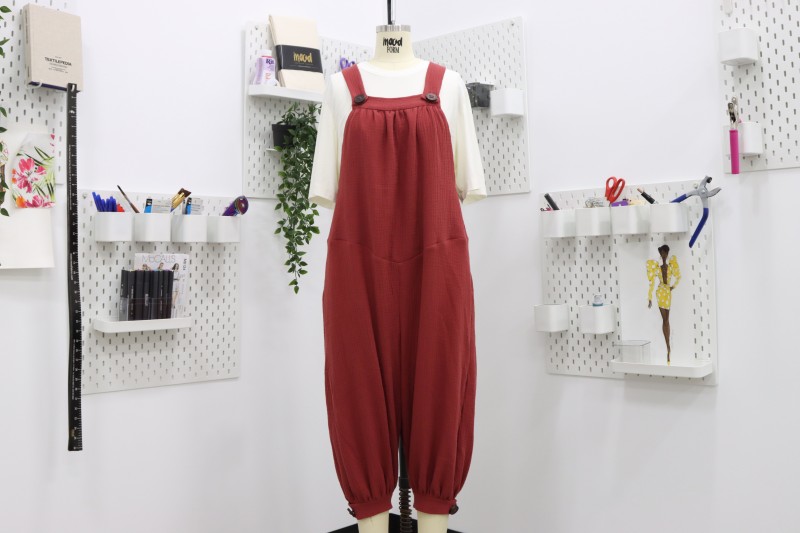
Jumpsuits might just be the ultimate transitional wardrobe piece. Throw one on over a simple tee or turtleneck while some of that spring chill remains, or wear it on its own as the weather grows warmer! The Oliver Jumpsuit is designed with that ease and comfort in mind. Adorably oversized, this new free sewing pattern can easily bring you from spring to summer to fall!


Purchase Materials Used Below:
- 4-5 yards Talamanca Rosewood Double Cotton Gauze
- 8 Brown Cross Stitch Plastic Shank Back Button – 44L/28mm
- MDF247 – The Oliver Jumpsuit Sewing Pattern (free download below!)
Alternative Recommended Fabrics:
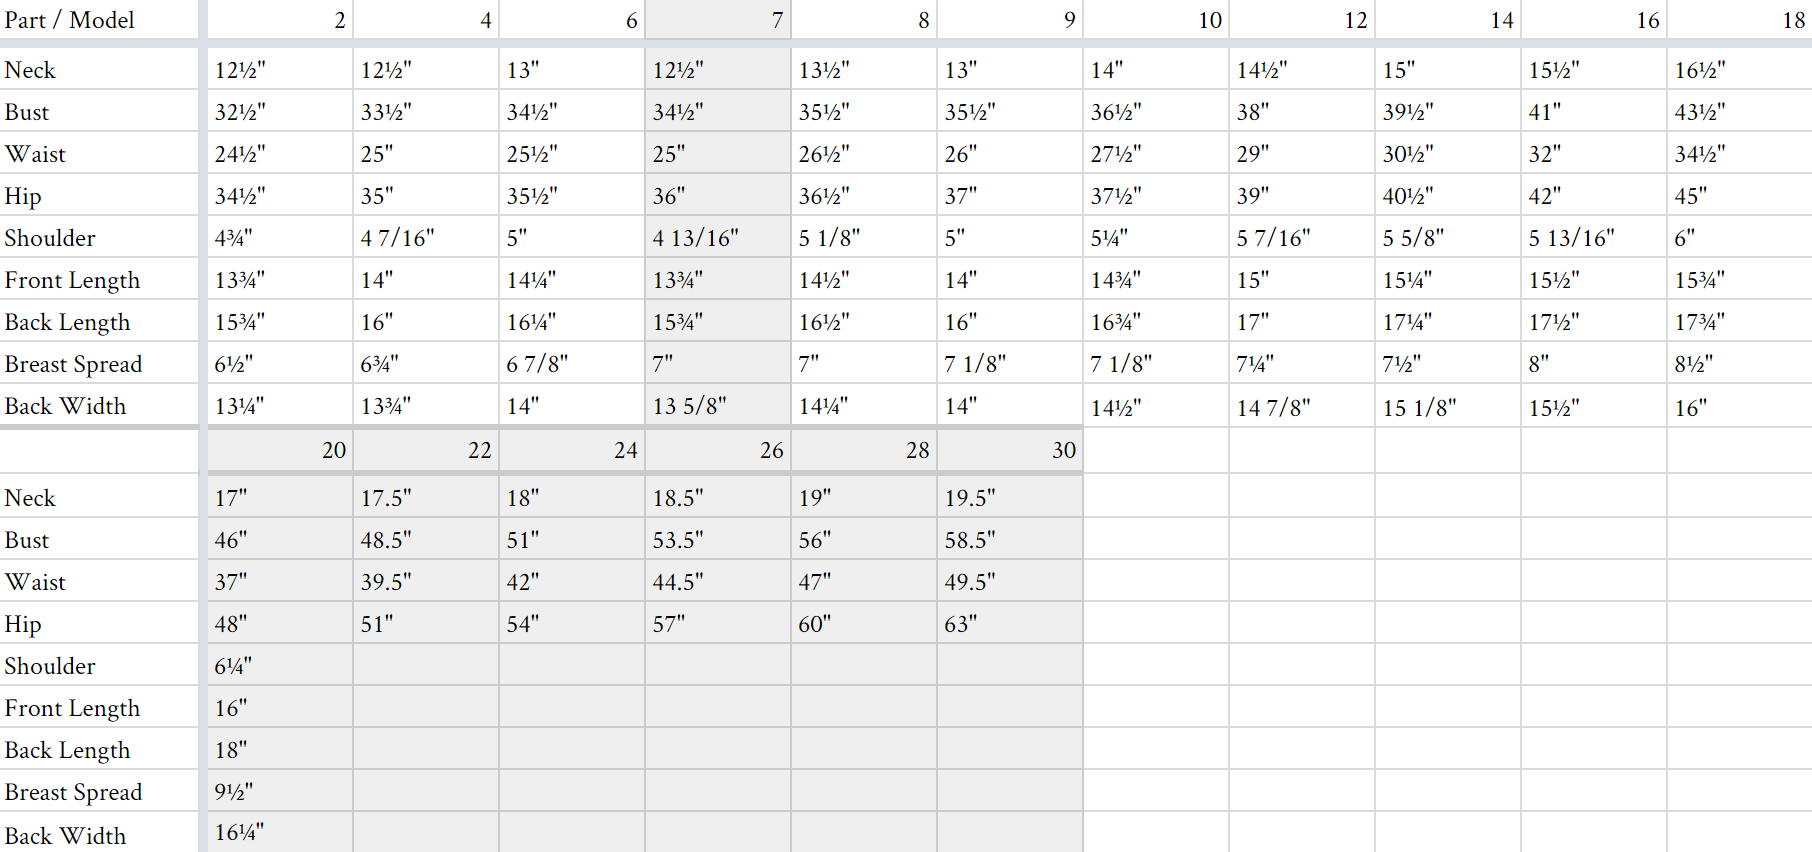
All seam allowances are 1/2″ unless otherwise stated. See chart below for sizing specifications. Note, this specific pattern is available up to a size 30.
First, create your straps by folding them in half along the length, face to face. Sewing along the long raw edge and one short edge. Clip the seam allowance at the corners, turn right side out, and press.

Pin each strap along the top edge of your back bodice. Leave 1/2″ on either side to account for seam allowance. Stay-stitch into place.
Place the lining piece over top, face to face, and sew along the top three edges.
Clip the seam allowance, turn right side out, and press.


Using a regular seam, attach the side bodice pieces to either side of the front, aligning the bottom edges. Press the seam allowances toward the side seams.
Repeat with your lining and lay face to face with your main bodice. Sew down the remainder of your front sides as well as the top of your side bodice, like below.
Clip the seam allowance at the corners, turn right side out, and press.


Gather the top edge of your bodice into the upper band, leaving 1/2″ of seam allowance on either side.


Fold the band in half, face to face like below, and sew along the sides.
Turn right side out and press. Tuck the raw edges inward and slip-stitch along the bottom inside your front bodice band.


Attach your two front pant panels at the front rise using a French seam. Repeat with your back panels.

Attach the upper portion to the front pant panels at the waistband using a French seam.
Repeat with the back bodice at the center of your back pant panels.
Note: the back pants will be much wider than the back bodice. There are two finishing options:
- Sew together as-is, and finish the remaining raw edges of your back waistline with a 1/4″ rolled hem. Once the garment is assembled, try it on to determine the button & buttonhole placement for the folded side feature, as seen in the finished garment photos.
- Gather the back pants into the waistband, as seen here.

Attach the front and back of your jumpsuit at the side seams and pant inseams using French seams.
Create the cuff by folding it in half, face to face, and sewing both short ends. Also, sew along the top until the notch marked on your pattern. Clip the notch and your seam allowances, turn right side out, and press.

The sewn portion of the cuff is a faux button placket. Overlap the placket and opposite end of the cuff to form a perfect circle with the raw seam allowance.
Gather the bottom of each pant leg into a cuff. Sew two buttons onto each placket, sewing through all fabric layers.
*This jumpsuit is intended for an oversized fit. However, you can pinch the waist at the sides and add buttons or snaps to adjust your desired fit. See the image below:

80 comments
Can I do this without french seams?
Hi, Allison! You could, but double cotton gauze tends to fray. You could use pinking shears to remedy some of that, but I’d recommend an overlock stitch or something similar for some cleaner edges if using regular seams. 🙂
Great pattern! I was able to use 2 yards of jersey knit fabric and had a little less than a 1/4th of a yard leftover. The pattern is super cute and easy to follow(though I did take some creative liberties by forgetting to read the instructions). 10/10, would recommend!
Hi Clara,
Do you mind me asking which size you made, that used 2 yards of jersey fabric? I was thinking of using jersey too. Thanks, Sarah
this crepe is 127cm wide whereas most jersey is 150cm wide, i assume that made enough of a difference. I also want to make one in jersey. Ill let you know how it goes.
I am in the UK we print on A4 paper which I believe is longer but narrower will this print ok and if not do u have a work around please
Hi Pauline, we’re sorry for the delay in responding to your question! We get dozens of comments and questions each day, and so many questions get buried and, unfortunately, unanswered. We are now focusing user support on patterns 2 years and newer. We hope this will prevent questions on our more current patterns from going unanswered. Although this is late, we wanted to respond in case anyone else has the same question: our patterns are all formatted to be printed at home in both A4 and US letter sizes!
This pattern said I needed 5 yards??! I have too much left over.
Hello, possibly for a bigger size 5 yards is needed but for smaller sizes we would recommend 3-3.5 yards
Can’t wait to make this one. Thanks.
Good day
Please help I am struggling to download the free jumpsuit sewing pattern
Hi Ursela, if you’re ever having trouble with downloading a pattern, email info@moodfabrics.com and they’ll send the pattern to you!
i now have a solid 7 patterns i have saved to make when my finals are over love all the recent designs and this is no exception!!
Beautiful!!
Cant wait to make this! Thanks for the free download.
i have so many patterns saved for this season now i have been loving all the recent designs and this is no exception!! so cute
Thank you so much for the pattern MDF247
I have downloaded it going to get the material today 16 Aug 2022
Cannot wait to start sewing fir my 3 grandchildren they going to love it.
Omg this makes me so happy I have been looking for an overall pattern for a long time.
I love this can’t wait to make my own.
I’m so late to sew my wardrobe but i love this pattern. Tank you so much.
How much fabric would you need for a size 10-12?
Hi, Hayley! You can find yardage recommendations for different sizes in the ‘Shop this Look’ tool! 🙂
I love it! Does the pattern include seam allowance? I´m so confused
A 1/2″ seam allowance is included! 🙂
Hi I cant dowload the pattern. Keeps on saying I must check my inbox for the download but thwre is nothing. I please want this pattern. Regards Asri
Hello! Just email info@moodfabrics.com to have the pattern sent directly to you. Happy sewing!
i just want to say how incredible this whole blog is for making plus sized clothing, my friends were very surprised i could actually make clothes for them without drafting the pattern bigger <3 can't wait to make this!
Hey there I was just curious if any fellow short people have tried this pattern? I’m barely 5ft, and really want to try this but I don’t wanna get too lost in the fabric.
Hi Krystal, I’m 5’2″ and I took 4.5″ off the top of the leg pieces. I actually cut the fabric as on the pattern and basted the pieces together to determine how much length I needed to remove.
Hi, I don’t understand what piece it means when it says “Gather the top edge of your bodice into the upper band, leaving 1/2″ of seam allowance on either side.”
Is the upper band the ‘pant hem band’ as stated on the pattern? Because my pant hem band is nearly 5 inches longer than the top of the bodice, so you can’t gather it into anything?
Hi, Haley! It should be labeled ‘Front Bib Band’ – it’s on the last page of the pattern printout. 🙂
I must have messed up sizing somewhere because this jumpsuit ended up COMICALLY large on me. I was expecting it to be roomy but MAN it was huge, I wish I could share a picture. I took a good 6 inches off the waistline and it looked a lot more like the picture at the top,but I’m not sure how it ended up so immensely different. Ah well! Its still wearable 🙂
What size do you usually wear, and what size did you make, if you’re willing to share? I usually pick a 16/L-XL, but I’m thinking maybe I should make the medium. I want to make one for my daughter, too – usually a size 10, but maybe make the size small? It’s an adorable jumpsuit.. too big and it’s tweedle dum though.
SAME! I’m actually 7 months pregnant so I sized up a little on purpose but according to my bust I went with a 16 and I could fit two full-term pregnant selves in these?! And my waist right now is getting close to 40″ too so I’m not sure what happened! I’m a beginner though so it could just be me -_-;;
You can measure the paper pattern pieces and it’ll give you a better idea of how big the finished garment will be. You could also make a mock-up out of a thrifted bedsheet, too, so you don’t wind up wasting your expensive fabric
I love this look! But, are there pockets? If not, a suggestion on best where to add them. It’s gotta have pockets!
Hi, Luanne! There are no pockets, but you can definitely add some at the side seams. Here’s a tutorial if you’ve never done it!
FINALLY , I can customise one that actually fit my body shape .. thank you so much for this great upload
What does face to face mean for cutting out the pattern? it is mirroring? It would be great to have a suggested layout for the pattern! I love your patterns, only place I can find things that fit me!
Yes, it means mirrored! 🙂
Could you line the legs too? I’ve got great fabric, but its super thin. How would you suggest I did it? I just love this pattern, I can’t wait to get it made!
Hi there, what a great idea! I suggest using the pant leg pattern to cut out the lining. Simply sew it into the cuff, just as you do with the outer fabric. 😀
Does this pattern lend itself to being made with Double Brushed Poly? Love the style. Thanks.
Hi Rebekah! This pattern is intended for wovens, so if you are using a knit, you may have to reinforce the straps, cuffs, and neckline, as well as size down. We suggest making a test garment first to ensure proper fit. 😀
One more question! Does this print in layers? Thank you.
Hi Rebekah! This prints as one complete file on multiple sheets of paper. 😀
Please, make a sew along. I made this and it came out soooo big. I will try again and hopefully it fits next time around.
Hi there! This is definitely an oversized jumpsuit, which some people love and others wish they had sized down a few times! We always recommend sewing a muslin first, to ensure you have the best fit! Oversized garments can be a little tricky because everyone has different preferences. 🙂
What size do you print this pattern? I can’t find out what the actual size for printing is.
Hi Eva! This pattern is intended for US Letter Size paper. 😀
This is the cutest jumpsuit ever!! – My muslin turned out so good, I added some embroidery flowers and think I will wear it too!!
I will be making more Mood fashions in the future. Thank you so much 🙂
Just out of curiosity, could you tell me what size is made for the mannequin?
Hi Erin, it was a size 4! 🙂
Would this pattern be good for a beginner? I love the piece but i dont know how to gather….
Hi! This pattern could be good for a sewist’s first jumpsuit since it doesn’t require a precise fit or tailoring. We’ve got a great tutorial on gathers, which can be found here. Enjoy!
Hi complete newbie here (maybe a little ambitious for my zero skill level)
Sorry probably a silly question.
There is no picture of the back bodice sewn to the back leg panels and I’m getting very confused at what bit to attach. The part my head is telling me is way too wide to fit?
I’m in the same boat, the back leg/waist is way larger than the back bodice piece…was the backside supposed to have the side panels as well? it doesn’t look like it in the finished photos.
Hi Alex! You can either gather the excess into the back bodice piece, or you can sew it as pictured, folding over the excess and buttoning it at the side. I’ve updated the instructions for more details. 🙂
This is NOT true to size. Just wasted 3 yards of beautiful, expensive fabric because the sizing is so wrong. I measured myself before cutting and even still, I had sized down. Still was way too big. Sent a picture to my friends and became a laughing stock. Could fit 3 of me in the final size. You need to size down at least 3 sizes.
Hi Megan, we’re sorry it didn’t fit as you had hoped! I’ve been there too, and it’s so heartbreaking when you use extra special fabric and end up with something unwearable :(. It’s always a great idea to make a quick mock up first to ensure you’ve got the fit you desire, before getting started with the good stuff!
I just finished this jumpsuit in an Ankara fabric and it is so cute amd comfy! This is also my first Mood pattern and can’t wait to try others.
Can’t wait to do this for coming spring ” going to try a patchwork style ‘ thank you from UK
Hi,
I’m really glad some people have had success. I have had an absolute disaster making this. I have been sewing for 10 years so feel fairly confident. I wonder if anyone can advise me. … I made a 10/12 (i’m a UK 12/14) and it is absolutely huge on me, beyond oversize. When I sewed up the inner legs, the front inner part was about 9 inches too short. I unpicked rechecked I’d put the correct pieces in place, and cut correctly, that was all fine. I’m at a total loss as to what I have done wrong. Can anyone advise? Thanks in advance x
The Link no longer works. Don’t waste your time.
We’re so sorry about that! We were making updates to our site, but everything should be working well now. If you still can’t get the pattern, email info@moodfabrics.com and they’ll send it over!
Hi I can’t figure out where the pattern is to download and print out.
Hi Shonta, we’re sorry for the delay in responding to your question! We get dozens of comments and questions each day, and so many questions get buried and, unfortunately, unanswered. We are now focusing user support on patterns 2 years and newer. We hope this will prevent questions on our more current patterns from going unanswered. Although this is late, we wanted to respond in case anyone else has the same question: under the technical drawing, there is a box where once you enter your name and email, the pattern will be sent to you. If you’re still having trouble downloading, email info@moodfabrics.com and they’ll send the patterns directly to you!
Hi everyone! I just wanted to leave a thorough review and possibly things to consider if you’re making this. I read all of the oversized comments. I read the measurements carefully which put me in a ridiculously large size category that I have never worn in my life. I went back and forth between the 4-6 and the 8-10. I usually make a 6 or 8 in garments. I went with the 8-10 so that I could take it in if I wanted to. There are a ton of fit issues in this thing. The top fit perfect. Exactly how I would want it to. And the shape is pretty close to the Korean style oversized jumpsuit. Which I love! That being said the waist should have been a 4-10 and the leg openings should have been a 18-20. To fix the waist I sewed in elastic ( wish it had been neater into the seam but it was a fit correction not a prethought) the elastic brought the sides in enough to where it didn’t puff out like a clown suit. It tapers more. I can live with that. I initially tried sewing in the leg cuffs like the instructions said. After much seam ripping I opened the faux part of the cuff to use ….. the cuff is still way too small to close around my calf. I suggest making it a couple of inches longer. I will just wear them open and keep the slit I added about an inch up the leg seam. If I button them it will be below the knee and above the calf and have it styled differently than the picture. Overall I am happy I tried this pattern. I really don’t suggest cutting into good fabric your first time making this.
I am trying to figure out the side area where the buttons go. I have the side bodice stitched to the back pants. Does this fold for the button placement? I don’t see any information about this area.
I am an experienced seamstress and should be able to figure this out, but please help!
Hi Susan, we’re sorry for the delay in responding to your question! We get dozens of comments and questions each day, and so many questions get buried and, unfortunately, unanswered. We are now focusing user support on patterns 2 years and newer. We hope this will prevent questions on our more current patterns from going unanswered. Although this is late, we wanted to respond in case anyone else has the same question: we recently gave this pattern a fit update which should help answer your question about the placements!
I love this jumpsuit – but I don’t know if I’m just reading it wrong, but I can’t figure out how/where to attach the top buttons for the straps. I’ve read the instructions 3 times over and I can’t figure it out. Do they just sew on with the straps so you can’t actually remove them?? Please help!
Hi Meghan! The placement is up to you! It doesn’t need to be exact. Try the jumpsuit on and pin the straps in place. Once you find a spot you like, mark the bodice and straps with pins. Sew the buttons onto the front bodice, and sew buttonholes in the straps. You can even do a few different buttonholes in the straps so it’s adjustable!
Hi! I’m 5,7 tall and want to make the leg longer, I can’t see the pic clearly, but the legs are short, I’m right?
I really have long legs and always struggled with pants…
My size is about 6-8 (is a M-G on BR measurements, I guess) and I’m fit, just don’t know how to do this, any help is appreciated
Plus, I’m Brazilian and my English is poor, please forgive any error, tnx
Hi Danili, yes the legs on this jumpsuit are above the ankles, but also keep in mind that the waist and crotch are dropped, so the inseam is going to seem VERY short. This jumpsuit is very generously oversized, you can easily sew a size 6 or 8 and either one will fit! If you want to lengthen the legs, add the length to the thigh. 🙂
Just completed this and I love it. I’ve made it in a lightweight polyester fabric which hangs beautifully. I’ve also put some pockets on the front. Looking to make it in a winter weight Jersey fabric. I wanted to add a photo but it doesn’t seem possible? Thank you for the pattern.
Hi Susan!
We’re so glad you loved this pattern! If you’d like to share an image of your jumpsuit, you can upload a photo into our Facebook group or upload to instagram with the hashtag #MadeWithMood !
Is there any way to get an A0 pattern instead of an A4 pattern? Thanks!
Hi Jean, our patterns are only formatted in A4 & US Letter; that’s what keeps them free!
I was gifted a sewing machine this month, and being new to sew i have to say this pattern was so easy to follow!! I made it with an old bedsheet and it came together so well! Currently not taking it off for the rest of the day !! Thank you for sharing this. 🙂
We’re so glad you liked this pattern Lizzie! Happy sewing 🙂