
With all of us being stuck inside at the moment, we figured we were in need of some great loungewear patterns. The Saffron Ensemble free sewing pattern features a simple bralette-style crop top and shorts with a comfy elastic waistband. Both garments also include alternative cut lines to make the top more cropped or make the shorts less high-waisted. Try a luxurious charmeuse paired with lace trim like we did, or go full comfort in a soft flannel or velour!


Purchase Materials Used Below:
- 2 yards Dewkist Silk Charmeuse
- 1 yard Off-White Floral Lace Trimming
- 1-2 yards 1/4″ Elastic
- MDF197 – The Saffron Ensemble Sewing Pattern
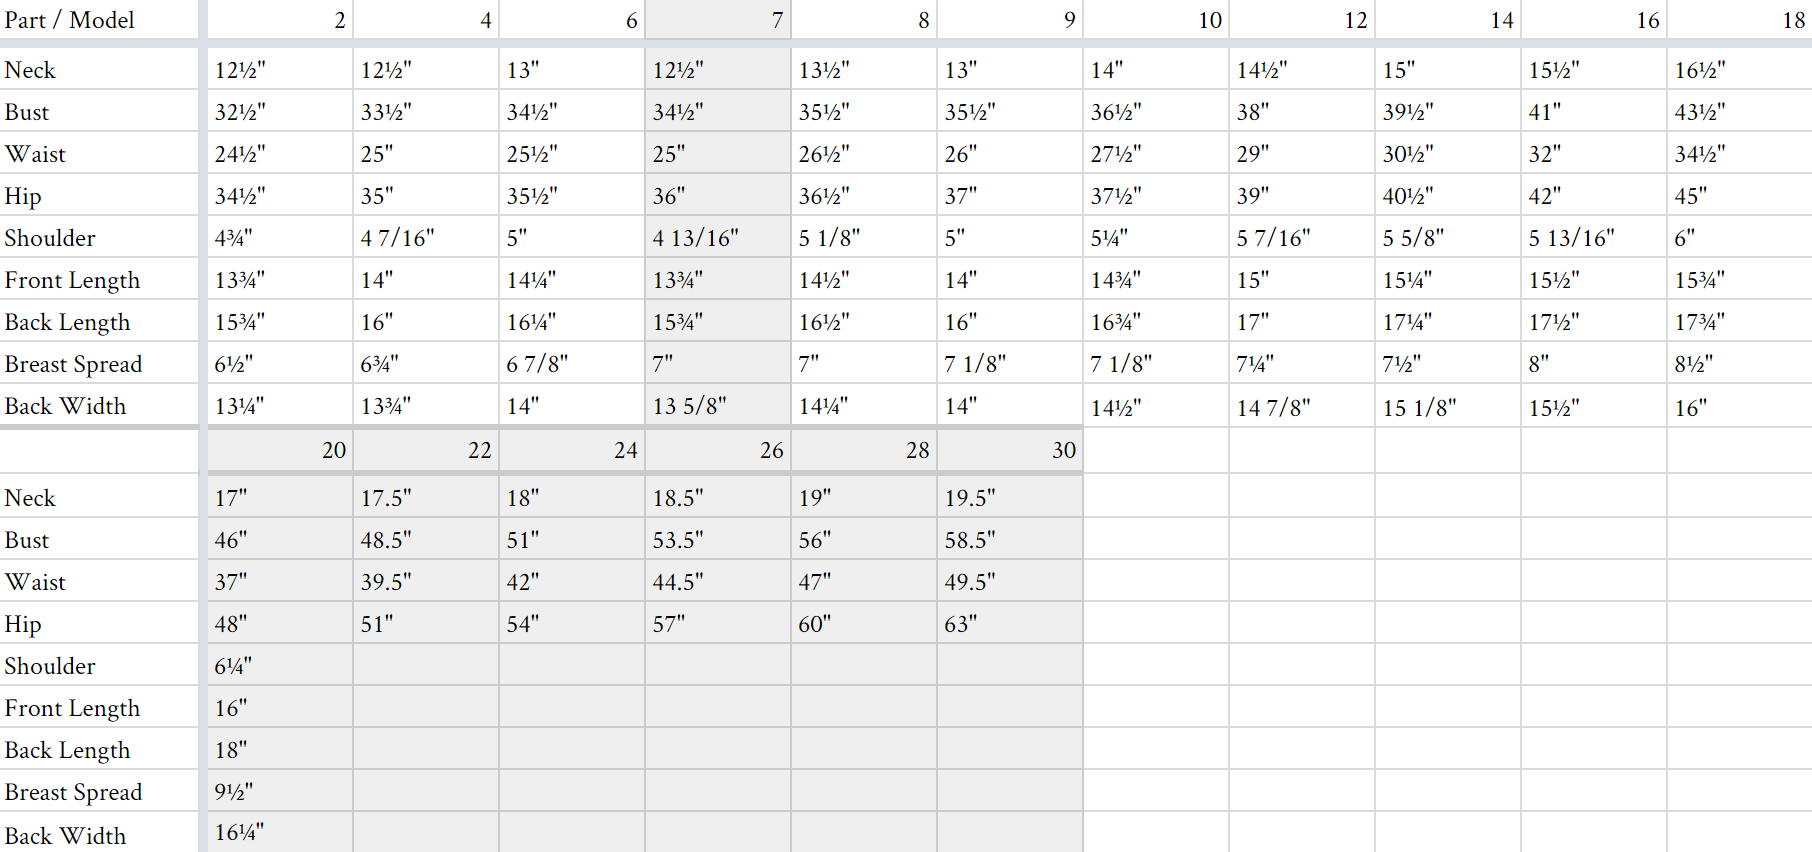
All seam allowances are 1/2″ unless otherwise stated. See chart below for sizing specifications. Note, this specific pattern is available up to a size 30.
We’ll start with the bodice, which goes together fairly easily.
Begin by sewing your darts onto the front bodice, following the guides on your pattern. Lightly press your darts downward.

Next, attach your front and back bodice at the sides using French seams.


Using a 1/4″ rolled hem, finish the top edge of your bodice and then press.

Form each of your straps and turn them right side out using a loop turner or something similar.
Attach each at the front and back bodice, like you see below.


Along the bottom of the blouse, fold the hem up a half inch twice and stitch along the top of the fold to create a casing for your elastic. Cut a piece of elastic to 1″-2″ shorter than your underbust measurement and feed it through the casing, seam ripping a small opening to get through. Sew the two ends of the elastic together once it’s fed through the other side and then slip-stitch the casing closed to finish your bodice.

If desired, you can top-stitch some lace along the top edge of your new shirt!

To star your shorts, connect your two front panels at the rise using a French seam. Repeat with your two back panels.

Attach the front and back of your shorts at the side seams and inseam, again using a French seam. Hem the bottom of your shorts with a simple 1/4″ rolled hem and create an elastic casing at the waist the same way you did at the bottom of your shirt.
Feed your elastic through, stitch, and your shorts are complete!

Will you be adding any details to your Saffron Ensemble? Let me know in the comments!
27 comments
It would be easy to add pockets to the side seams of the shorts.
Beautiful pattern – I intend to make the lace with my embroidery unit
I made the pattern. Super easy. I could not determine the ease. I cut the 24/26 but should have cut the 20/22. Great pattern. I used charmeuse but will try it for my daughter on cotton.
Pockets are a must and the top will get a bit more length and no elastic for this 67 yr old fashionista
Hi Valerie! If you’d like, our Marigold Camisole would probably be the perfect option for a more modest top. 🙂
Hi! Thanks for the great pattern! About how much fabric would I need if I was only going to make the shorts?
Hi Abby, you’d only need 1 yard. 🙂
I can’t wait to make this beautiful ensemble!
Do you think this pattern would work in a cotton shirting? I have 2 yards in a blue and white check that I want to use.
Yes, a cotton shirting would work well! 🙂
hello just ask if the pattern already have seam allowance or it needs to add allawance.. thank you. im just new in this field
A 1/2″ seam allowance is already included! 🙂
Hello, this pattern looks so fun !! I’m new to sewing so i’m wondering why there’s 2 ” front bodice” ? I get the one with the darts, but the other rectangle says front bodice too ? I really want to make this beautiful pattern but I need help !!
Hi Carol-Anne – apologies! The piece with the darts is the ‘front bodice’ and the other rectangle should say ‘back bodice.’
Oh yeah, that make so much more sense !!! Thank you for your quick response !
Just finished these! They’re soo cute! They currently don’t have any trim but I’m thinking maybe I’ll add a boa trim!
Looking forward to making myself some summery PJs from this! I just gave birth a week ago and plan to slightly alter the top to attach to my nursing bra rather than resting on its own straps. I also have a bunch of cotton thread to crochet the lace from.
Hi! These are adorable! If I only want to make the top, what pages should I print?
Thank you!!
Thanks so much! For the top you should just need pages 2-4 and 14-25. 🙂 You can also include page 1 if you’d like to print the layout and test square.
Would it be possible to use a jersey fabric for the shorts? I have some in my stash I’d like to use.
Hi Christina, yes that would be super comfy! The pattern should work well as-is, but you may also want to size down once because of the stretch in the jersey.
It might just be me, but I dont have a rolled hem presser foot and I’m having a really hard time managing the rolled hem around the corners and the neckline. Any tips on how to do that?
Hi Courtney, we’re sorry for the delay in responding to your question! We get dozens of comments and questions each day, and so many questions get buried and, unfortunately, unanswered. We are now focusing user support on patterns 2 years and newer. We hope this will prevent questions on our more current patterns from going unanswered. Although this is late, we wanted to respond in case anyone else has the same question: we used this pattern for our beginner’s sewing course, which can help you solve your issue.
how do i find the pattern?
Hi Emily, just fill out the form on this page, and you’ll be sent a link with the download!
I wonder if you have any tips on doing a rolled hem along the the v neck of the top? Thank you!
Hi Colleen! We’re sorry for the delay in responding to your question! We get dozens of comments and questions each day, and so many questions get buried and, unfortunately, unanswered. We are now focusing user support on patterns 2 years and newer. We hope this will prevent questions on our more current patterns from going unanswered. Although this is late, we wanted to respond in case anyone else has the same question: We cover this a little more in depth in this part of our beginner sewing course!