
Our next Mood pattern is from our #Moodmadesketch19 challenge! We are thrilled to feature the winning design by Shaliam Rachielle as our Valeriana bodysuit free sewing pattern. Bodysuits have been resurfacing as a major trend from the 90s and I’m here for it! Whether you prefer fitted and casual or dressy and blouson, there’s a style for everyone. Who doesn’t love when their top is perfectly tucked in place? Slightly off-the-shoulder with an assymetrical neckline, the Valeriana bodysuit can turn any pair of pants or skirt into a glamorous look. Download your pattern now and let us know how you’ll be rocking yours!


Purchase Materials Used Below:
- 2 yards of Italian Metallic Gold and Black Knit Pique
- 1/2 yard of Nude Shaper Power-Mesh
- MDF178 – The Valeriana Bodysuit Sewing Pattern (free download below!)
Alternative Recommended Fabrics:
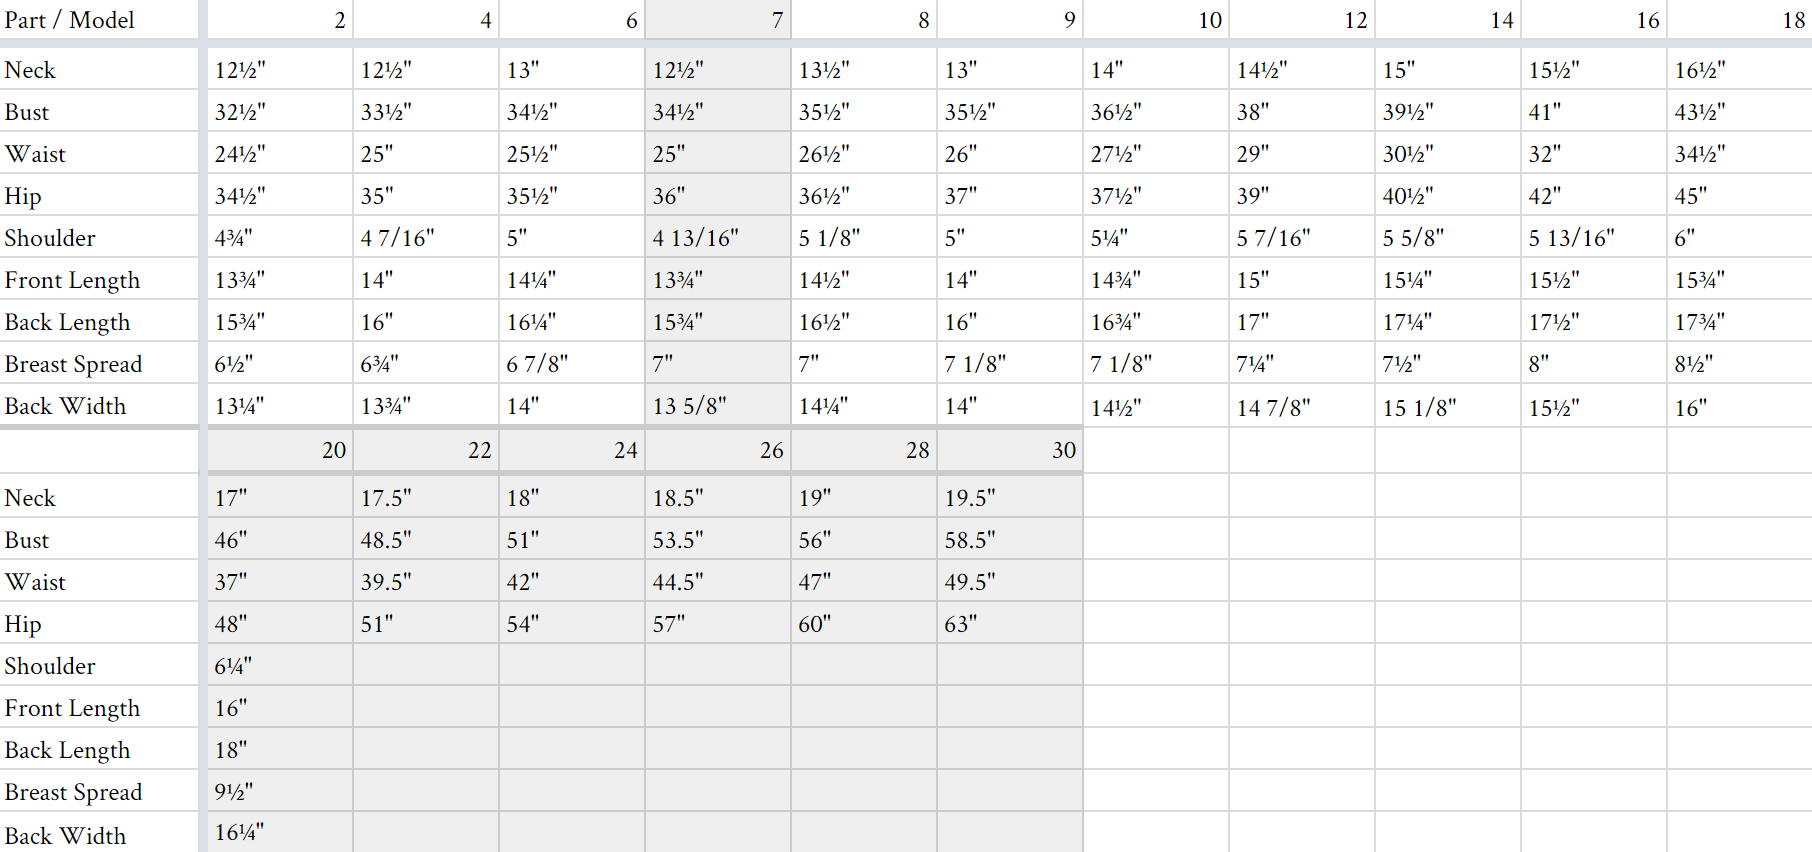
All seam allowances are 1/2″ unless otherwise stated. See chart below for sizing specifications. Note, this specific pattern is available up to a size 30.
Pattern Difficulty: Advanced
Here’s how to sew: (Follow the pattern placement key printed on the first page)
First sew in the darts on your back bodice pieces.
Next, pin both back pieces at the center back seam and stitch.
Press your darts, and down the center back seam.
Next, working on the front bodice, pin the center front and side front panels together and stitch along the princess seam.
Complete both sides and press.
Now, pin the back bodice to your front bodice at the side and shoulder seams and stitch.
Press all seams. Use a rolled hem to stitch and finish the armhole opening.
Next, you can pin all collar pieces together and stitch creating one continuous piece. Do the same for the collar facing.
Attach the collar by sandwiching the neck opening in between the collar and collar facing. Pin and stitch along the top edge.

Turn the collar right side facing out, and press along the top edge. Turn under the bottom edge and slip stitch the collar attaching it to the bodice.
Do the same for the outer collar sleeve opening and press all the way around when done.
Overlap the bodice where the right side is on top. Align the top edge along the left princess seam and pin to hold in place. Pin the bodide closed along the waist and stitch in place using a stretch stitch.
Now let’s work on the bottom of our bodysuit. Pin the front to the back and stitch at the side seams. Make sure to use a stretch stitch and finish with flat felled seams.
With right sides together pin the bodice to panty at the waist and sew. Turn and press.
Now, all that’s left to do is sew on your closures. Attach a small hook and eye at the top of your bodice to keep the overlaping edge closed.
Add the snaps the bottom of your bodysuit opening and your done!

13 comments
I love this patterns
Hi, such a stunning pattern!
I’m midway through but struggle with attaching the collar to the neck opening.
When do you close the two collar layers, and how? Which side is attached to the neck opening first? The photos and instructions are not clear to me…Please help!
Thank you!!
Hello there!
Thanks for visiting the Mood Sewciety Blog! We’re proud to have released over 350 free sewing patterns, and we hope you’re enjoying them.
Behind the scenes we’re a dedicated team of three, and we want to be able to offer top notch support. We have exciting plans for our patterns on the horizon, and as we continue to grow, we’ve decided to focus our sewist support on patterns from the last 2 years. If this pattern hasn’t been recently reduxed or updated, we won’t be able to respond to technical questions on these older posts.
If you come across any pattern errors, rest assured our team is on it – just let us know!
Don’t miss out on our Mood Sewciety Facebook Group – a fantastic space for fellow sewists to connect, share wins, and tackle challenges together.
Thank you for your understanding and happy sewing!
Hi Shavonne,
I love your style. I have made so many of your designs and they all fit me perfectly. I made this one in gingham for a retro summer look. Thanks so much.
Just found this and looks awesome! Will try to make it for a wedding. Are all the stitches supposed to be stretch (zigzag) stitches or only the ones indicated for closing of the bodice + assembling the bottom? And second question, if I wanted to make this in non-stretch fabric, I could simply add a zipper to a side seam I’m thinking?
Hi Nynke! Yes, I suggest using a zig zag or stretch stitch if you’re using a stretch fabric. If you want to use a non stretch fabric you might need to size up. I definitely suggest making a muslin first since you’re wanting to switch the fabric from stretch to non! Good luck 🙂
This is a stunning top. I’m in the process of making it for a wedding. It’s a black tie event so the bodice is a (ever so slightly suggestive embossed) black knit with the collar a satin black – much like a tuxedo. The skirt is the all purpose Mood circle skirt modified to my taste. Can’t wait for the finished product. Taking my time….
I’m struggling with the collar.
At first you have to sew the sides attaching the collar to the bodysuit, right? Than how do I close the other side? Is that by hand stitching like a slip stitch? And if you’ve closed it, is that seam visible when you stitch it to the body, or do you fold the seam under the collar?
Hope someone could help me out ;).
Love the look of the body already by the way!
Hello there!
Thanks for visiting the Mood Sewciety Blog! We’re proud to have released over 350 free sewing patterns, and we hope you’re enjoying them.
Behind the scenes we’re a dedicated team of three, and we want to be able to offer top notch support. We have exciting plans for our patterns on the horizon, and as we continue to grow, we’ve decided to focus our sewist support on patterns from the last 2 years. If this pattern hasn’t been recently reduxed or updated, we won’t be able to respond to technical questions on these older posts.
If you come across any pattern errors, rest assured our team is on it – just let us know!
Don’t miss out on our Mood Sewciety Facebook Group – a fantastic space for fellow sewists to connect, share wins, and tackle challenges together.
Thank you for your understanding and happy sewing!
Best regards,
The Mood Sewciety Blog Team
I’m making this as a skating costume for an upcoming competition. I am stuck at this part: Next, you can pin all collar pieces together and stitch creating one continuous piece. Do the same for the collar facing. Attach the collar by sandwiching the neck opening in between the collar and collar facing. Pin and stitch along the top edge.
Do you have any pictures or guidance on how to connect the collar pieces and then which direction they should be attached to the bodice?
Hello there!
Thanks for visiting the Mood Sewciety Blog! We’re proud to have released over 350 free sewing patterns, and we hope you’re enjoying them.
Behind the scenes we’re a dedicated team of three, and we want to be able to offer top notch support. We have exciting plans for our patterns on the horizon, and as we continue to grow, we’ve decided to focus our sewist support on patterns from the last 2 years. If this pattern hasn’t been recently reduxed or updated, we won’t be able to respond to technical questions on these older posts.
If you come across any pattern errors, rest assured our team is on it – just let us know!
Don’t miss out on our Mood Sewciety Facebook Group – a fantastic space for fellow sewists to connect, share wins, and tackle challenges together.
Thank you for your understanding and happy sewing!
Best regards,
The Mood Sewciety Blog Team
Is anyone else super confused on how to attach the collar? I feel like I need an extra step and/or photo to help me understand how this is supposed to go on. I’m kind of new to sewing and need as much help as I can get. Any feedback is greatly appreciated!
Hello there!
Thanks for visiting the Mood Sewciety Blog! We’re proud to have released over 350 free sewing patterns, and we hope you’re enjoying them.
Behind the scenes we’re a dedicated team of three, and we want to be able to offer top notch support. We have exciting plans for our patterns on the horizon, and as we continue to grow, we’ve decided to focus our sewist support on patterns from the last 2 years. If this pattern hasn’t been recently reduxed or updated, we won’t be able to respond to technical questions on these older posts.
If you come across any pattern errors, rest assured our team is on it – just let us know!
Don’t miss out on our Mood Sewciety Facebook Group – a fantastic space for fellow sewists to connect, share wins, and tackle challenges together.
Thank you for your understanding and happy sewing!