Over the holidays while browsing the lovely pieces on the Stella & Dot website, I happened to fall in love with one of their absolutely stunning mixed metal bib necklaces, but lost a little steam when I peeped the price tag. Not one to let finances dictate fashion…I took to Mood Fabrics for my jewelry supplies, and let the creativity fly to create my own.
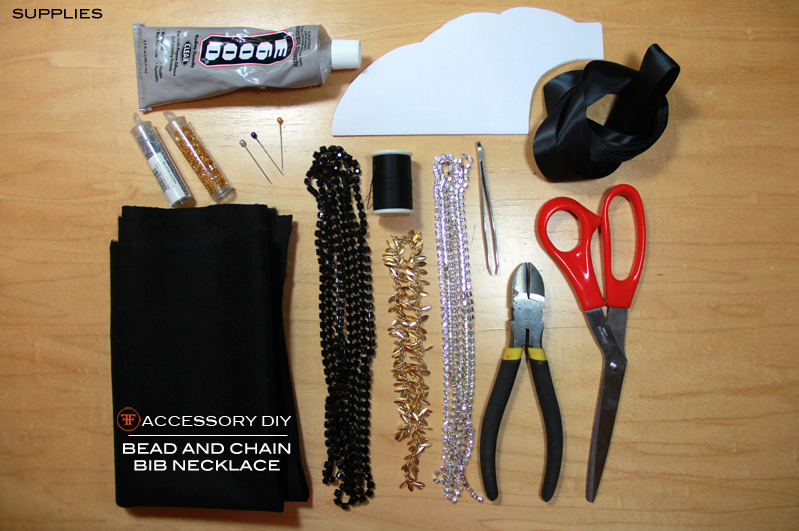
Supplies:
Multi-purpose glue, bib template (download here), satin ribbon, tiny individual glass and plastic beads, straight pins, needle and thread, tweezers, felt, black rhinestone chain, loose leaf chains (purchased from another store), clear rhinestone chain, wire cutters, and scissors (Note: I also at the last minute added a bit of gold chain around the neckline for an extra special touch).
Step-by-Step:
1. Download bib template here.
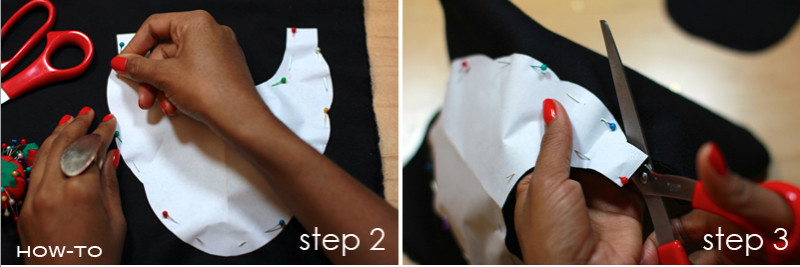
2. Fold a piece of felt or ultra suede in half, and then pin the template to these two layers.
3. Cut out these two forms, and then remove straight pins.
4. Choose one layer of the cut out felt; set the other layer aside.
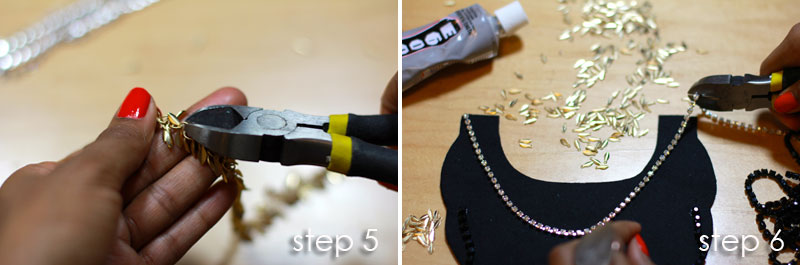
5. With wire cutters, remove leaves from their chain.
6. Cut rhinestones and beaded chains to desired length (Note: I suggest playing around with beads to get an idea of layout before doing any gluing and sewing).

7. Add a tiny bit of glue to back of chain to adhere it to the felt, following up with stitching where necessary for added stability.
8. Glue beaded black rhinestone chain within the body of the necklace; cutting where necessary to wedge into tight spots for a seamless appearance.
9. Apply a tiny amount of glue to fix leaves in place. Let leaves dry for at least 20 minutes before stitching them into place, and then repeat.
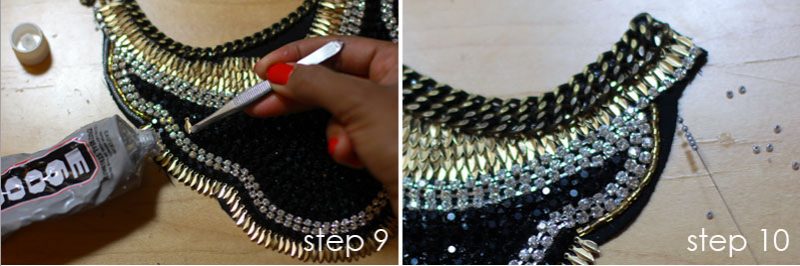
10. Take a needle and feed a single thread through top necklace layer, knot the back, thread tiny plastic beads onto the string, and then remove needle for ease of applying beads.
11. Once you reach your desired amount of beads, add needle back to thread and use it to drive this string back through this layer, and knot the back (Note: I also added a tiny bit of glue to the under side of the finished row of beads just so they wouldn’t move).
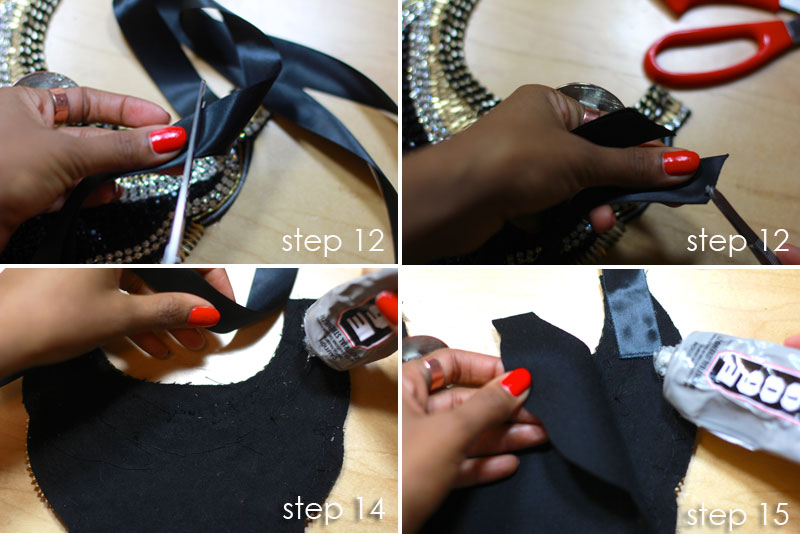
12. Cut 2 pieces of ribbon to your desired length (Note: You can cut one side straight across, and then cut the exposed side at an angle for added effect).
13. Apply glue (or clear nail polish) to ends of ribbon to avoid fraying.
14. Turn top layer of necklace over and glue each ribbon about 1.5 inches from top of each side. (Note: Feel free to also stitch ribbon to necklace).
15. Take 2nd layer of felt that you set aside in Step #4 and glue it to the back of 1st layer.

Enjoy!
Brandhyze Stanley is the chief voice of Frugal-nomics.com; a platform designed to share with women how to live and look fabulous on a dime. A DIY girl at heart—Brandhyze has been featured on The View, The Early Show, The Today Show, MTVStyle, Essence Magazine, and TJMaxx.com. A Wilhelmina Model for nearly a decade, with a Business Degree from Loyola University Chicago, Brandhyze is a Fashion & Style Writer and Video Contributor for Newsday Westchester, and provides DIY content to the popular How-To Site, eHow. Brandhyze is a huge thrifter and a lover of all good deals, follow her on Twitter @MyFrugalnomics and on Facebook at Facebook.com/Frugalnomics.