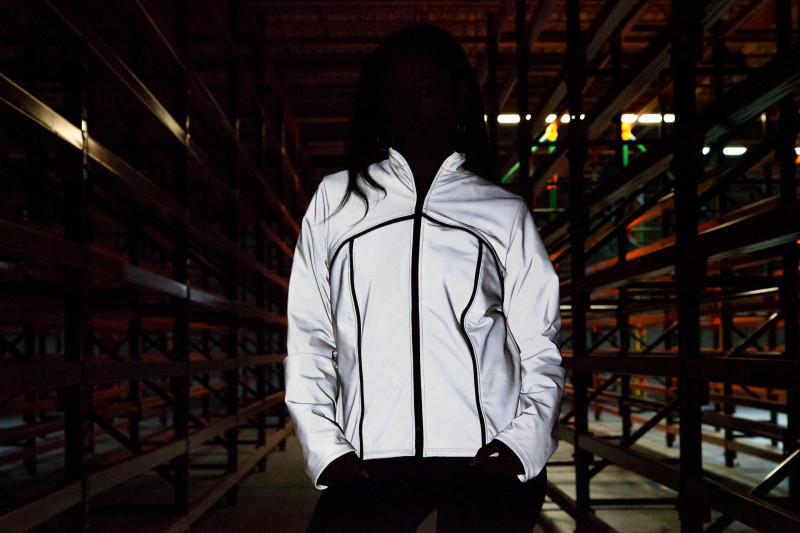
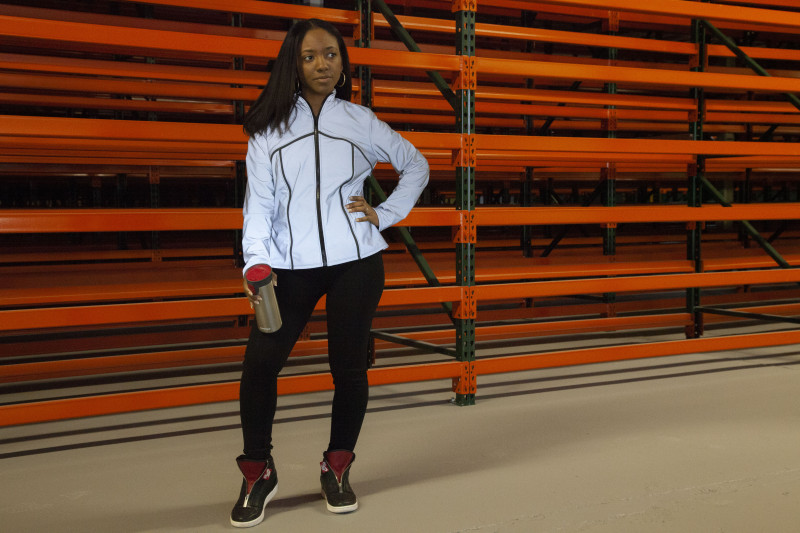
Here at Mood Fabrics, we can’t seem to get enough of the reflective wear trend that has seemed to take off overnight! Our Hawthorn Jacket free sewing pattern is here to highlight all the great attributes of Mood’s reflective fabric. This jacket is lightweight but provides just the right amount of warmth due to the fleece backing. Not only will you be easily spotted, but we’ve also added contrasting self-made piping along the style lines for a bold look. The back of the jacket has cute layered paneling for a stylish feminine touch. Here’s another outstanding piece to add to your activewear wardrobe, so try any one of our amazing performance fabrics to whip up a matching pair of leggings or tank top to wear with your new jacket!


Fabrics & materials used:
- 2.5 yards of Silver on Black Fleece-Backed Reflective Fabric
- 1 yard of Black on Black Stretch Knit Reflective Fabric
- 1 Black Separating Plastic Molded Zipper 25.5″
- 2-3 yards of 1/4″ Natural Drawcord
- MDF108 – The Hawthorn Sewing Pattern (free download below!)
The Hawthorn Jacket pattern may seem a little tricky to sew, but looks can be deceiving. I’ll help you out a bit along the way.
Here’s how to sew:
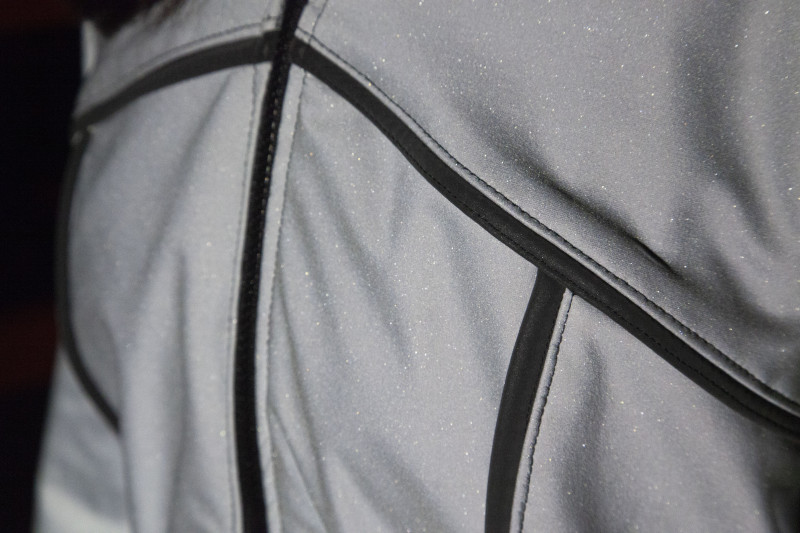
First, we want to make our self-made piping. We are going to use a darker color reflective fabric for the contrast. Create a long piece of piping that you can cut and use as you need it. Cut a long strip of the contrast fabric the same length as the cord and about 1.5″ wide.
Place the cord inside of the strip of fabric. Fold over the fabric and pin it close to the cord so it’s tightly sandwiched in between.
Stitch close to the cord leaving about 1/2″ of fabric extended at the edge. Cut a piece to the length of the center front and side front seams.
After your piping is done, pin it to the center front panel and sew it in place.
Now with the right sides of fabric together, pin the side front and center front panels together. Your piping should be sandwiched in between. Stitch and trim down seam allowance on piping.
Next, add a strip of the piping along the top edge of your yoke seam. Stitch in place and then with right sides of the fabric together, pin front yoke to front sandwiching the piping in between.
After both sides are done, you can assemble the back panels. For the back, we are using panels “A” and “B”. When cutting out patterns, you will fold the fabric in half and cut two of each piece.
I used an overlock stitch to finish the edges of my fabric and to stitch pieces together. This is optional but helps when sewing through several layers.
Lay down the first back panel “A”. Then lay down the opposite side back panel “A” directly on top. Pin and stitch together at side seams, and shoulder seams. Before adding the next panel, trim away the seam allowance of the top layer. This will reduce bulk at the seams.
Next, pin the first “B” back panel to the back at side and shoulder seams. Stitch in place and trim seam allowance. Pin the last layer, panel “B”, to the opposite side and stitch in place.
Next, pin the front to the back at shoulder seams and side seams and stitch in place.

Using a twin needle stitch, finish the edge of the sleeve. Pin the sleeve together at the underarm seam and stitch.
Pin sleeve to armhole and set in place.
With right sides of the fabric together, pin the collar facing to the collar and stitch. Press open and top stitch along seam edge.

Pin collar to neck opening and stitch leaving the collar facing free.
Before installing the zipper, you can turn up the bottom edge 1″ and hem it using a twin needle finish. Separate the zipper and starting at the very top of the collar and pin the zipper along the edge of your jacket opening.
Turn the collar facing inside out so that the right side of the collar is against the zipper. Sew starting at the top of the collar making sure the zipper is sandwiched in between. Do the same for the opposite side.
Now turn the collar back right side out, tucking under the seam allowance, and stitch along the inside of the neck to close the facing. Top stitch along the outside of the collar and down alongside the zipper opening.
That’s it, you’re done! I hope you’ll enjoy your new jacket as much as I do!

18 comments
I just bought some gorgeous fleece yesterday with the intention of making a simple hoodie. After seeing this pattern, I think I’m changing my plans. Also, I’ll add in some side seam pockets, because… pockets. Thanks for making such great patterns free for downloading!
Hi Kristy! I’m glad you are enjoying our patterns! Adding pockets is a great idea! Let us know how it turns out. Thank you!
Okay I have to ask…how long were you sewing before you attained that level of visible seam-sewing perfection?!
I’m just starting to finally focus on the appearance of seams and it is like a meditation session each time!
Hi, I really want to make this jacket out of Softshell fabric. Could you tell me how much stretch-percentage the fabric should have? Or would it maybe work with non-stretch fabric??
Thanks in Advance 🙂
Hi Kristin, the fabric I used did have a 4-way stretch, however, I think that using a non-stretch would work just as well. The cut of the jacket is not very fitted. Hope this helps.
Thank you so much for this amazing jacket pattern! I want to start straight away.
Thank you for this pattern!! I just made this pattern with some design modifications to the back inspired by a RTW brand athletic jacket. I used the reflective fabric for detailing and used a performance fleece backed fabric from Mood for the jacket. I am also thinking of adding zipped pockets. Great pattern and great fabric! Excited to wear this!
Looking at the sleeve piece- is the single or the double dash the front of the sleeve? Everything is cut… want to double check before I start sewing
Hi, Ashley! The single dash represents the front and the double is the back. 🙂
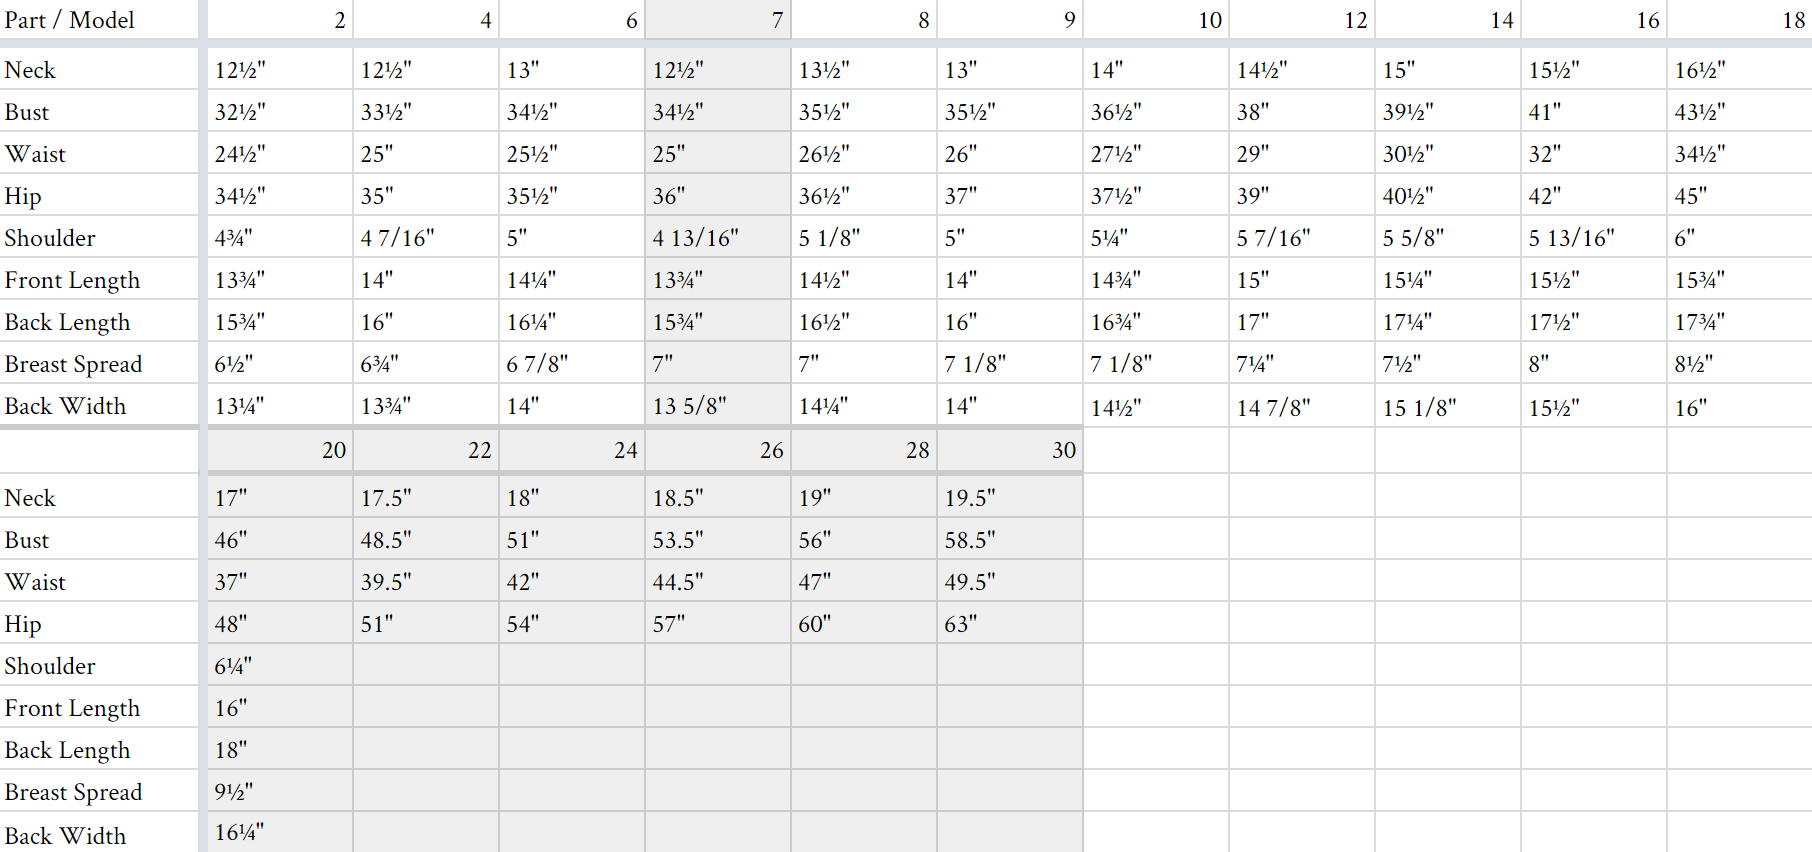
Hi Shavonne, I’m looking forward to getting started on this jacket! Can you please tell me, are the measurements in the chart body measurements or finished garment measurements?
Thanks,
Libby
Hi, Libby! The size chart indicates body measurements. 🙂
Hi Shavonne! Love that jacket! Thanks for such a great free pattern.
Just one question: are seam allowances already included in the pattern?
Got some black polar fleece fabric waiting to be cut…
Thanks,
Manu
Yes, a 1/2″ seam allowance is already included! 🙂
Can I ask why it’s nessesery to hav 4 layers of fabric at the back ?? Seems like a waist ??
Otherwice the pattern is great… 😉
Hi Lena, it’s just a unique style detail, but feel free to omit the panels if you want. 🙂
The pattern is great, I needed something to cover up after my workout and this is just the thing. It looks smart and stylish for a quick snack after a workout. I also made sweat pants to match. Love it. Thank you so much for the free patten.
I’d like to make this as a vest that I can throw over any jacket or coat … if I made it without sleeves, would it work as it’s currently cut or would I need to adjust the shoulders in some way? That way, if I’m wearing my big coat in the winter, it’ll fit as a vest, whereas it wouldn’t fit as a jacket over that coat. If that makes sense …
Thank you.
Hi Sue, you could make this a vest by omitting the sleeves. As always, we recommend making a muslin first to ensure the proper fit before working with your fashion fabric.