
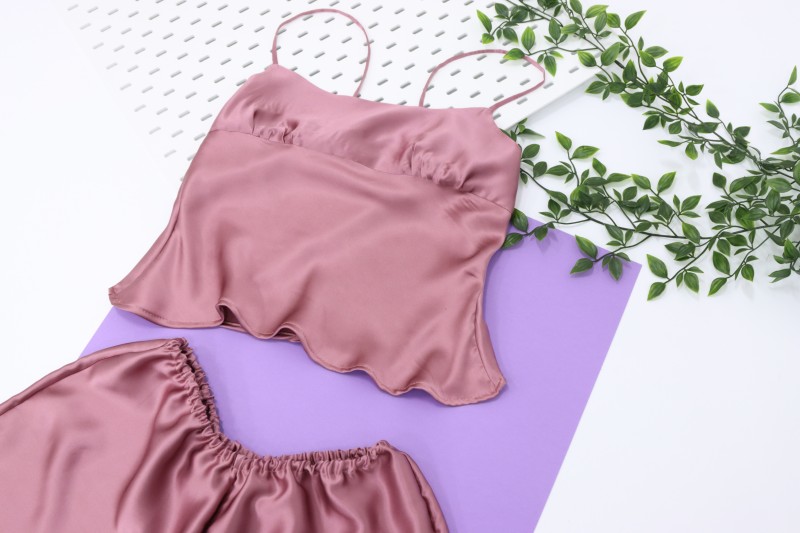
Comfort clothing has become, not only popular but the norm these days. Why dress up when there’s nowhere to go? As a result, luxe sleepwear and loungewear have become an increasingly important part of one’s closet. Everyone needs sleepwear, so why not splurge on both comfort and style? The Linden Sleepwear Set features delicate high bust gathers and a slight bias-cut peplum silhouette paired with flared shorts.
Purchase Materials Used Below:
- 2 yards Crushed Berry Stretch Silk Charmeuse
- 2 yards White Elastic – 0.25″
- MDF232– The Linden Sleepwear Set Sewing Pattern (free download below!)
Alternative Recommended Fabrics:
Please note: our free sewing pattern files and photography are not available for redistribution or resale.
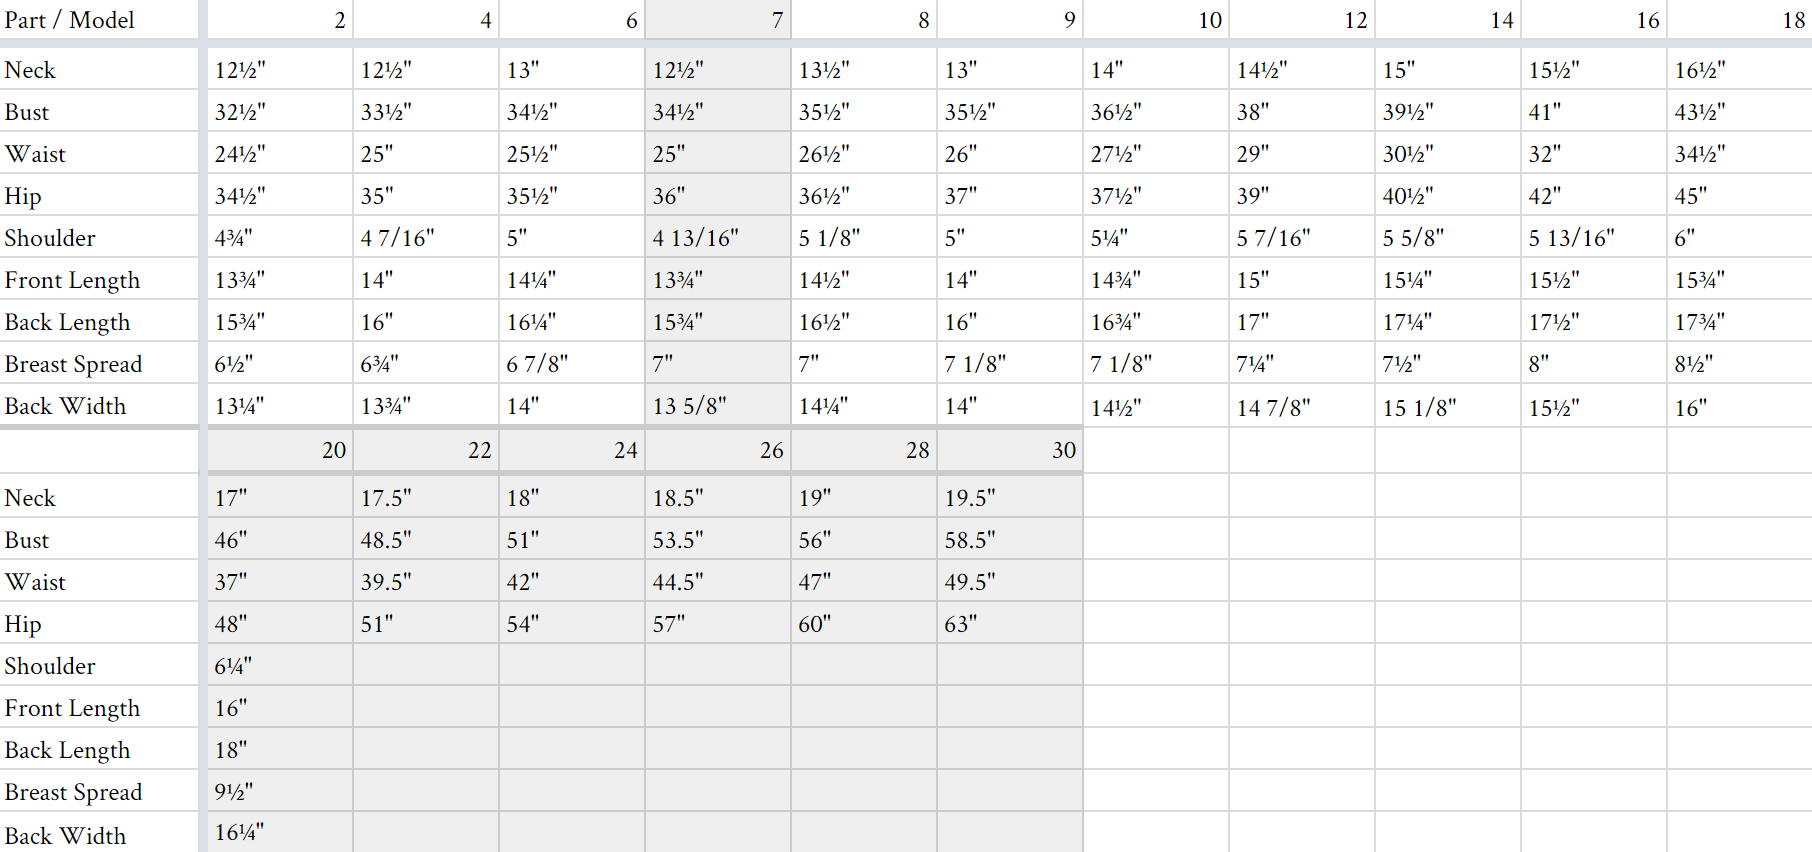
All seam allowances are 1/2″ unless otherwise stated. See chart below for sizing specifications. Note, this specific pattern is available up to a size 30.
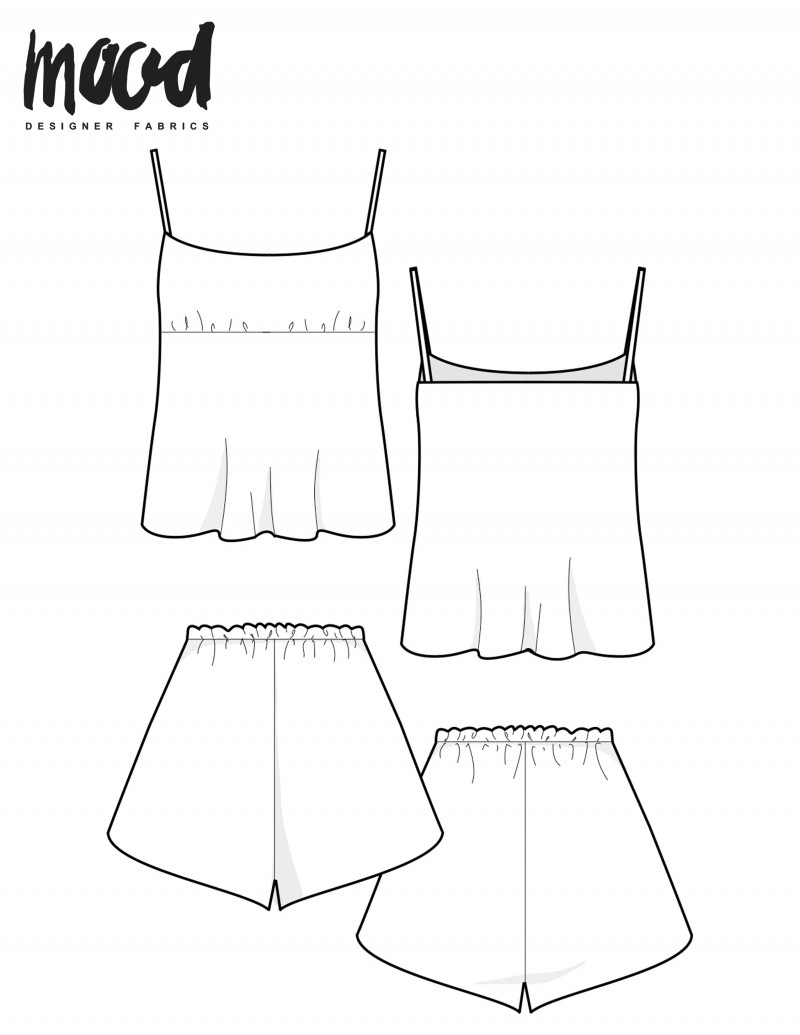
How to Sew the Blouse:
Using a basting stitch, gather the bottom edge of your upper front panels (aka the bust), using the gathering notches as a guide.
Press the lining’s seam allowance under, and set aside for now.
Right sides together, place the lower front and outer front panel together, aligning the underbust edge. Sew, as pictured below.

Create each of your straps, folding them in half, face to face, and sewing up the raw edge. Use a loop turner to turn them right side out and press. Pin them to the uppermost point on the bust. Then, pin your upper front lining to outer bust, face to face, and sew along the top edge, as seen below. Note: the pictured bust lining hasn’t been gathered and pressed yet, but yours should be!
Trim your seam allowance, turn right side out, pull the straps out, and press.
Either slipstitch the folded edge of the lining in place, or stitch in the ditch.

Create a 3/8″ casing along the top edge of your shirt back for your elastic. Cut your elastic 2″-3″ less than the width of your back panel, depending on how tightly you’d like your blouse to fit along the top. Feed the elastic through the casing and pin to either end.


Attach the front and back of your blouse at the side seams using a French seam and finish the bottom off with a 1/4″ rolled hem.
How to Sew the Shorts:
Attach your two front panels at the rise using a French seam. Repeat with your two back panels.
Attach the front and back of your shorts at the sides and inseam, also using a French seam. Press all seams.

Create a 1/2″ casing along the top edge of your shorts and feed your elastic through. The elastic should measure 1″-2″ shorted than your waist. Stitch the ends of your elastic together and tuck inside the casing before stitching the casing closed.
Finish off your shorts with another 1/4″ rolled seam. Press and your garments are ready to wear!

38 comments
I’m excited to try this. I’m a quilter who is venturing out into the world of garment making
Love this look! Can’t wait to try French seams.
Can someone tell me how to sew the strap at the back side of the shirt. Im being confuse for around 1 hour. I matched the notch but i dont know how to stitch the strap
Yeah, I don’t see those instructions included. I’m going to try to attach them by matching up the raw edges with the straps and the back before I make the casing. I’m going to stitch them down so there won’t be an issue when I’m threading the elastic through. Shouldn’t be able to see those stitches either since they’ll be on the inside once the casing is created
Looking forward to making these
I would love to see the top converted to a slip dress.:very simple lines with tulip flare at the bottom.
We might have to make that version in the future!
Could this be made from a woven no stretch fabric? With hoping minimal pattern modifications?
Hi JJ! With this pattern, stretch is optional. If you choose to make it out of a fabric without stretch, you won’t have to modify the pattern. We suggest a lightweight, fluid fabric such as silk charmeuse or crepe de chine for the best results. 🙂
Will the pattern suit a non stretch cotton voile?
Yes, that would be perfect!
oooh, perfect for summer sleepwear!
I’m so so excited to try sewing this thanks for the free pattern
Love the pattern! I made the top and long PJ pants and also a short night gown. I just lengthen the pattern with my curved ruler. So darn cute!
Next, maxi dress with Long ties for bows .
I’m thinking something thicker so I can wear it with turtle necks under for winter ! So 90s.
This is such a cute idea I have to try that
great basic short pattern. I did a channeled waistband though, so kind of a paperbag waist and heightened the top so i could have them high rise. i made them out of double cotton gauze and theyre so airy for the summer.
Just finished my set , the pattern was easy to follow. I’m a beginner sewist so I did use YouTube for help but my set came out great.
I do have some learn some finishing techniques but other than that it looks great.
I made the camisole and also a lengthened version as a nightie. They’re brilliant! A very good pattern for the smaller busted lady, thank you. Photos on IG @cakeymcdoodle
I wish there was an option with more support for the bust, but these shorts are amazing !!
Use a hanky weight linen instead of silk. Linen is far more durable when under strain than silk; if you can’t live without the feel of silk, maybe try reinforcing the under bust seam and straps with linen bias tape?
I can’t wait to make this set! I’m a DD cup so I think I’ll need to do a FBA. Has anyone tried that with this pattern?
I tried, because this top has very little room and sits extremely strangely on medium sized busts (3in difference between high bust and apex). I only adjusted the top part, and that made for another odd fit. I’m sure someone more experienced at making FBAs could get it right, but I’ve personally started looking for an alternative pattern for the top since it really doesn’t fit me nor my friend.
Hi V, we’re sorry the fit wasn’t what you had expected. Hopefully you made a muslin first before cutting into your fashion fabric!
Thank you for this free pattern! I’ve been wanting a camisole to wear under summer dresses that are just a bit too see-thru and/or cling to lumps and bumps, but I didn’t line in order to keep them cool and breathable (it’s very hot where I live in Australia). This afternoon, I made this top with a piece of beige lightweight poly knit lining fabric from my hoard. I used my overlocker on the seams and topstitched the hem and neckline to stop the knit’s tendency to curl. I’m a size 18DD (and sometimes have to grade waistline out to 20), so I used the 16/18 cutting lines on the pattern as the knit lining fabric is very stretchy as well as the back and lower front pieces being cut on the bias and thus stretching even more. It’s turned out a beautiful fit, snug enough to have no gaps around the neckline and bust. It drapes very nicely down to my hips and smooths over the panty lines. I don’t think this would work for me in a woven fabric with minimal or nil stretch, due to the bust. A cotton or bamboo jersey knit might make for very comfy pjs though!
We’re so glad you liked this pattern Janey!
HI1 I want to make this set as loungewear, so I want to use rib fabric. Will the pattern suit rib fabric?
Hi Vanessa! Yes, rib knit fabric will work well. 😀
Hello! I’m a beginner and english is not my first language. I’m having trouble figuring out what raw edge to slip stitch och after ataching the straps. And also, is it a slip stitch you sew by hand that appears when i google it or is it the classic mechine sewn zig zag?
Hi Anna! Slip stitch the raw edge of the lining to the inside of the top. We suggest doing it by hand so it’s nearly invisible from the outside! 🙂
Okay! Thanks!
I’m guessing I must be overlooking this since nobody else seems to have had this confusion, but I’m not seeing how you attach the top front pieces to the bottom front piece and when that’s supposed to happen.
Hi there! The instructions have been updated 🙂
I’d really love to make this set in a jersey. Would it work? Not ready to try silk yet and I want the comfort of the Florin set, but don’t think all the ruffles will complement my figure. Thank you so much!
Hi Sarah, this could possibly work in jersey. You may need to adjust the sizing a bit though.
Could you tell me what country the sizes are from? E.g Usa or Uk? Seems to be coming up very parge but i might be drafting the wrong size! Thank you! X
Hi Georgia, these are in US sizes 🙂
I just printed the pattern and saw there were only 8 sizes and no legend. How do I pick the correct size?
Hello! Using the size chart in this blog post, you would find your correct size. From there, each pattern piece has a chart for which line is for each size (0-2, 4-6, 8-10, etc.) and cut the line according to your size on the pattern.