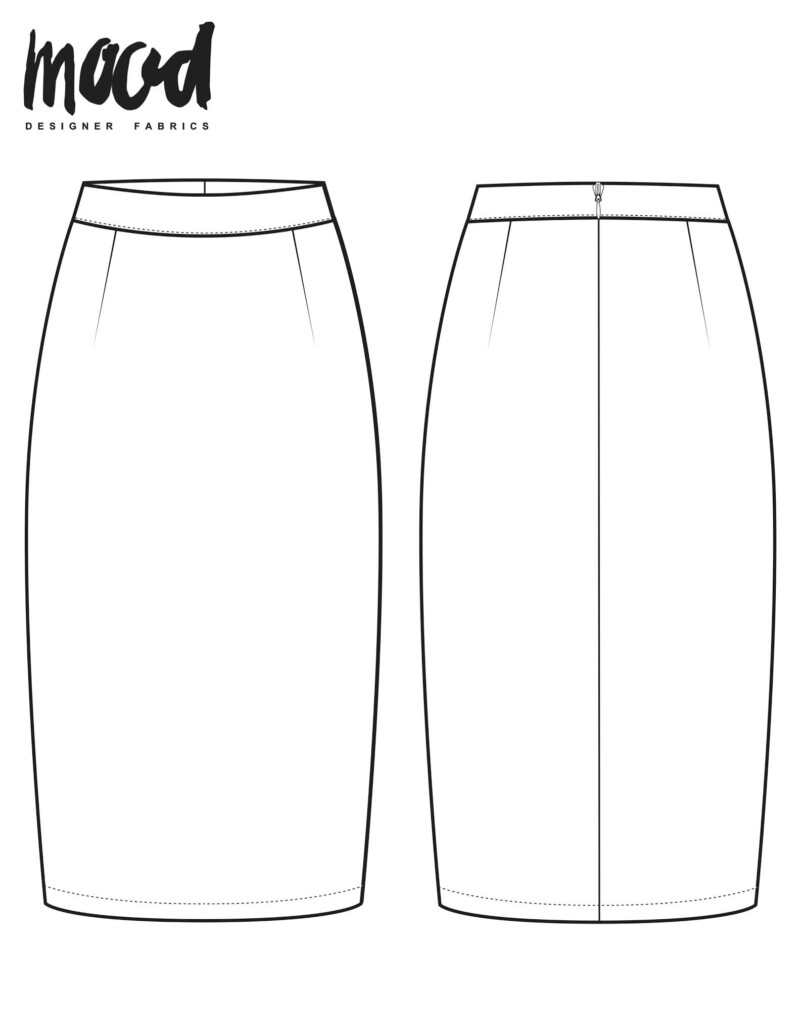
I don’t know about you, but my Fall wardrobe wouldn’t be complete without a beautiful classic tweed piece. Luckily, Mood Fabrics always has us covered! For this project, I used one of Mood’s multi-faceted metallic tweeds that’s highlighted with shimmering threads and multi-colored yarns. As always, a great way to showcase such an intricate fabric is to use a simple silhouette like our Aspen Skirt free sewing pattern. This fitted pencil skirt was quickly updated with a matching self-belt, making it ready for any ensemble. Try wearing it with a chunky cropped sweater and sneakers for a cool back to school look! You could even style it with a flowy blouse for a day at the office. Let us know if you plan on making any tweed pieces this fall.


Purchase Materials Used Below:
- 2 yards of Metallic Multicolor Polyester Tweed
- 1 pc Antique Copper Metal Buckle
- MDF079– The Aspen Enssemble Sewing Pattern (free download below!)
Alternative Recommended Fabrics:
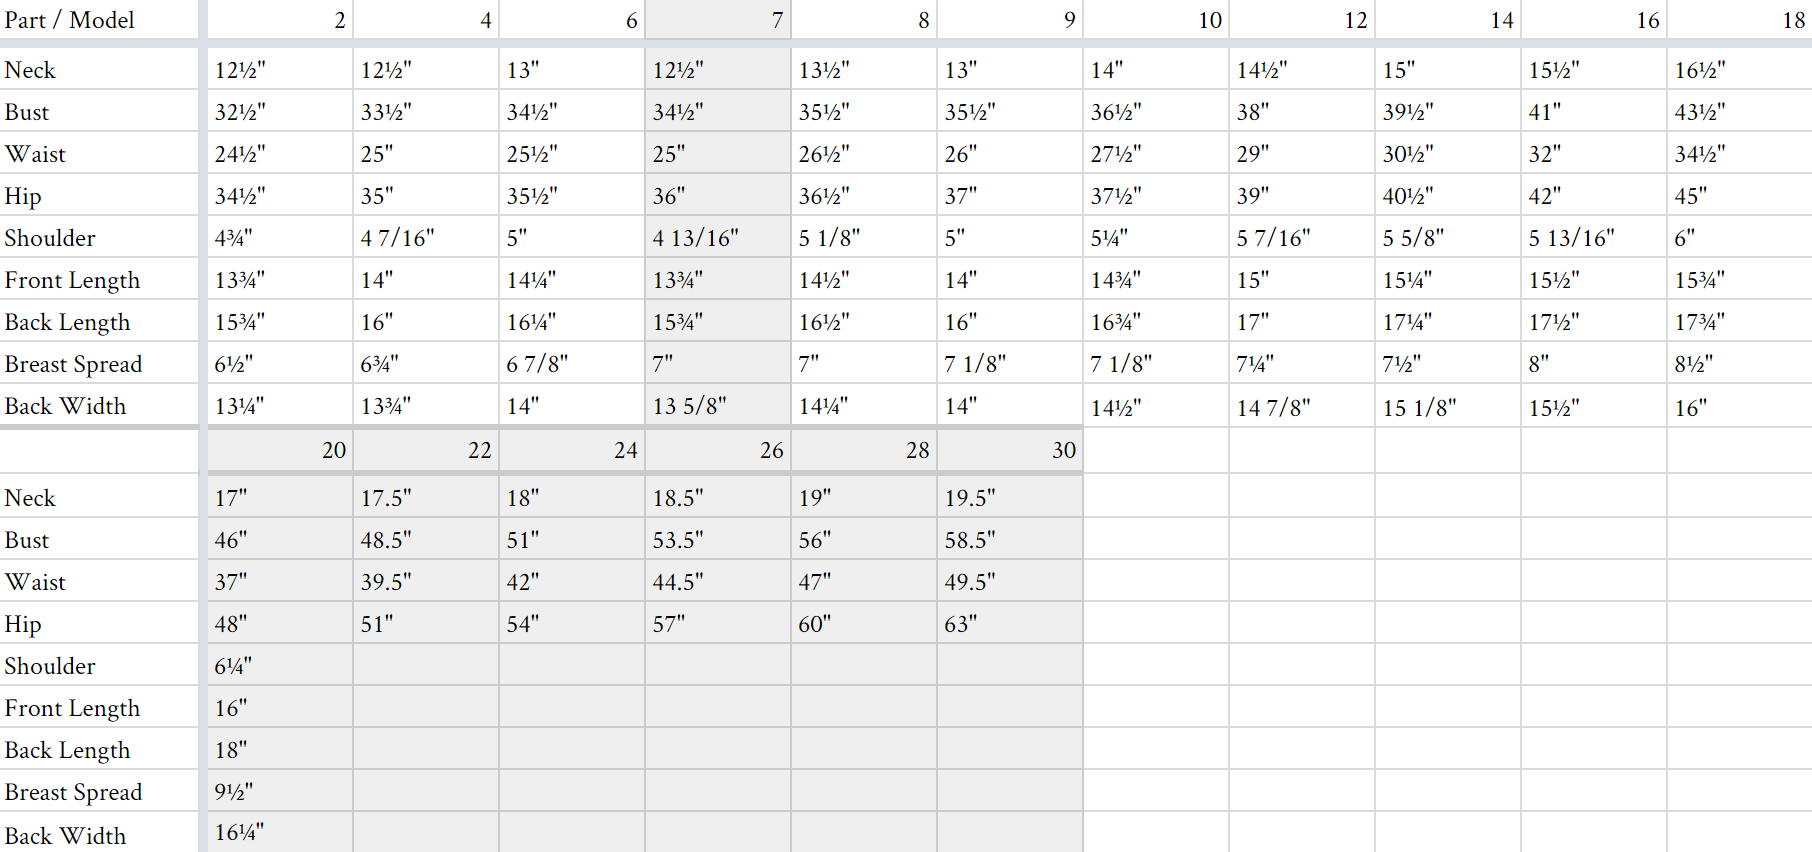
All seam allowances are 1/2″ unless otherwise stated. See chart below for sizing specifications. Note, this specific pattern is available up to a size 30.

For our Aspen Skirt Redux, we simply added a belt to the already fabulous design.
Measure out the length of your waist by wraping your tape measure around your waist. Place it right above your hips and just below your belly button. Make sure to leave a little slack for inserting the belt through the buckle. Once you have a comfortable fit, transfer that measurement to your pattern paper. For my belt, I will be using a 2″ buckle so I will make the width 2″. Finish by adding a 1/2″ seam allowance all around. This will be the easiest way to make the pattern for your belt.

Our Aspen skirt is paired perfectly Mood Fabrics Bixa Sweatshirt free sewing pattern. Just trim off a little from the bottom hem and you have one stunning crop top!


9 comments
This is perfect for some fabric I’ve been given but was unsure what to do with. A great autumn staple that j can imagine in dark denim too.
I noticed there is a kick pleat and the length of this redux skirt is below the knee. I would like to know if the pattern here is altered, or would I have to make those alterations since only the belt & buckle was mentioned. I am not certain how to go about making the kick pleat change, even the length, where was it lengthened from; adding to the hem or would the addition start at a higher point. Thank you in advance for all your help and especially all these beautiful patterns.
Hi Lynn, it doesn’t say that any length was added, but you’re right – it looks like it! To lengthen the skirt, I recommend cutting the skirt at a 90 degree angle from the grainline, around the mid thigh area. Tape paper in-between the pattern pieces, adding as much length as you want. Make sure that when you’re taping everything, the length is even all the way across, and the grainline is still straight! Redraw the seamlines as needed, and cut the new pattern piece out.
Repeat with the back skirt, this time adding a vent. Typically the vent goes all the way up to the knees. Download our Hydrus Coat to reference when you’re drafting the vent.
Before sewing the two back pieces together, finish the edges of the CB back skirt by serging, including the raw edges of the vents. Fold the vertical edges of the vent down to create a 1/4″ hem, and sew in place. Sew the back skirts together, down the CB through to the vent’s kick out point. Don’t sew the vertical edges of the vent pieces though. Clip the 90 degree corner of the vent, then fold and press both pieces to one side. On the side you the vent to, sew the kick out point together to secure to the skirt.
Hi 2 quick questions, this version appears longer than the original, any suggestions on lengthening the pattern? and there is also a short slit at the back, any recommendations on how to include this modification? I’m relatively new to sewing and would love to recreate this version of the aspen pattern!!
Hi Shel,
To lengthen the skirt, I recommend cutting the skirt at a 90 degree angle from the grainline, around the mid thigh area. Tape paper in-between the pattern pieces, adding as much length as you want. Make sure that when you’re taping everything, the length is even all the way across, and the grainline is still straight! Redraw the seamlines as needed, and cut the new pattern piece out.
Repeat with the back skirt, this time adding a vent. Typically the vent goes all the way up to the knees. Download our Hydrus Coat to reference when you’re drafting the vent.
Before sewing the two back pieces together, finish the edges of the CB back skirt by serging, including the raw edges of the vents. Fold the vertical edges of the vent down to create a 1/4″ hem, and sew in place. Sew the back skirts together, down the CB through to the vent’s kick out point. Don’t sew the vertical edges of the vent pieces though. Clip the 90 degree corner of the vent, then fold and press both pieces to one side. On the side you the vent to, sew the kick out point together to secure to the skirt.
HI there!
Super excited to get into this project, but I was wondering about the length of this version compared to the original… From the pictures it looks like this version is a little longer and has an added center back slit in addition to the belt redux. Could you point me in the right direction for how best to add those changes as well, please? 🙂
Thanks for sharing your awesome sewing-powers with us mere mortals, greatly appreciated!!
/Julia
Hi Julia, it doesn’t say that any length was added, but you’re right – it looks like it! To lengthen the skirt, I recommend cutting the skirt at a 90 degree angle from the grainline, around the mid thigh area. Tape paper in-between the pattern pieces, adding as much length as you want. Make sure that when you’re taping everything, the length is even all the way across, and the grainline is still straight! Redraw the seamlines as needed, and cut the new pattern piece out.
Repeat with the back skirt, this time adding a vent. Typically the vent goes all the way up to the knees. Download our Hydrus Coat to reference when you’re drafting the vent.
Before sewing the two back pieces together, finish the edges of the CB back skirt by serging, including the raw edges of the vents. Fold the vertical edges of the vent down to create a 1/4″ hem, and sew in place. Sew the back skirts together, down the CB through to the vent’s kick out point. Don’t sew the vertical edges of the vent pieces though. Clip the 90 degree corner of the vent, then fold and press both pieces to one side. On the side you the vent to, sew the kick out point together to secure to the skirt.
I’d really like to make this skirt. Tried twice to download it, but keep getting the pattern and instructions for the original – side zip and no kick pleat. While the original is okay, I prefer the redux with the kick pleat and back zip. Can you help me out?
Hi Kristen, we’re sorry for the delay in responding to your question! We get dozens of comments and questions each day, and so many questions get buried and, unfortunately, unanswered. We are now focusing user support on patterns 2 years and newer. We hope this will prevent questions on our more current patterns from going unanswered. Although this is late, we wanted to respond in case anyone else has the same question:
To lengthen the skirt, I recommend cutting the skirt at a 90 degree angle from the grainline, around the mid thigh area. Tape paper in-between the pattern pieces, adding as much length as you want. Make sure that when you’re taping everything, the length is even all the way across, and the grainline is still straight! Redraw the seamlines as needed, and cut the new pattern piece out.
Repeat with the back skirt, this time adding a vent. Typically the vent goes all the way up to the knees. Download our Hydrus Coat to reference when you’re drafting the vent.
Before sewing the two back pieces together, finish the edges of the CB back skirt by serging, including the raw edges of the vents. Fold the vertical edges of the vent down to create a 1/4″ hem, and sew in place. Sew the back skirts together, down the CB through to the vent’s kick out point. Don’t sew the vertical edges of the vent pieces though. Clip the 90 degree corner of the vent, then fold and press both pieces to one side. On the side you the vent to, sew the kick out point together to secure to the skirt.