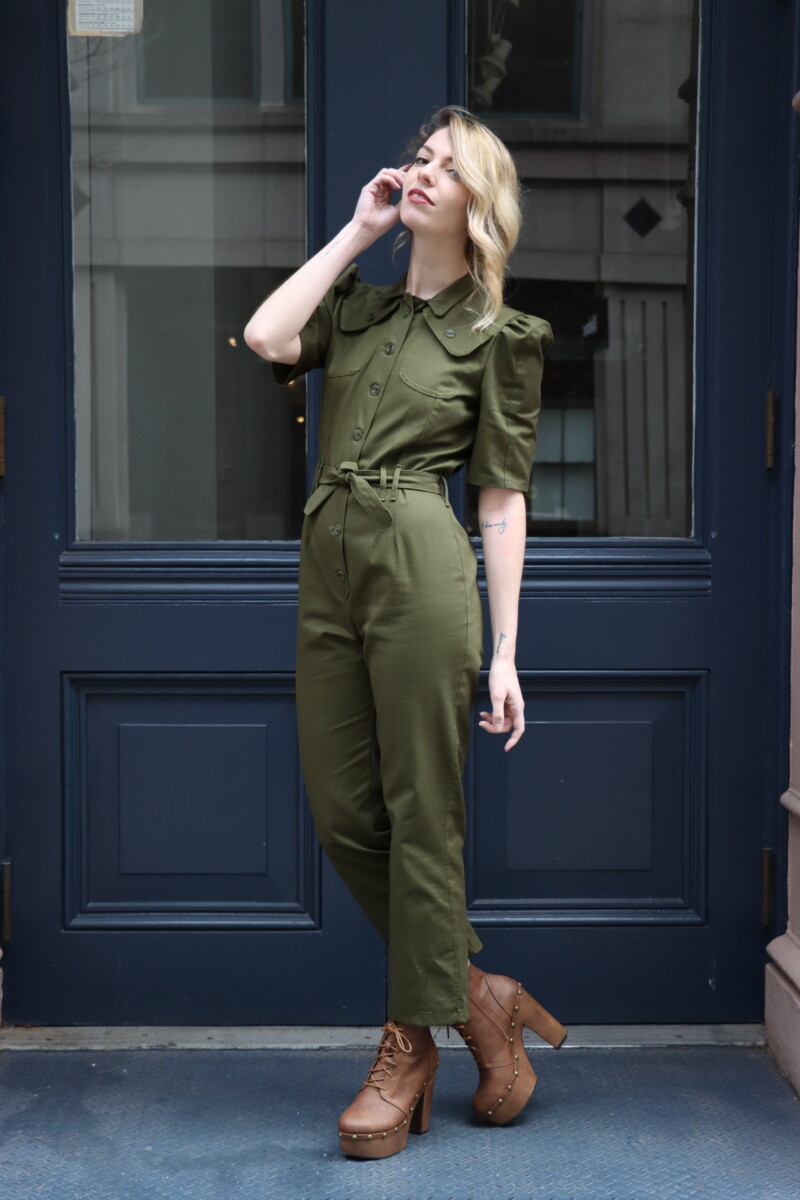
Don’t you just love a good grab-and-go outfit? The kind of ensemble that seems to put itself together. Mood’s Forrest Jumpsuit free sewing pattern is just that! This one-piece showstopper is full of personality. With puff sleeves, patch pockets and topstitching, you’ll enjoy the best of both style and function. The full button down front makes getting dressed a snap! Just pull on, tie the belt and you’re good to go. Whether you’re going for utilitarian slay or safari chic, the Forrest Jumpsuit will do the job. Style with sneakers or heels and easily go from running errands to date night! Try making your jumpsuit in heavyweight linen and transition into a fashionable summer!


Purchase Materials Used Below:
- 4 yards of Olive Solid Organic Cotton Twill
- 9pc Green Plastic Buttons
- MDF189 – The Forrest Jumpsuit Sewing Pattern (free download below!)
Alternative Recommended Fabrics:
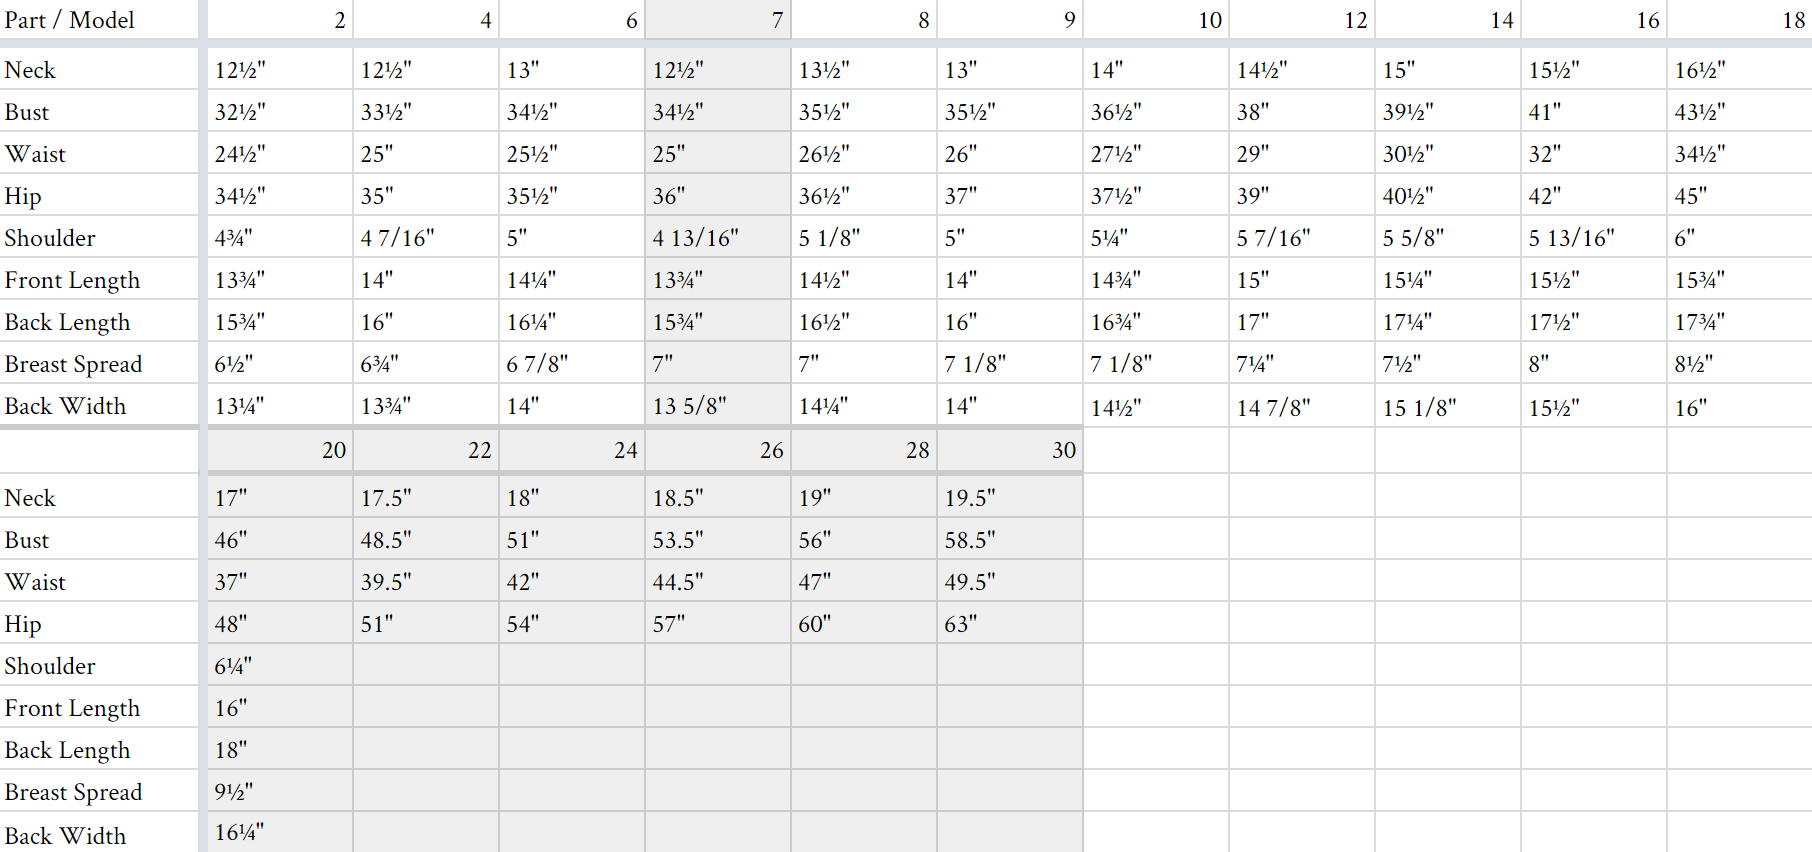
All seam allowances are 1/2″ unless otherwise stated. See chart below for sizing specifications. Note, this specific pattern is available up to a size 30.
Here’s How to Sew:
- Sew in your darts on your pant backs. Press. Next, with right sides of the fabric together, pin the backs together at the center back seam and stitch. Press.
2. Pin pants front together and sew up to placket notch and back stitch. Press and set aside.

3. Sew center front, middle and side bodice together. Press and topstitch.
4. Pin and sew shoulder yoke. Press and topstitch.
5. Pin center backs together and sew. Press and topstitch. Pin back yoke to back bodice. Sew press and topstitch.
6. Apply fusible to pocket flaps. With right sides together pin and sew pocket flaps. Trim seam allowance, clip curves, turn and press. Topstich.
7. Use pocket placement template to mark position of patch pocket.

8. Pin pocket flap to front and stitch in place. Apply pocket facing to pocket opening. Press and turn. Pin pocket to front and stitch.
9. Topstitch patch pocket and mark the buttonhole placement on the flap. Pin front bodice to back at the shoulders and side seams. Sew and press seam allowances.
10. Prepare Sleeve: Pin the sleeve inset to the opening and stitch. Press and topstitch. Next use a basting stitch to sew and gather along the cap. Sew the sleeve together at seam, press and topstich.
11. Set in sleeves and sew. Use a basting stitch and sew along the bottom back edge. Slightly gather at the waist. Finish pants by sewing along the side seams and inseams. Press and topstitch all seams. Pin bodice to pant at waist and sew.
12. I self drafted my belt loops 2.5″x 1.5″. 7 belt loops in total. 2 on each side in the front. and 1 on each side seam and back. Pin and sew on belt loops. Apply fusible to your belt. Sew belt with right sides facing. Make sure to leave a large enough opening along one side of your belt for turning it right-side-out. Press belt and topstitch.
13. Next, apply the fusible to your placket facings. Pin your placket facings to your front and stitch.
14. Apply fusible to your collar pieces. Pin collar together with right sides facing. Stitch along outside edge. Clip and trim the seam allowance. Turn the collar and press. Beginning at the back, line up notches and pin collar to the neck opening. Sew collar and turn under seam allownce and press. Topstitch your collar.
15. Attach your buttons and sew your button-holes

16. Finish by hemming your pants and that’s it! You’re done!

25 comments
This is super cute!! I can’t wait to sew this up!
Thanks, Kesha! Let us know how yours turns out!
I love this!!! how do you think this would look in a cotton sateen?
A cotton sateen would look lovely!
I love this! I would like to make it a dress instead of pants 🙂 In love with those chest pockets…so cool!
I love this outfit! I am sewing it this weekend!
Hello,
I cut and assembled the pattern. I’m French and the translation is not always good. Are the seam allowances already in the pattern or should they be added. thank you
Yes, 1/2″ seam allowance is already included! 🙂
Hello!
Could you please tell me what size the model in the images is wearing? Also, I noticed that the patterns come in double sizes (e.g. 4/6). Does this mean we make adjustments to the pattern to fit? By the measurements, it looks like I might be size 6-7, which size would you recommend me cutting? Thanks so much.
Hi Eman! You’d likely want to try an 8/10 and taking it in at the sides if needed. I recommend trying it in a muslin first if you’d like to test the fit.
This lights my fire! Thanks SO MUCH for this and the other amazing patterns. They add so much value to purchasing fabrics from Mood. XoXo
You’re so welcome! Thank you for checking out our patterns and fabrics! <3
I tried making this pattern. I thought my measurements matched 16/18 size for the top, but I think I should’ve done 20/22 instead. I also have a longer torso than average (I’m 5’9″ ish), because I had to add about 6 inches of extra fabric to the bodice to make it long enough to connect to the pants. When I try to make this again, I will add at least 6 inches to the bottom of all the bodice pieces from the beginning.
I also tried making this with a black, polka-dot flower patterned fabric. Maybe it was the black fabric, maybe it was the pattern, but it hid a lot of the detail that goes into the bodice, so perhaps this would look better with a lighter color or a plain fabric (like the example).
I’m thinking of making this but I’m concerned that the chest pockets would look ridiculous on my large bust. I might try some inseam pockets in the pants instead.
That sounds like an awesome idea! 🙂
Swoon. This is so stylish. Can’t wait to make this.
Is it size 4/6 in the images?
Yes!
Hi I can’t seem to get the download link to work. It keeps saying network is lost. Is there another way for me to get the pattern please
Hello! If you ever have trouble downloading a pattern, email info@moodfabrics.com and they’ll send it over!
Hello! Question about the pockets – mine are turning out quite a bit smaller than pictured, are you still doing 1/2″ seam allowance for them (especially the pocket flaps)? Also for the pocket body how much do you fold in the edges when you pin and press it?
Hello there!
Thanks for visiting the Mood Sewciety Blog! We’re proud to have released over 350 free sewing patterns, and we hope you’re enjoying them.
Behind the scenes we’re a dedicated team of three, and we want to be able to offer top notch support. We have exciting plans for our patterns on the horizon, and as we continue to grow, we’ve decided to focus our sewist support on patterns from the last 2 years. If this pattern hasn’t been recently reduxed or updated, we won’t be able to respond to technical questions on these older posts.
If you come across any pattern errors, rest assured our team is on it – just let us know!
Don’t miss out on our Mood Sewciety Facebook Group – a fantastic space for fellow sewists to connect, share wins, and tackle challenges together.
Thank you for your understanding and happy sewing!
Best regards,
The Mood Sewciety Blog Team
Hello! Could you please explain more on how to add the placket? Do you pin both pieces to the front? Do you sew them together first and then add them to the front?
Hello there!
Thanks for visiting the Mood Sewciety Blog! We’re proud to have released over 350 free sewing patterns, and we hope you’re enjoying them.
Behind the scenes we’re a dedicated team of three, and we want to be able to offer top notch support. We have exciting plans for our patterns on the horizon, and as we continue to grow, we’ve decided to focus our sewist support on patterns from the last 2 years. If this pattern hasn’t been recently reduxed or updated, we won’t be able to respond to technical questions on these older posts.
If you come across any pattern errors, rest assured our team is on it – just let us know!
Don’t miss out on our Mood Sewciety Facebook Group – a fantastic space for fellow sewists to connect, share wins, and tackle challenges together.
Thank you for your understanding and happy sewing!
Best regards,
The Mood Sewciety Blog Team
Hermoso, me encanta, lo voy a hacer en largo y en short