
Everyone can probably agree that Midge Maisel has a closet worthy of envy. The Maisel Dress free sewing pattern channels her signature LBD for a vintage look that would look stunning in anyone’s wardrobe. Try yours in a luxe satin or sateen or make an office-ready version in a wool suiting! Not a fan of sleeveless silhouettes? Add the Layton Bolero, also inspired by the Prime show, to your sewing list as well!


Purchase Materials Used Below:
- 5-6 yards Italian Blueberry and Charcoal Plaid Wool Suiting
- 5-6 yards Lustro Black Twill Bemberg Lining
- 1 156 Charcoal 24″ Invisible Zipper
- MDF234 – The Maisel Dress Sewing Pattern (free download below!)
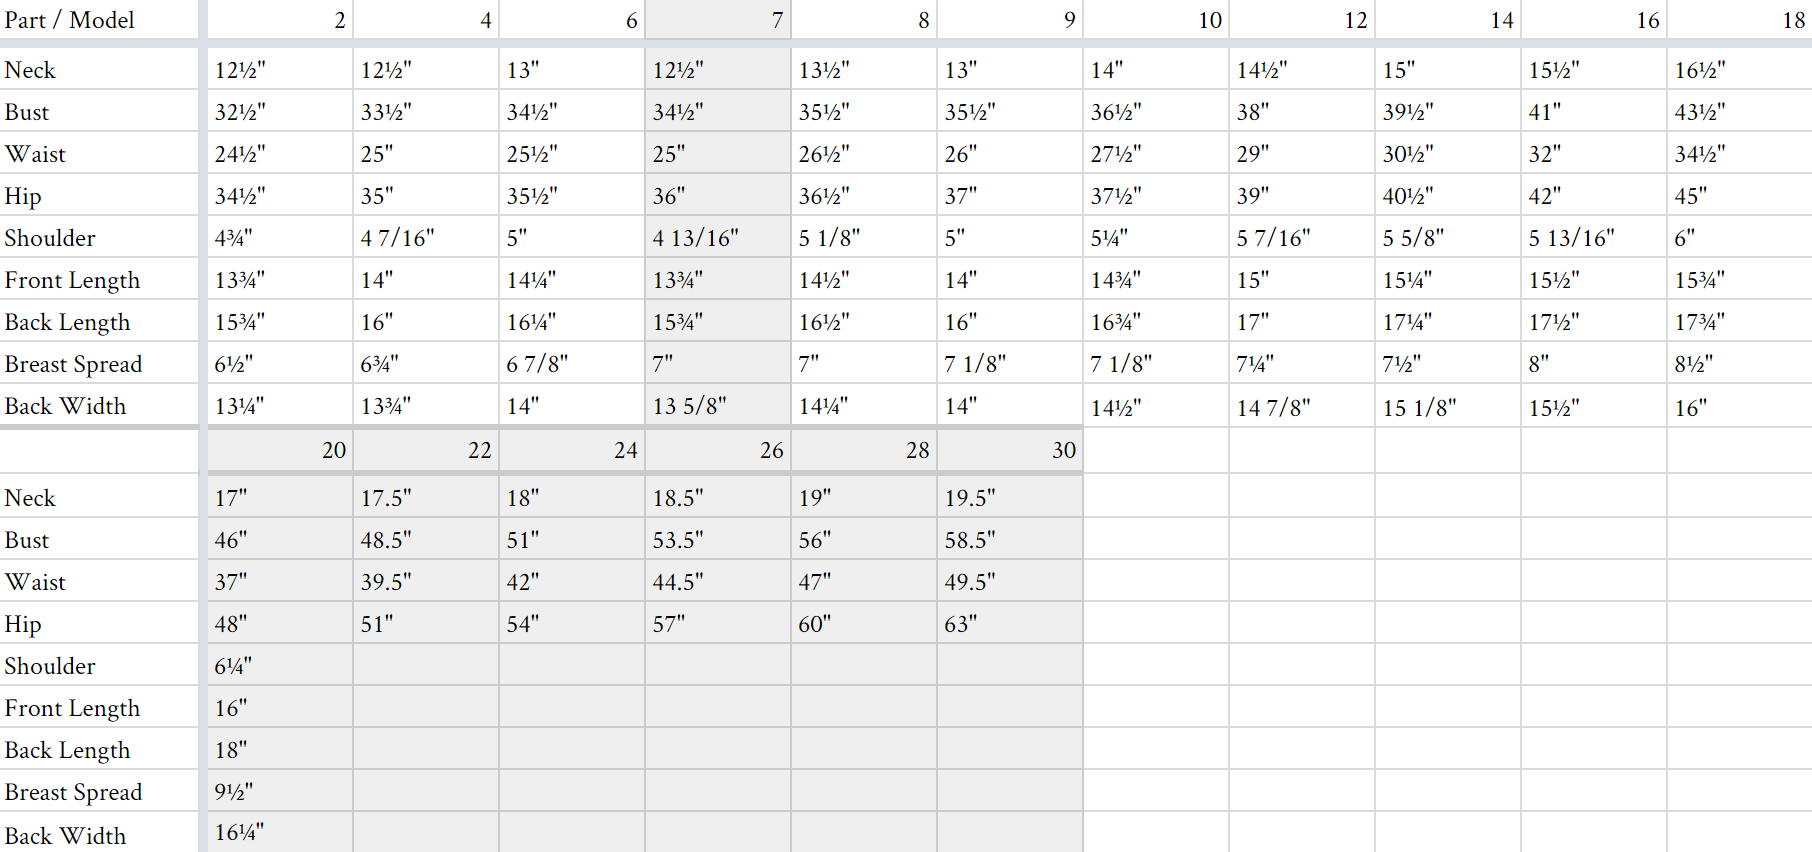
All seam allowances are 1/2″ unless otherwise stated. See chart below for sizing specifications. Note, this specific pattern is available up to a size 30.
Cut your Back Bodice (in self fabric x 2) and mark the dart leg notches and the vanishing point of the dart on the wrong side of the fabric before removing the pattern from those cut pieces.

Using your ruler, draw a guideline from the dart leg notches to the vanishing point as your guideline for sewing the back darts.


For the front bodice piece, mark your dart legs with 1/2″ seam allowance ending at the dart point location to serve as a guideline for sewing the dart.


Optional: Pin your dart perpendicular to the dart sewing line as pictured. Hand baste your darts before running them through the machine. Repeat this for the self fabric bodice front and back darts.


Sew your darts closed using the basting or your chalk guidelines to sew the seam allowance perfectly.

Skirt sewing panel order:
Note: Skirt panels are shown shortened here for easier photographing.
Center back, side back (one notch), side front (two notches), center front, side front (two notches), side back (one notch), center back.

Sew each skirt panel using 1/2″ seam allowance and press open.

Press your bodice darts; front bodice darts pointing towards side seams and back darts pointing towards center back.


Sew side seams of front and back with right sides of fabric facing 1/2″ seam allowance. Press seam allowances open. Repeat the same steps for the lining bodice panels. (*For this sample the navy blue fabric is my lining and the gray pinstripe is my ‘self’ aka outer fabric)


For the straps, sew lengthwise with right sides together 1/2″ seam allowance and turn right side out. Press with the seam side towards the back so it can be hidden against the body when joined to the dress.

After the skirt panels are assembled align each panel seam to its corresponding seam on the bodice, with right sides together. My sample looks like a peplum as I wanted to be sure the fit was perfect and not waste fabric for the skirt panels if I had to make any size adjustments.
View of skirt and bodice pinned, right sides together:

Once the skirt is sewn to the bodice with 1/2″ seam allowance, repeat this step for your lining skirt attached to lining bodice: (My blue wool suiting is serving as my lining, the gray pinstripe suiting is serving as my self fabric)


With right sides (what will become the outside of the garment showing when it is worn) pin along the necklines from center back to center back.

As you approach the back neckline-straps, place your narrow trim piece centered as pictured below to become sandwiched between the self and lining fabrics. To attach the strap to its notch location along the front neckline, you can open the front neckline and place the strap inside at that location with the garment right-sides together, or topstitch in place depending on your desired shoulder strap length.

Pin your zipper with right side of the zipper-tape facing right side of the self-fabric at 1/2″ seam allowance (teeth should be facing in towards the garment, repeat this for the opposite center back seam and maintain that the zipper does not get twisted.


You should have the wrong side of the lining facing you and see the wrong side of the zipper once it is pinned in place. Catch the top of the zipper tape when closing the full length of the neckline seen as pinned:

Attach bodices with 1/2″ seam allowance:

Clip your seam allowance at the shoulder as pictured below so when it is flipped right side out there is no bulkiness in these narrow areas of the neckline.


Clip along both sides of the neckline so you can flip these corners nice and clean to reflect that on the right-side of the garment:


Understitch: Clip your curved seams of the armhole to help release the fabric so it can turn without tension. To complete the understitch, do a topstitch on the lining 1/8″ in from your original stitch line to catch both the lining and self seam allowances which will force the lining to stay inside the garment along the neckline.


Complete your invisible zipper with 1/2″ seam allowance and hem the lining by turning up and topstitching towards the inside of the garment. For the self hem allowance use a baby-roller hem. Top Stitch 1/4″ from the raw edge of the hem and press up towards the inside of the garment, finish with a 1/8″ topstitch and your ‘Maisel Dress’ is complete!
Lace-up Back neckline option:
For an alternative back neckline with rouleau loops, cut your back neckline on a slant from the top edge of center back and slant towards how wide you would like the opening to be.

Create rouleau loops with 1” wide bias strips of self fabric and cut to desired length for each loop, sure to align them on either side of the back neckline.
Attach at 3/8″ seam allowance facing away from the raw seam allowance edge of the fabric, close seam allowance to join lining to self fabric with ½” and under stitch to finish. Then join the invisible zipper to center back and your dress is complete!


29 comments
This is a delightful pattern! So Audrey! And the laced back is lovely
Helen makes it look so easy! Everyone should try because the right teacher makes all the difference
Gorgeous!!!! Thanx for the detailed instructions
Thank you so much for the detailed instructions! Makes all the difference.
I’m almost done attaching facing to lining and I realized in the final finished back view and pattern there is a belt. Was this just a buckle or tie belt? It’s not attached as far as I can tell…
Also and as always, thank you for the free patterns!
When cutting the pattern, I noticed it said on the pattern, Cut “face to face” What does that mean? Does that mean cut piece at a time (not folded) with the right side of the fabric facing up and the pattern facing down?
Hi, Kate! It means the fabric should be folded face to face so you cut two mirrored pieces. 🙂
This is such an amazing dress! I was hoping to add sleeves and was wondering if it was possible and what pattern to use?
Hi Ensley, we’re sorry for the delay in responding to your question! We get dozens of comments and questions each day, and so many questions get buried and, unfortunately, unanswered. We are now focusing user support on patterns 2 years and newer. We hope this will prevent questions on our more current patterns from going unanswered. Although this is late, we wanted to respond in case anyone else has the same question: I would recommend taking a look at our Valli Sleeve Pack and seeing which one would work best!
Hi! I was wondering if the 0.5 inch seam allowance is already included in the pattern when I cut it out, or if I need to cut 0.5 inch away from the pattern?
Thank you for the pattern, it is lovely!
The 1/2″ is already included! 🙂
I just made a mock-up of this and it already looks so good, especially with the bows! Thanks for the pattern.
I’ve been trying to download some other patterns but the link that comes in the email doesn’t lead anywhere, can anyone help me?
Hi, Miranda – sorry for the technical troubles! Some in the past have mentioned that the link doesn’t show correctly in certain browsers, but it seems to work best in Chrome. Hope that helps!
If I want to make the peplum version, how many inches into the skirt should I shorten it?
Hi Rachel! Our peplum was 8″ long. 🙂
Hello! If I’d like to make this into a top, would the darts still be the same?
Hi Kimberly! Yes, the darts would be the same. 😀
I have never sewn an invisible zipper or a lined garment. I found a few tutorials on YouTube that might help others
Style Sew Me
https://youtu.be/mBMsgQ7G764
Professor Pincushion
https://youtu.be/qVYD3s8G8xU
I Can’t Afford That
https://youtu.be/Tmm56QZ2SZU
Hi! It looks like the drawings for the dress have pleats, but not the actual finished garment. Is there a way to use pleats in the skirt?
Hi Beatrice! You can use the pleated skirt from our Oleander Dress Free Sewing Pattern. I think that would look great!
Would a brushed cotton or cotton fabric be suitable for this? If so, would it be needed to add interfacing for structure or would lining be sufficient? I want to make this with a thinner, more breathable fabric for summer wear!
Absolutely, Kaia! I think it would look great in a lighter fabric. I think a lining would be sufficient. 🙂
Hi!
Is it possible to use the top of this and then have a quarter circle skirt? I love the top but looking for a a little more figure hugging bottom, almost like a slip dress bottom. What would you suggest? Thank you! I have a bright pink sateen I am going to use!
Hi Rosalind, yes that would look fabulous! You can either adjust the pattern or use our circle skirt calculator and draft your own. 🙂
Is there a PDF download of the instructions available please?
Using the PDF generator on this page results in a badly formatted doc.
Hi Nathalie, we’re sorry for the delay in responding to your question! We get dozens of comments and questions each day, and so many questions get buried and, unfortunately, unanswered. We are now focusing user support on patterns 2 years and newer. We hope this will prevent questions on our more current patterns from going unanswered. Although this is late, we wanted to respond in case anyone else has the same question: We don’t offer separate downloadable instructions to print, but there are still a few options: you can always just print directly from this page, or copy & paste into a word processor and print from there!
If you guys need summer post ideas, this could be easily altered to look lime the plaid dress in the new Barbie movie trailer! 🙂 (that’s currently my plan!)
Hi, whenever I try to download by putting in my email and name, I never seem to receive the email with the free pattern. Is there another way I could get this patter?
Download Instructions for opening older Mood Fabrics Free Sewing Patterns:
For older patterns, when opening the download link shared to your email, the link opens to a new page which looks like the screenshot below.
Scroll down, then click on the orange box titled “Click here to Download Your Free Sewing Pattern”.
A new tab will open in your browser that will contain the PDF pattern.
If you want to download the pattern to your device, you will need to click on the download icon.
Happy Sewing!
The MoodSewciety Team