
Imagine sitting in the park on a beautiful Fall day, the air is crisp and you’re sipping on a pumkin spice latte. The trees are putting on a spendid show of their leaves changing colors and you are wearing the perfect blouse worthy of several selfies! The Peony Blouse free sewing pattern is a quick and easy sewing project, allowing you to add a fabulous top to your wardrobe in no time. With a surplice neckline, full sleeves and banded bottom, it provides volume while cinching in your waist for a flattering fit. For my top, I used Mood’s Exclusive print Garden of Earthly Delights in poly crepe. It feels amazing and the colors are vibrant and fresh! You could also try using bamboo or velour knit as another option. Where do you plan to wear your blouse? Let us know!


Purchase Materials Used Below:
- 2 yards of Mood Exclusive Garden of Earthly Delights stretch poly crepe.
- MD0260 – The Peony Blouse Sewing Pattern (free download below!)
Alternative Recommended Fabrics:
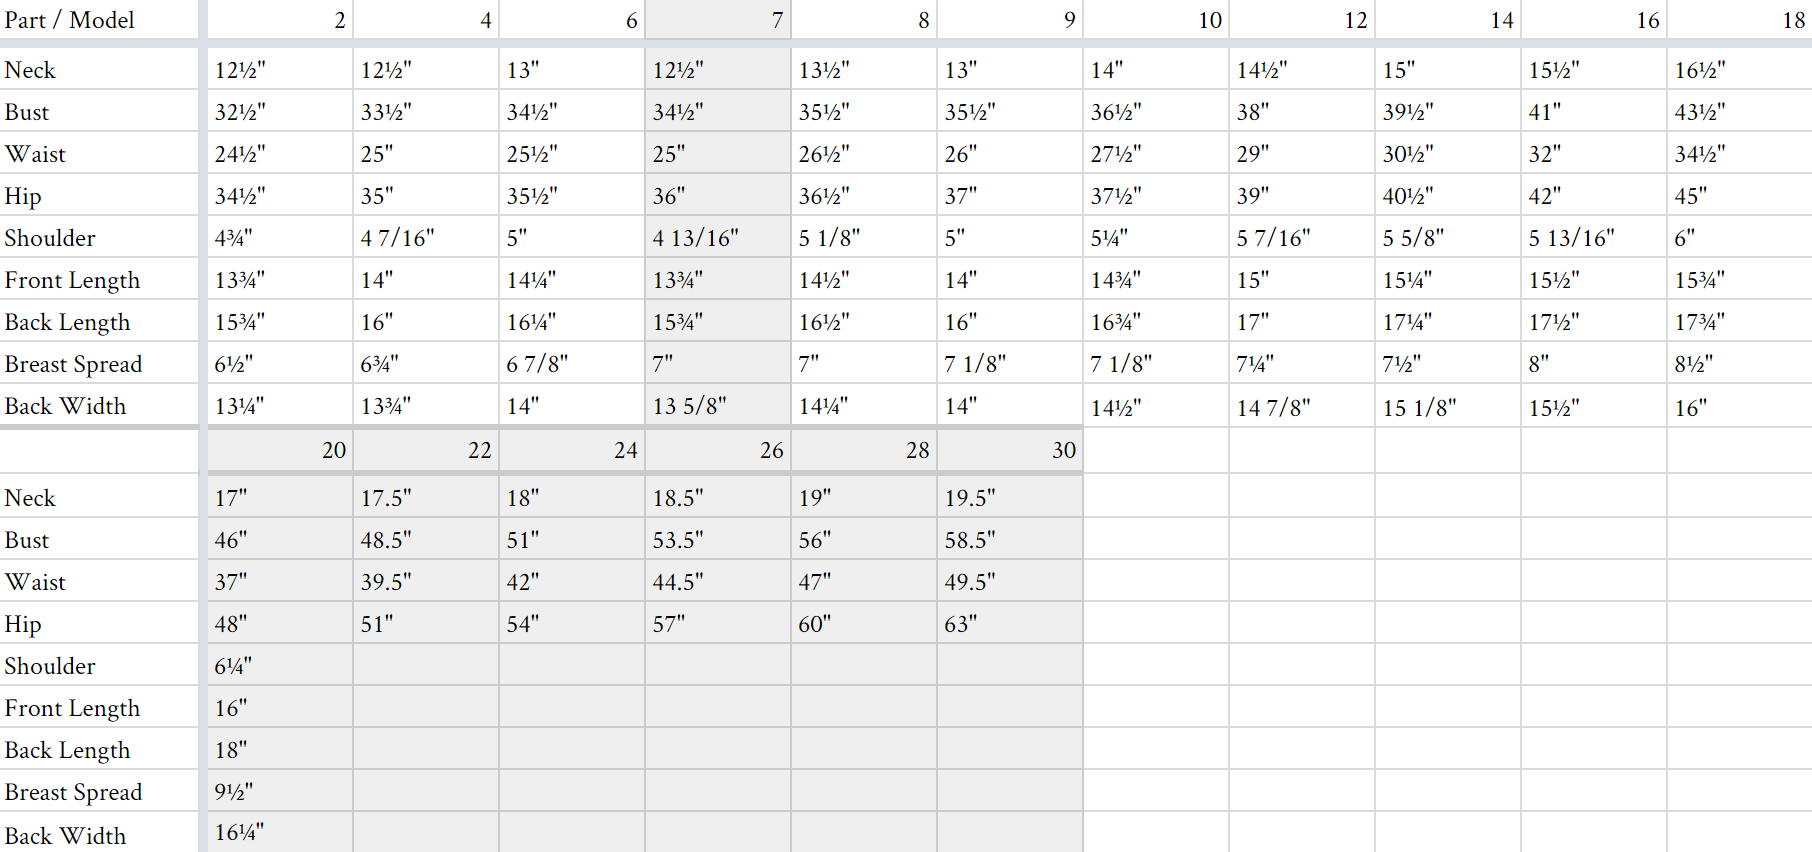
All seam allowances are 1/2″ unless otherwise stated. See chart below for sizing specifications. Note, this specific pattern is available up to a size 30.
Here’s how to sew:
First lay out your pattern pieces to get a visual of how the blouse will look.
Pin your front to your back with wrong sides together because we will be using a French seam to finish our edges. Go ahead and sew together your shoulder seams first.
Next, finish the neckline with a 1/2″ rolled hem before sewing the side seams.
Now, finish your sides seams with a French seam and set aside.
Next, sew in the darts on your your sleeve at the cuff opening. Press the darts once done.
Now fold the sleeve and stitch the underarm seam using a French seam.
Attach the cuff and insert a small strip of elastic before top stitching closed.
Set in your sleeves, stitch in place and press.
The last thing to do is attach your waistband. Before doing that, using a basting stitch, stitch along the bottom edge and slightly gather the waist.
Now pin your waistband to the bottom opening of your blouse and stitch. Top stitch along the inside of the waistband and press.
That’s it! You’re done!

32 comments
Beautiful and looks so easy. I’ll try it, for sure
I love it
Such a lovely and chic pattern!! Do you think i could make this in a silk touch fabric??
Yes, that would look lovely!
The fabric is so beautiful.
Does the garment the model is wearing have shoulder pads in it? They seem rather large and crisp.
Hi Amanda, this version doesn’t have shoulder pads, but you could certainly add some!
Beautiful!
If you added a side invisible zipper, would you be able to make this pattern in a fabric with no stretch?
Yes, you certainly could!
Hii, I want to make this out of a stretch velvet, but i think using a normal stitch would decrease the electricity of the fabric. Do you think using a stretch stich will give me a better result or do you think a normal stitch will be just fine?
Hi Fleur, I would definitely use a stretch stitch. Even though stretch isn’t required for the pattern itself, you wouldn’t want to accidentally pop any stitches when handling your new shirt. 🙂
Hey! 🙂 I was wondering, why do we need to cut 4 pieces for waistband? Because I think that 2 would be just fine to go around my waist
Hi Ola – 2 go around your waist and the other two line the inside. 🙂
Are the sleeve-to-bodice seams finished at all? Based on the instructions it SEEMS like that’ll be the only unfinished seam area, but I just wanted to make sure I’m reading correctly.
Hi Dani! You can finish them with French seams like the rest of the shirt, but they can get a bit tricky around curves. I’d recommend doing a regular seam at the armholes and binding the raw edges with bias tape. 🙂
Just wondering if a poly/spandex knit would work for this?
Yes, it should! 🙂
Just wondering if I could combine the bottom of the Bergenia jumpsuit with this gorgeous top to make a dressy jumpsuit with a higher neckline. I love the Bergenia, but can’t do it’s low neckline.
Hi Susan – I think that would look really great!
Sooo….. where do I get the actual pattern? So many of these free downloads have the instructions, but not the pattern. It’s a little disappointing 🙁 I’m hoping I am just not looking in the right place.
Hi, Stacie! You just fill out your name and email in the dialogue box up in the blog post and it should get sent directly to you. 🙂
Was using velour knit- very pleased with the result! Thanks for the pattern!
Hello, I am sorry but i am trying to print some of your amazing patterns but it don’t works…. the corner’s marks are always not in the corners and i can’t do anything to fix this. Maybe you can help me to fix this?
Hi Cathy, are you printing the pages at 100%?
“Attach the cuff and insert a small strip of elastic before top stitching closed”
This needs to recommend a width of elastic. I kept having to find smaller and smaller elastic to fit this very small cuff. Unfortunately, just googling “how to finish a cuff, how to insert elastic into a cuff” ect was not helpful at all. Theres several ways to do a cuff, I ended up redoing this cuff area several times and still arnt happy with the results.
Hello!
Thank you for your feedback. Most of the instructions on our 350+ patterns, especially these older ones, do reflect their no-cost nature. But we understand your frustration!
Unfortunately we can’t update the instructions on every pattern in our archive, especially if they are over 2 years old, however, if there are errors we will correct them! We encourage you to take a look at the improved in newer patterns, offering more thorough guidance! We appreciate your engagement and invite you to explore these updated options for a better sewing experience!
Many thanks !
Help, I’m confused with what to do with the waistband. The pattern said to cut four pieces but there is no direction for what to do with the four pieces. How to they get attached together? Long edge sewn or short edge? My entire blouse is together and looks amazing but I have no idea how to finish the waist band.
Hello Alison, the reason why the waistband pattern says to cut 4 pieces is because it uses 2 as the main fabric and 2 as the self-facing. join 2 pieces together for the front and 2 pieces together for the back. Pin the 2 pieces right sides together and sew down on one side, across the bottom, and back up the other side. Sew the front and back waistband together at the side seams. The side with the raw edges get pinned and sewn to the gathered waist on the blouse, right sides together with 1/2″ SA.
hi ! il love this model ! Do you think i can make waistband longer ?
Hi Mimi, you can definitely make the waistband longer. Simply add a couple inches to the length of the waistband pattern to accommodate your desired length.