

With October coming to a close, pumpkin spice lattes are getting cold and making way for roaring fires and steaming cocoa. Velvet, one of my favorite winter fabrics, is the perfect option for staying warm and looking gorgeous as the crisper air rolls in. The Vestia Dress free sewing pattern hops on the blazer dress trend with a more relaxed fit and exquisite metal fringe details. Best made with velvet, this easy pattern can also be whipped up with an even comfier velour, a lush 4-ply crepe, or even a loud and proud sequin option!


Purchase Materials Used Below:
- 4 yards Fudge Soft Rayon-Silk Velvet
- Foam Shoulder Pads Covered with Black Polyester – 5.5″ x 3.25″ x .5″
- 35-40 yards Antique Gold Aluminum Metal Chain
- 2 yards White Water Jet Loom Interlining and Fusible
- MDF176 – The Vestia Dress Sewing Pattern (free download below!)
Alternative Recommended Fabrics:
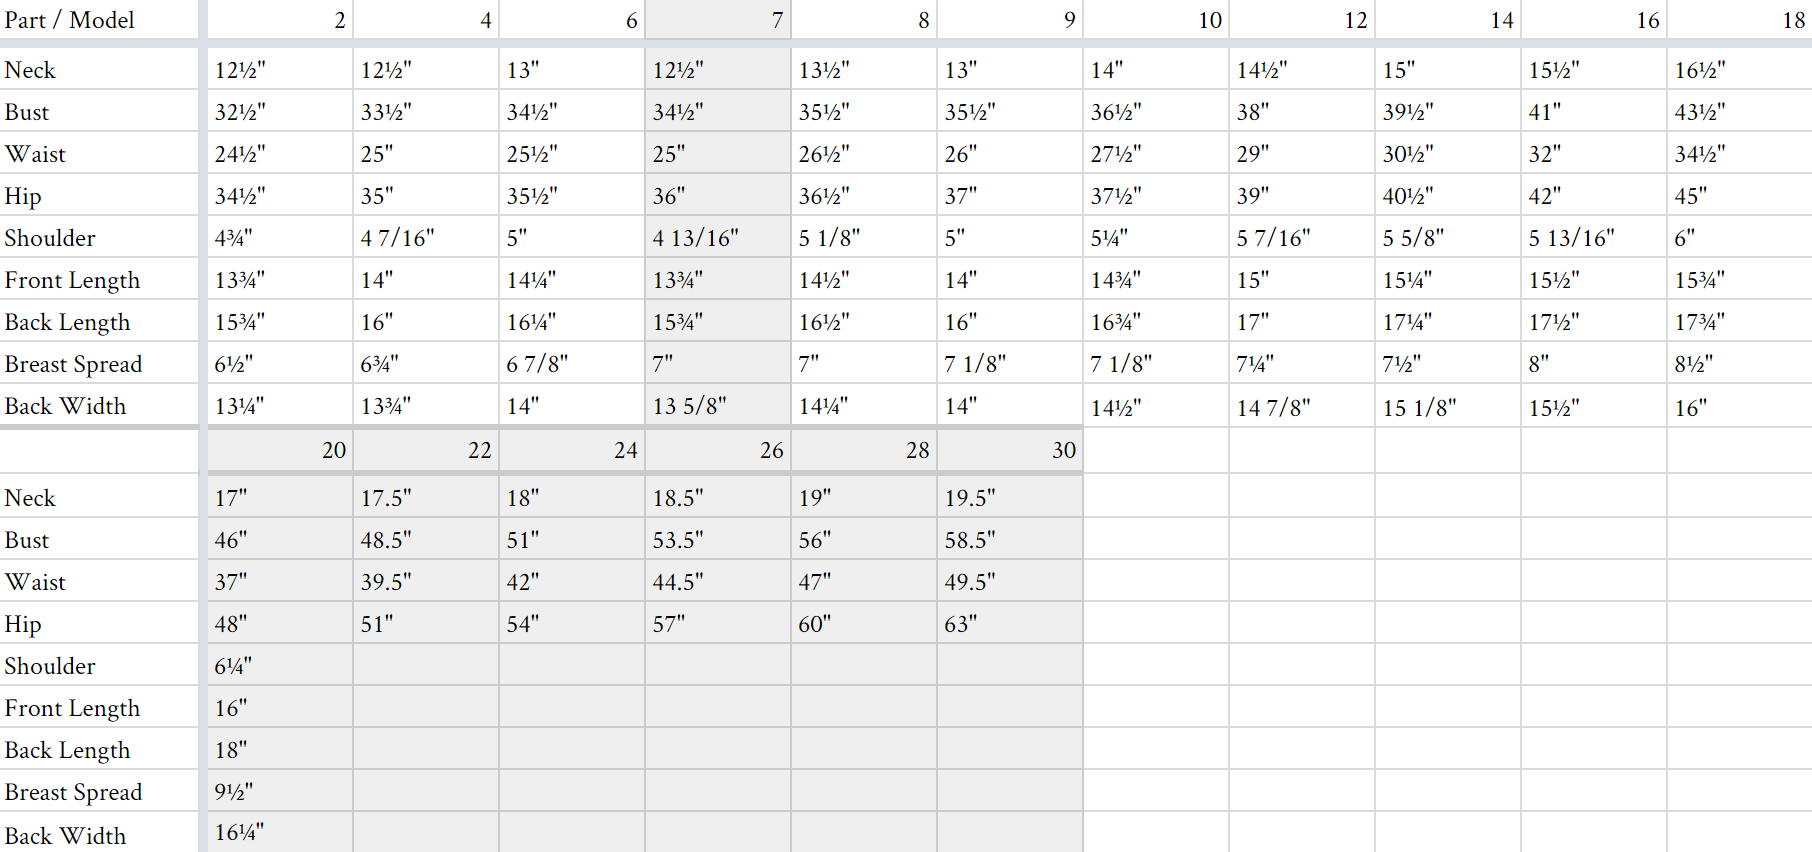
All seam allowances are 1/2″ unless otherwise stated. See chart below for sizing specifications. Note, this specific pattern is available up to a size 30.
Once your pattern is cut out, interface each of your front lapel panels. Sew one layer to your side front pieces, like you see below. Attach your back panel to the fronts at the shoulders and side seams.


Once the bulk of your vest is complete, you can get started on your pockets! Interface each of your pocket panels and then sew two face-to-face along the bottom curve. Clip your seam allowance, turn them right-side-out, and slip-stitch the top closed.
Fold the top inch downward and stitch down as you add a length of chain along the lower edge of the folded portion.


Since your pockets have now taken shape, the fringe can be added!
For mine, I cut the chain into about a hundred 6″ pieces (50 for each pocket). They were then hand-sewn onto the outer curve.
Once your fringe is to your desired level of fullness, the pockets can be top-stitched into place on your vest.


Repeat to add your chain fringe along the upper armsyce of your vest. Add in your shoulder pads, and then you can create your vest facings.
Hem the back facing like you see below and then attach it to the front facings at the shoulders. Sew the facings along the neckline and center front, faces together, and then lightly press inward. Slip-stitch the front facings down along the princess seams.

Hem your vest and then all that’s left is to create the belt! Simply fold the belt piece in half along the length and sew along the two long and one short side. Turn the belt right-side out and slip-stitch the last edge closed. Lightly press and it’s ready to wear!


12 comments
LOVE is in the air … I can see myself in a maxi length … THANKS!!! FIESTA 🙂
Can you do this without shoulder pads?
Yes, you certainly could!
Is the yardage for the metal chain accurate ? 35-40 yards seems like a LOT, that’s all!
Hi there! Each pocket and shoulder used fifty to sixty 6″ pieces of trim; I think about 210 pieces altogether. Personally, I used 35 yards for this project, but that can fluctuate based on sizing and how full you’d like it to be. 🙂
Ok, thank you! Looks great – can’t wait to make this in emerald green !
Love this dress. Unfortunately, I don’t have internet in my house, just my phone.
Could you do this with a fringe trim instead of individual pieces of chain? If so, how many yards of fringe would it likely take?
Hi Sarah, you certainly could! You’d likely need less than 2 yards. 🙂
Hi Courtney Norris
This is my 1st Mood MDF
Very excited to get started.. This will be a gift for my niece.
Thank you,
I cannot send this pattern to my e-mail address, help! Is this pattern for The Vestia Dress still available?
Thank you so much! If you’re still having trouble you can email info@moodfabrics.com and they’ll send the pattern directly to you!