
Just before we rounded the corner on a new decade, Pantone announced Classic Blue as their Color of the Year for 2020, sending the social media-sphere into a frenzy. Reminiscent of their first ever Color of the Year announcement of Cerulean, Classic Blue oozes feelings of comfort, nostalgia, and the serene, but that doesn’t mean it can’t pop.
As soon as the announcement dropped, I wanted something funky and vibrant. The Bayberry Coat is just that; with 3/4 sleeves perfect for showing off some chunky bracelets and contrast panels that would be perfect for color-blocking, this free sewing pattern can lend itself to any trend you’re currently obsessed with. Follow our lead with some moire paired with a luxe velvet, or get even bolder with a metallic brocade and your favorite faux fur!


Purchase Materials Used Below:
- 3 yards Ultra Royal Polyester Moire Bengaline
- 3 yards Italian Black Rectangular Quilted Stretch Knit
- 1 yard Estate Blue Polyester Velvet
- 1 yard Gray Stretch One Sided Fleece-Backed Knit
- MDF182 – The Bayberry Coat Sewing Pattern (free download below!)
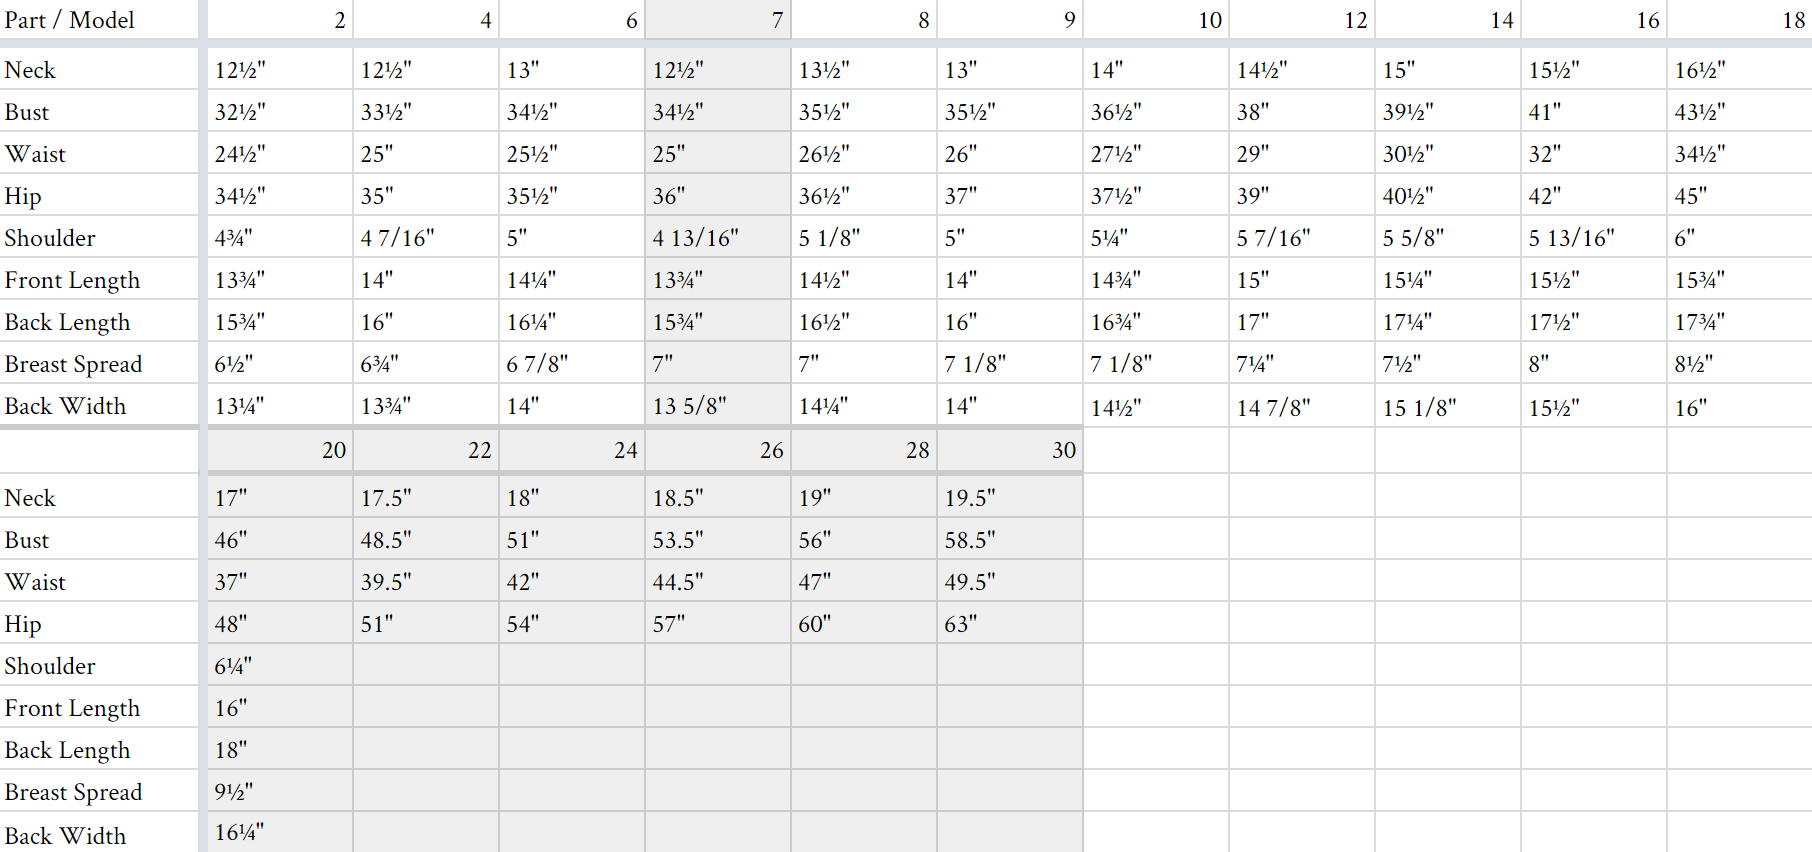
All seam allowances are 1/2″ unless otherwise stated. See chart below for sizing specifications. Note, this specific pattern is available up to a size 30.
First, create your pocket flaps by folding each piece in half and sewing up the sides with the fabric face together. Turn right side out and press.
Next, attach your pocket welt along the top of the pocket lining like you see in the lower image on the right.


Place each pocket flap along the pocket guideline on your front coat panels. The faces should be together and the flap should lay as if it’s flipped upwards on your jacket.
Face down, place your pocket welt/lining over your flap and pin into place. The welt should overlap the bottom of your flap 1.5″.


Sew a 1/2″ tall rectangle through all three layers, like you see below, and cut a slit through the center of it as well as out toward the corners.


Flip the welt and lining in toward the inside of your coat and press. Fold the welt in half up toward the top of the pocket opening and press into place.
Fold the entire lining up to align with the top of the pocket facing and sew up the sides and top, sewing through the lining and welt.


Next, sew each dart into your front coat panel and press open.
On your lining layer, the dart is omitted by the fact that the front portion of your lining is comprised of the side front and the front facing; attach them with the faces together.
Once the front bits of both your lining and main layer, they can each be connected to their respective back panels at the shoulders and side seams. Be sure to press open your seam allowances. (Since my lining was so bulky, I top-stitched the seam allowance down.)

Create each of your sleeves and set them into their respective armscye. Be sure to match up the notches to ensure a smooth seam. Repeat with your lining layer.

For the contrast parts that I made with velvet, I also interlined each piece with fleece for extra insulation as well as volume.
For the collar, I sewed the velvet and fleece collar pieces together along the top edge, clipped the seam allowance, turned it right side out and then attached it to the neckline of the main layer of the coat.


Your sleeve cuffs, as well as the hem cuff, can be made similarly, folded in half, and then sewn to the bottom of your sleeves and coat.

Lastly, attach your lining to your coat along the lapels, neckline and center front. Turn your coat right side out, and slip-stitch the bottom edge and sleeve hems of your lining down.
Your coat is ready to wear! For added warmth, you could also add some covered buttons or snaps along the center front opening of your coat.


4 comments
Hello! If I wanted to create this coat from only one type of fabric, would that require 5 yards (not including the lining)? Apologies if this is an obvious thing to know; I’m a semi-beginner when it comes to fabric types and it’s a bit difficult for me to see the difference in the pictures provided. Thank you for your help!
Hi, Deux! I think you’d be find with just 4 yards, unless it’s a directional fabric – then you might want to get some extra just in case. 🙂
Hi, is it possible to use a non-stretch tissue for the coat ? Thank!
Hi Yasmine, we’re sorry for the delay in responding to your question! We get dozens of comments and questions each day, and so many questions get buried and, unfortunately, unanswered. We are now focusing user support on patterns 2 years and newer. We hope this will prevent questions on our more current patterns from going unanswered. Although this is late, we wanted to respond in case anyone else has the same question: Yes! It is possible to use a non-stretch for this coat. Happy Sewing 🙂