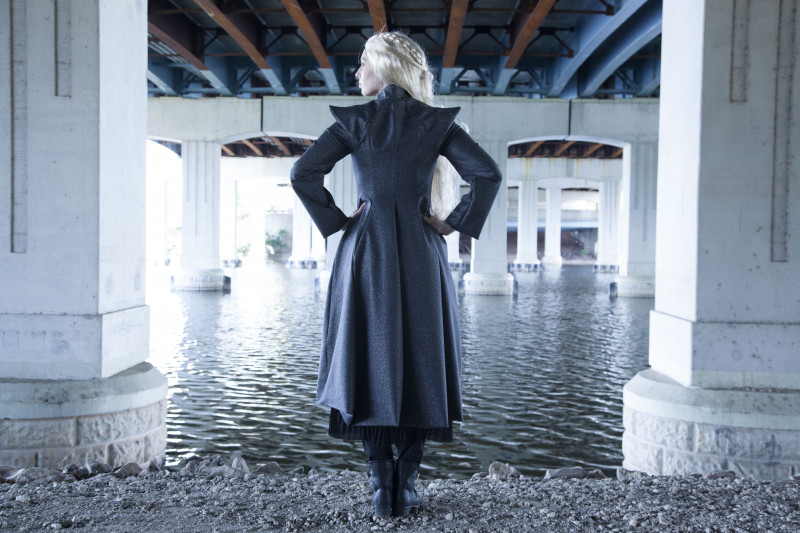
 Season 7 of the much-loved Game of Thrones series is coming to a close tonight and I am beyond excited, terrified, and a little sad that I’ll need to wait at least a year to know the conclusion of whatever cliffhanger the showrunners leave us with tonight. For anyone who might go through some show withdrawal, I recommend making a Daenerys-inspired jacket with this free template!
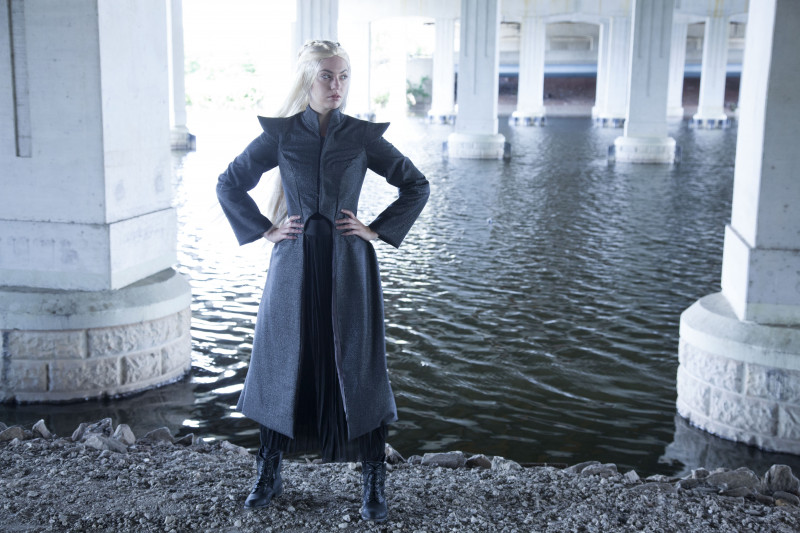
Fabrics & materials used:
- 4 yards Theory Metallic Silver/Charcoal Blended Suiting
- 4 yards Medium Gray Polyester Lining
- 1 yard Black Water Jet Loom Fusible Interfacing
- 1/2 yard Natural and Gold Snap Tape
- 1/2 yard Black Fabric Covered Boning
- MDF015 – The Atlas Sewing Pattern (free download below!)
 Unfortunately, this isn’t a full pattern with multiple sizes, but I do hope that the template can help get people started on this project! It was made for a 34″ bust and 28″ waist, but always make a muslin and do a fitting before getting started with your real fabric. Also, please note that this template does not include seam allowance.
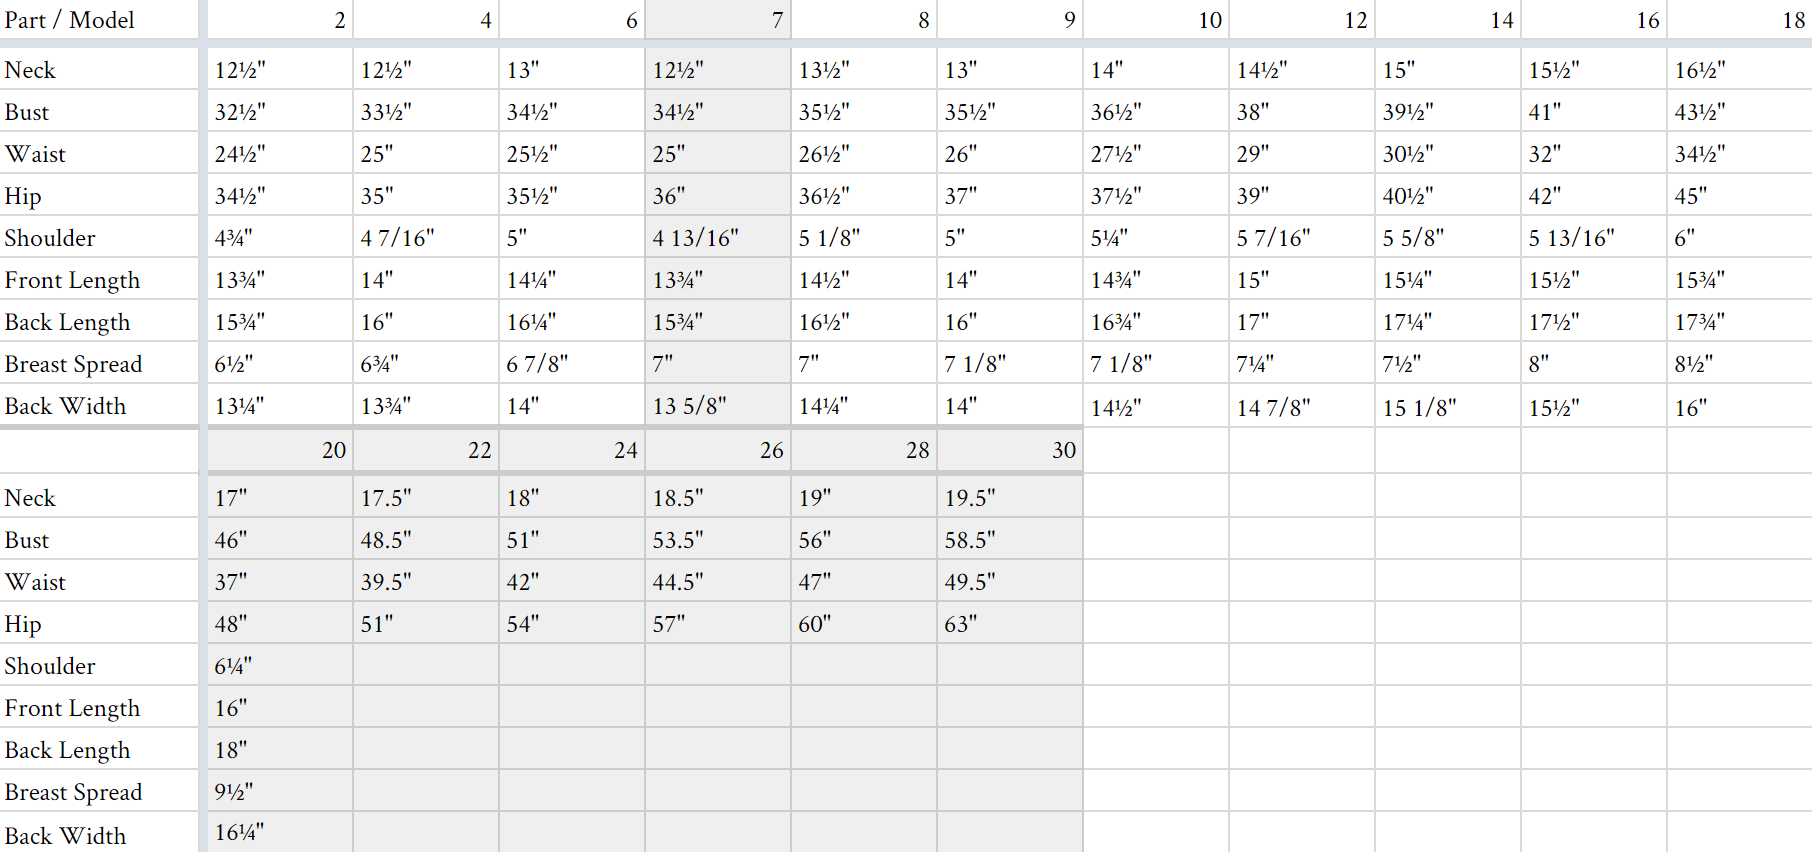
UPDATE: This pattern is now available up to size 24! We still always recommend making a muslin before cutting into your final fabric, but we hope this helps you get started! Note, this pattern now includes a 1/2″ seam allowance unless otherwise stated.
To start, interface the following pattern pieces: 1, 7, 8, 9, 10, and 11.
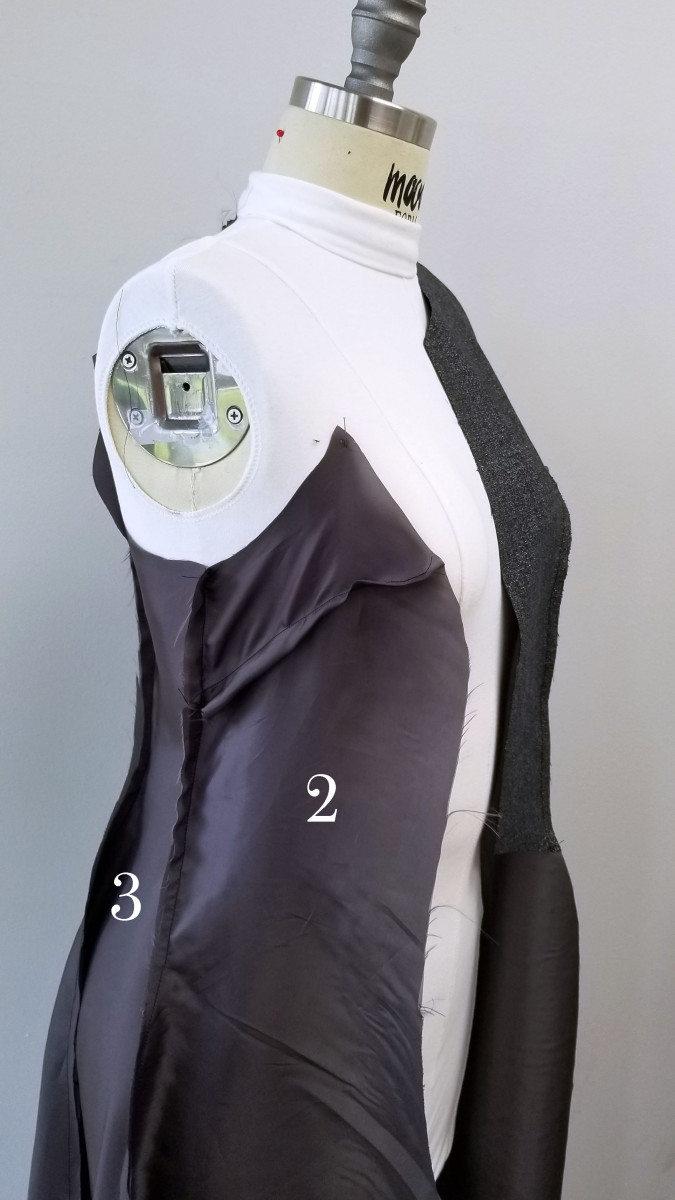 Next, I recommend getting started on your lining first. Follow the dotted lines to add a dart to each of your side front (#2) pieces, like you see above.
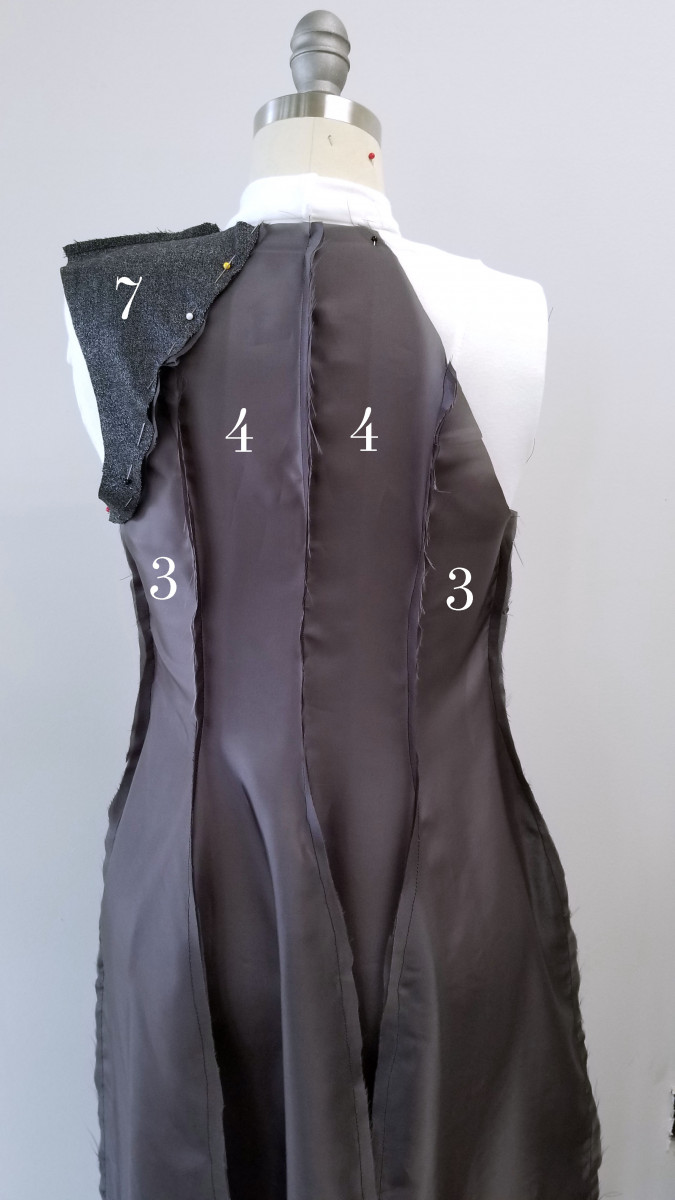 The main body of the jacket goes together pretty easily, with pieces #2 and #3 attaching at the sides, and #3 meeting with #4. The front bodice lining (#6) can also be sewn along the curved side of #2, like below. Attach piece #7 at the shoulders.
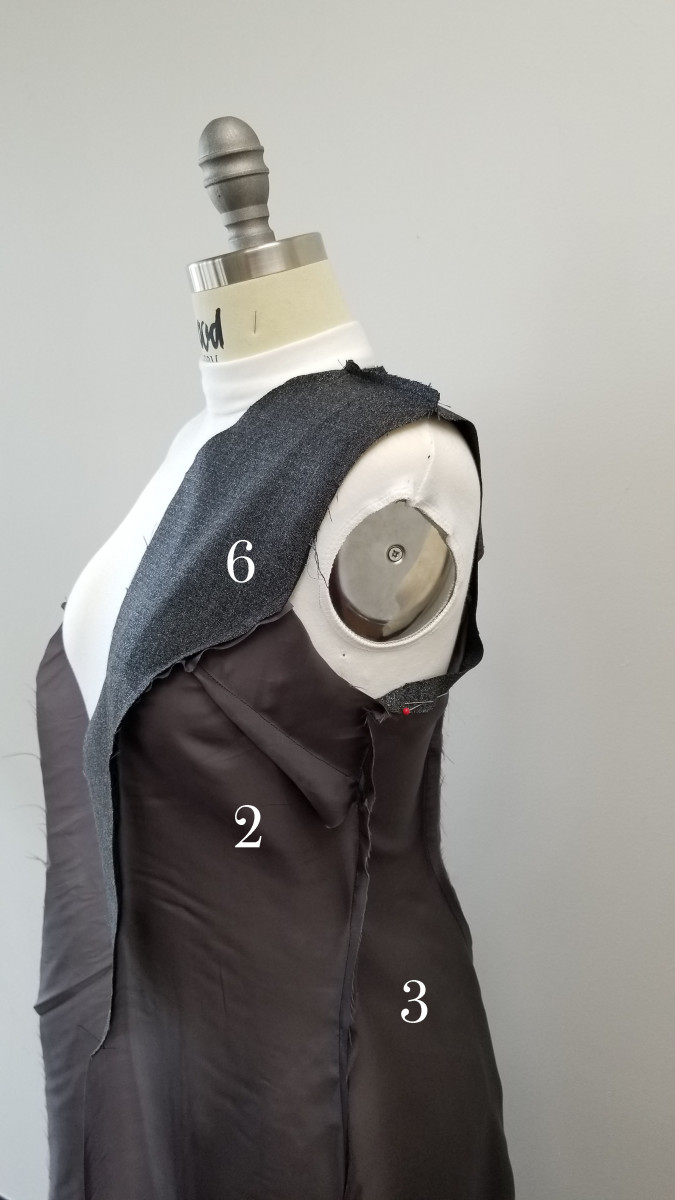
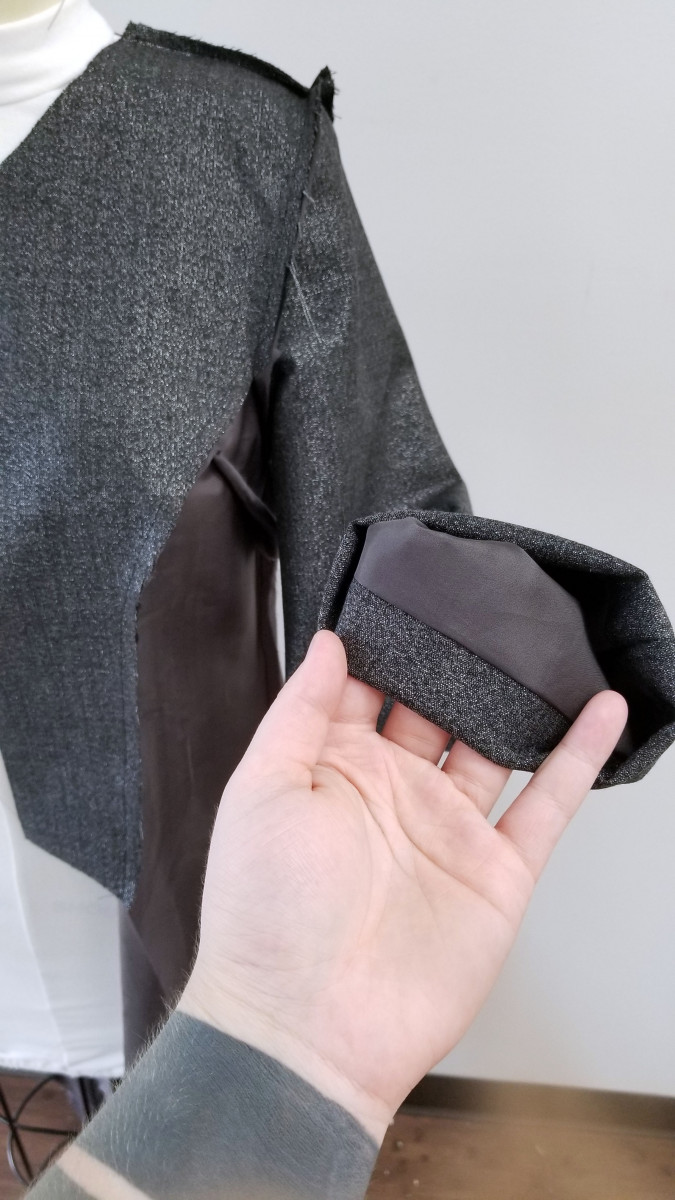
At this point, you’ll essentially have a long vest happening. You’ll need to add sleeves! Sew each of your sleeve pieces up the sides to form tubes, both with your main fabric and lining fabric. Then, sew the lining to the fabric at the wrists, turn right side out, and press. The sleeve can then be attached to the shoulder of your lining.
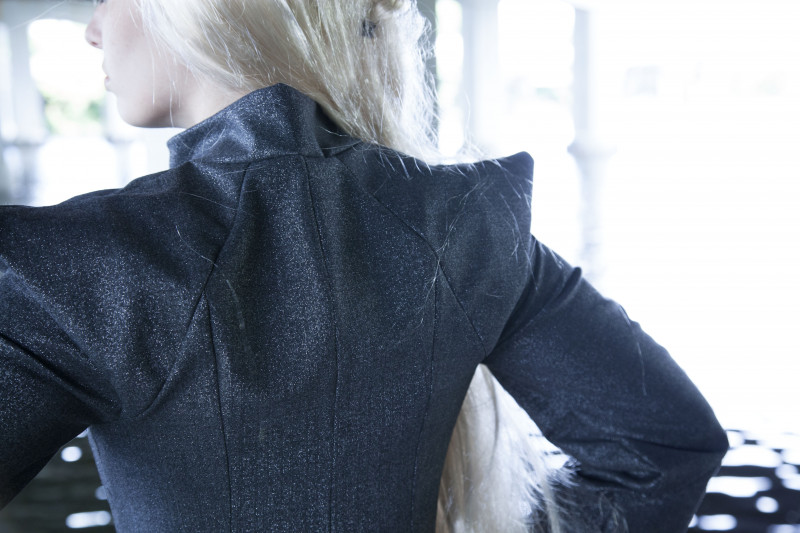
To hide the top half of the sleeve seams at the shoulder, sew pieces #8 and #11 together and then onto the shoulder of your jacket.
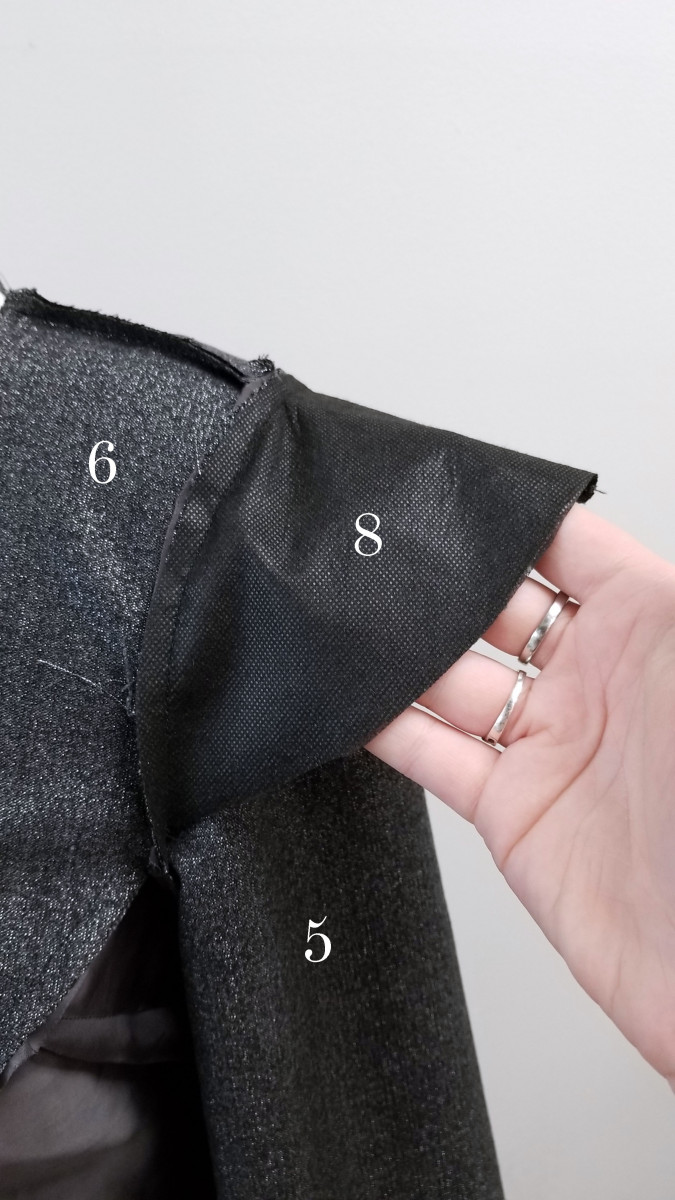
Before shaping the shoulders, add one of the collar pieces to the neckline of the jacket.
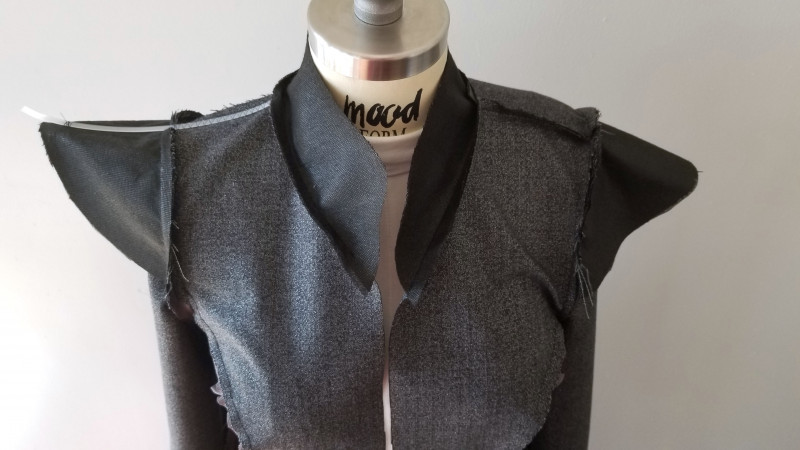
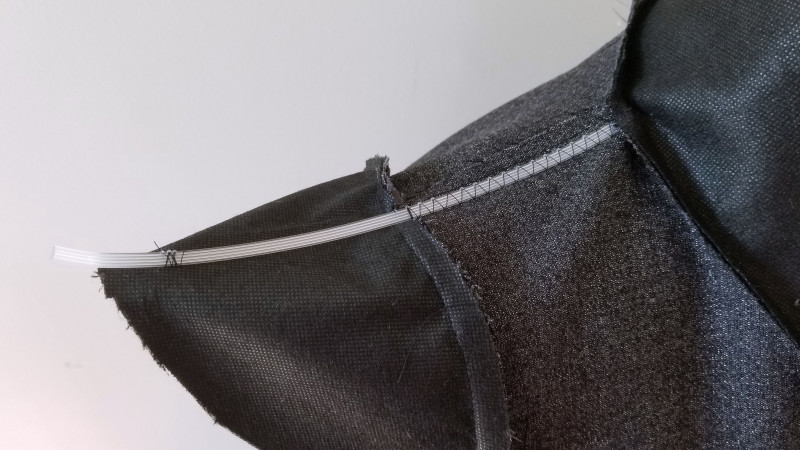
A few inches of boning sewn in at the seams of the shoulders creates the perfect shape for Daenerys’ jacket. I chose to take the fabric covering off to reduce bulk, and used a zig-zag stitch to keep it in place.
The outer layer of the jacket goes together much easier; no sleeves, no boning, and much fewer pattern pieces to work with. Essentially, you’ll follow the first few steps of putting together the lining, but use pieces #1, #2, #3, and #4.
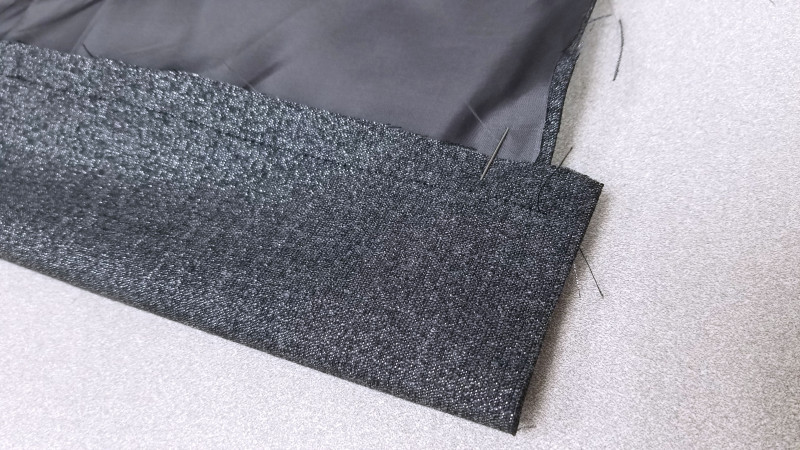 Cut about 2″ from the bottom of your lining and place the right sides of your hems together. Sew the lining to the outer layer along the hem.
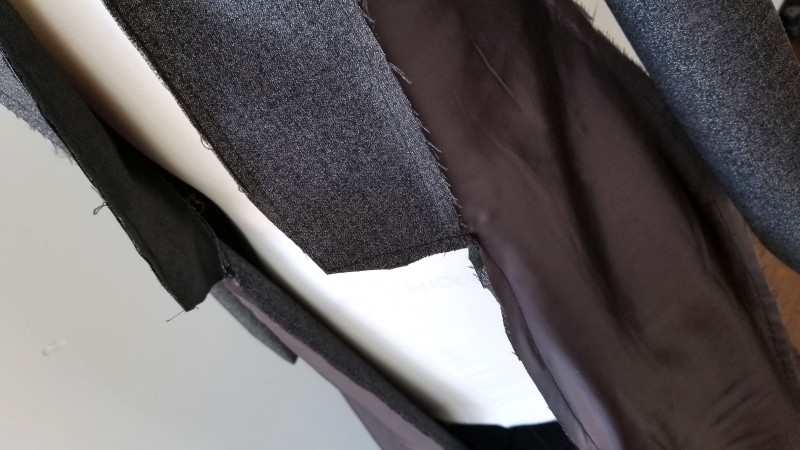 Next, line up the remainder of your jacket with the lining, sew along the entire length as well as the lapels and collar. The only openings left should now be your two armholes. Pull your jacket right side out through one of the armholes and slip-stitch them both closed.
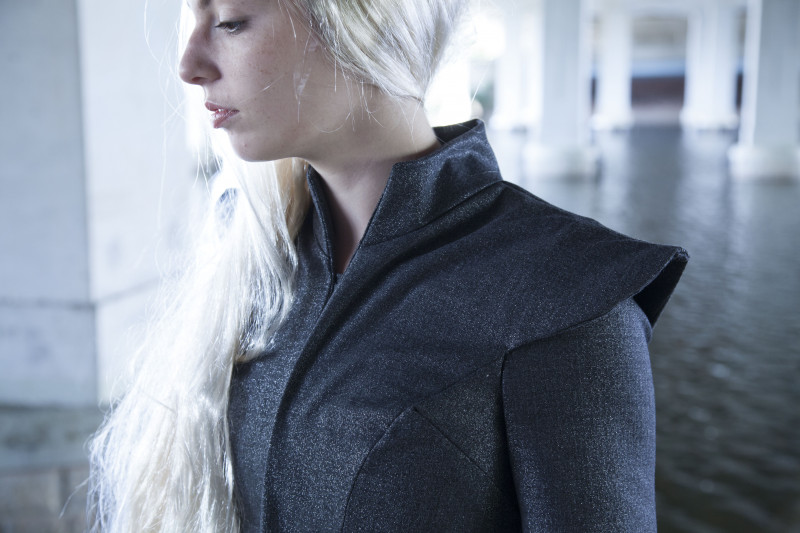 Your jacket should now be (relatively) complete! There are a few options for keeping your jacket closed. Personally, I added a 4″ wide rectangle down the inside of the front of the jacket, extending a couple inches out. On the extension, I sewed on some snap tape and attached it to the inside of the opposite front bodice piece.
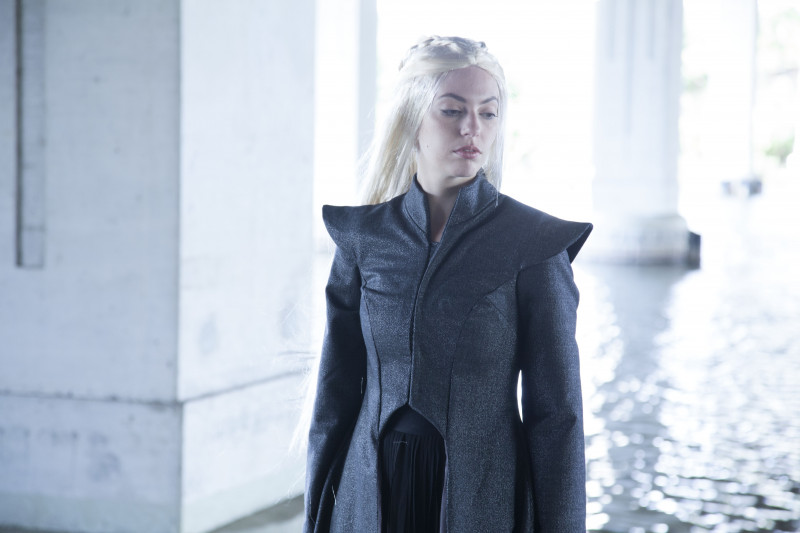 All in all, I’m a little in love with the way this came out. Mood even had the perfect pleated chiffon to complete a fairly screen accurate version of one of Daenerys’ outfits in season 7.
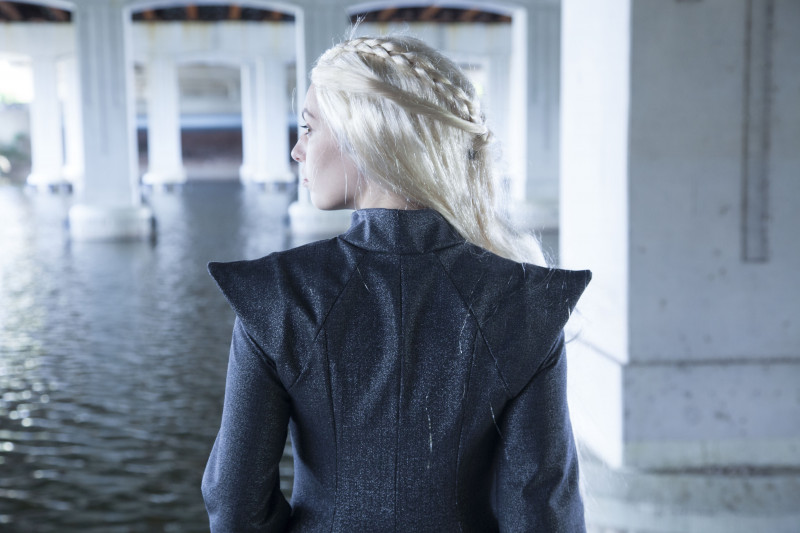
Will you be making your own jacket? Be sure to tag Mood on Instagram and use #madewithmood!

57 comments
Just double checking the original measurements because the model’s bust looks larger than her waist – is it really made for a 34B and 38W? Thanks.
So sorry, it’s a 28W. Thank you so much for the catch!!
I wish the steps were easily printable. I’ll have to copy and paste to keep with the pattern. TY
Where does piece 10 go?
Hi! Those are the back shoulder pieces. They go on the outer layer of your jacket, so they’ll be cut from your main fabric. You can see them in the last photo on the blog. 🙂
This is amazing, not sure my sewing skills are up for the challenge. Do you sell/ make custom?
What size paper am I suppose to print this on?
This is designed for US Letter size.
This is amazing! I was researching for a pattern like that since some weeks. It comes a bit tight on my bust, but I’m sure that I’ll be able to add the missing 2 inches larger there 🙂 Currently I’m working on Daenerys’ blue dragonscale dress.
Hi, does this need to be shrunk to fit the letter size paper? It shows up as a 8.3×11.7 file. Can’t wait to make this jacket, thank you!
Yes, I fit mine to the page when I printed it out. Be sure to make a muslin first to make sure the template fits your size/shape!
Definitely, I need to do an FBA so I will need to make a muslin first.
I also need to figure out how you attached the shoulders/sleeve part. It’s a little confusing to me at the moment. Thanks for the info!
Hello Courtney, I want to start with a big super thank you for posting this!! I was 100% lost and now I have my muslin fitting almost done with your help.
I wanted to ask about the process for the outer pieces to the lining I am just a bit lost on one I have 1 and 10 sewn together where do I sew the top of 2 ? To the raw sleeve seam ?
I am not very great at sewing so maybe I am just missing some fundamentals on the whole inside out part.
Thank you again,
Molly
Hi! No problem at all, thank you so much for checking it out!
Yes, the top of two will be sewn where the sleeve meets the lining. I tucked the raw edges inside and slip-stitched all the way around so you can’t see any edges.
I did the same around the whole extended shoulder, attaching the outer jacket to the lining.
Let me know if that helps, or if you need anything else explained better! It was tricky to get all my steps out of my head and into a blog!
Hi Courtney,
This is exactly what I needed 🙂
Thank you so much for this.
The added pictures are so helpful.
Thank you again <3
Molly
How do you keep the jacket closed? is there a zipper somewhere? How do you get it on?
Hi! There are a few options for keeping your jacket closed. Personally, I added a 4″ wide rectangle down the inside of the front of the jacket, extending a couple inches out. On the extension, I sewed on some snap tape and attached it to the inside of the opposite front bodice piece.
Hi Courtney, I’m a beginner in sewing and I’m taking this on for a Halloween party tomorrow. yikes! Last night I taped the pattern together and cut out the pieces. I can’t tell if they already include seam allowance. I am exactly the measurements that you listed above (34″/28″). Do I need to add seam allowance or just cut my fabric exactly the shape of the pattern pieces? Thanks!
Oh, man – I wish you luck!! These do not include seam allowance, so I would definitely add some in. I hope you finish in time – let me know how it goes!
I’m a little confused about the shoulder part with the boning, probably because I’m a complete noob about sewing. Am I correct that for the majority of the photos, including the one showing the boning, the jacket is inside out? If so, how does the shoulder piece come through when you turn the jacket outside in?
Hello! Most of the photos are showing the lining layer, so the boning is sewn into the lining. When you attach the outer layer, it gets turned right-side-out through the armhole and then slip-stitched around the armhole/shoulder. Let me know if that makes sense!
First of all – you’re amazing for answering all these questions and I super appreciate it! I guess I’m confused about what directions things are facing in. Tell me where my visual is incorrect: So the lining is sewn and placed on a dress form or whatever with the edges of the seams facing outwards. You basically make the entire jacket like this with the lining material first, always having the edges of the seams facing outwards like in the first couple photos. There are a few pieces that don’t have linings – rather you take your fancy fabric and interface it to make it stronger, like the collar. Then you sew sleeves in a layered fashion of fancy fabric with lining fabric on top, with the seams outwards, resulting in an inside-out sleeve. Then you pull the sleeve right side out, so the edges of the seams are inwards, looking like an everyday jacket sleeve with the fancy fabric on the outside and the lining on the inside. You then fully attach that normal-looking sleeve to your lining where everything else has seams outwards – or do you only sew the top half of the sleeve to the top half of the arm opening? You sew pieces #8 and #11 together (in fancy fabric, but with the back of the fancy fabric facing outwards) and attach on top of the shoulder. You sew the jacket again using pieces #1-4 in your fancy fabric, then sew #10 to it as well (connecting 1 and 10 together at this point) and then match up it’s outwards seams with the lining’s outward seams, essentially covering the unfinished-looking outward seam side of the lining with the unfinished-looking outward seam side of the fancy fabric jacket so the two unfinished-looking outward seam sides touch one another. You sew …..only around the perimeter of the jacket (?) to secure the two layers together, like a sandwich? Why would need to pull anything through an armhole at that point? Isn’t piece #1 and 10 of your fancy fabric layer already over the boning at that point so nothing has to go through armholes? Sorry for the long comment; I hope my description of how I’m imagining this is understandable and you can figure out where I’m going wrong!
Hi, ^^ I am sporry for bothering. I am french and I didn’t understand the shoulder part when you have to sew the fabric to the lining.
Did you to the whole assembly of the final armhole by handstich?
Thank you very much^^
Hi! Yes, bottom of the armhole and the shoulder extension get slip-stitched closed by hand.
Thanks for posting such an awesome tutorial. When I assemble the pattern pieces do I just like up the edges of the paper or do I need to trim the edges before joining the pieces?
Hello! These pattern pieces don’t include seam allowances, so you’ll need to add a bit extra when you cut them out.
Hello. Thank you for such a great pattern and tutorial! Could you advise as to what the listed measurements are? I am unsure of where to measure for front/back length and for breast spread. Could you also tell me if the shoulder measurement is in reference to circumference around the wearers shoulders or is it the span of the jacket with the extended shoulders?
Thanks so much
Hello! The sizes are based on our Mood brand dress forms, so they are body measurements not finished garment measurements.
I am working on this now, but I am a little lost with the shoulders. I am making this dress without the lining. How do I attach piece 7 to the back shoulder?
Thanks!
Hi there! I’m not quite sure how the structure of the shoulder will work without the lining since the sleeve is pretty dependent on it, but if you’re definitely skipping it then you shouldn’t need piece #7 at all.
I am so excited about this pattern! I have just requested the download and can’t wait to make it. I’m an avid Game of Thrones fan and have some fabric that will be perfect for this. Thanks so much!
Hello! I just started to cut my lining but the piece 7 and 8 kinda confused me. Do I cut them from my main fabric or from the lining?
Hi! Those are cut from your main fabric.
And the front bodice lining is also cut from the main fabric? Right?
Thank you SO MUCH for this!!
Hello! So excited to have found this pattern, I am in the middle of putting together a muslin and am really struggling with some things regarding the sleeves. Do you sew both lining and outer fabric to the entire arm opening, or do you leave the armpit area open until later? Also how do pieces 8 and 11 fit together? There are no pictures of 11 on the blog! I would really appreciate a steo by step breakdown of the arm and shoulder area, it seems like a lot of other people have struggled with this too. Thank you!
Hi Rachel,
Thank you so much for your interest! We went ahead and updated the pattern image so that all pieces are shown (Good Catch!)
Unfortunately the owner of this blog post is no longer in house, but we are working on getting the answer to your question as soon as possible. Please stay tuned for updates!
Thanks for your patience!
Thank you! I’ll be waiting patiently 🙂
Hey there, I’m confused about piece 7… if I put together pieces 3 and 4, piece 7 doesn’t fit to the back! It isn’t long enough 🙁
Don’t know if this will help but I think the long end of seven is supposed to end up curving under your armpit
I think so too. I found my piece to be about 2 inches to short so I cut it on an angle to fit my sleeve to. I also found that my sleeve was 13cm too short for my armhole. I didn’t mind that as I have fat arms. I have now found out that the collar is about 2 inches to short. I have loads of adjustments to make. But it is nice having a pattern to work from as I was dreading making my own.
Hi there! I can’t seem to be able to download the pattern 🙁
Sorry for the inconvenience! The issue should be fixed now, but please let me know if it still gives you any trouble.
Is the a pattern for the shift under the coat?
Hi there! It’s actually just a skirt made with our pleated chiffon. We have a tutorial with our pleated satin, which you can find here!
Thank you very much for all your time, detail and efforts.
Hello, thanks for this great pattern. Please could i ask about the size chart you have on here, is that the body measurements, or the expected finished garment measurements? Many thanks!
That is body measurements, based on our Mood dress forms. 🙂
Lovely, thank you very much indeed 🙂 <3
I had so much trouble putting this coat together, and the end result had the strangest fit. My measurements are approx B38″/W31″/H40″ which means size 14/16 fits nice according to the chart, but it is too tight at the back (Pulling my shoulder blades in), it is suffocating my arms and is huge at the waist and hip (I’m talking 5-7 inches too big around the waist and hip area, maybe 2 inches at the bust).
I know I have an “athletic” physique but I have still followed the size chart, cut the pattern correctly and sewn with the right SA’s and somehow the end result fits almost like a 40″42″44″ (I haven’t actually measured, it is a guess based on how it fits), I do not understand how it happened and was hoping you had any suggestions so I can try again?
Hello there!
Thanks for visiting the Mood Sewciety Blog! We’re proud to have released over 350 free sewing patterns, and we hope you’re enjoying them.
Behind the scenes we’re a dedicated team of three, and we want to be able to offer top notch support. We have exciting plans for our patterns on the horizon, and as we continue to grow, we’ve decided to focus our sewist support on patterns from the last 2 years. If this pattern hasn’t been recently reduxed or updated, we won’t be able to respond to technical questions on these older posts.
If you come across any pattern errors, rest assured our team is on it – just let us know!
Don’t miss out on our Mood Sewciety Facebook Group – a fantastic space for fellow sewists to connect, share wins, and tackle challenges together.
Thank you for your understanding and happy sewing!
Best regards,
The Mood Sewciety Blog Team
How do I download this pattern? I can’t find a button or place anywhere
Hi Grace, the download link will be sent to you after you fill out the form “Download Your Free Pattern”. The link seems to be working on our end, but if you’re still having trouble you can email info@moodfabrics.com and they’ll send the pattern directly to you!
I know this is older, but I cannot for the life of me figure out how piece 11 fits in. I wish there were markings for the shoulder pieces showing how it attaches to make it easier.
Hello Brittany,
Thanks for visiting the Mood Sewciety Blog! We’re proud to have released over 350 free sewing patterns, and we hope you’re enjoying them.
Behind the scenes we’re a dedicated team of three, and we want to be able to offer top notch support. We have exciting plans for our patterns on the horizon, and as we continue to grow, we’ve decided to focus our sewist support on patterns from the last 2 years. If this pattern hasn’t been recently reduxed or updated, we won’t be able to respond to technical questions on these older posts.
If you come across any pattern errors, rest assured our team is on it – just let us know!
Don’t miss out on our Mood Sewciety Facebook Group – a fantastic space for fellow sewists to connect, share wins, and tackle challenges together.
Thank you for your understanding and happy sewing!
Hello, I would like help with the pattern it’s super important I have a lot of difficulty understanding how pieces 7,8,10 and 11 are sewn on the rest of the jacket because nothing in the explanations or in the photos are incomprehensible. Thank you for helping me, I’ve been turning the work over and over for days without understanding how to do it.
Hello Maureen,
Thanks for visiting the Mood Sewciety Blog! We’re proud to have released over 350 free sewing patterns, and we hope you’re enjoying them.
Behind the scenes we’re a dedicated team of three, and we want to be able to offer top notch support. We have exciting plans for our patterns on the horizon, and as we continue to grow, we’ve decided to focus our sewist support on patterns from the last 2 years. If this pattern hasn’t been recently reduxed or updated, we won’t be able to respond to technical questions on these older posts.
If you come across any pattern errors, rest assured our team is on it – just let us know!
Don’t miss out on our Mood Sewciety Facebook Group – a fantastic space for fellow sewists to connect, share wins, and tackle challenges together.
Thank you for your understanding and happy sewing!