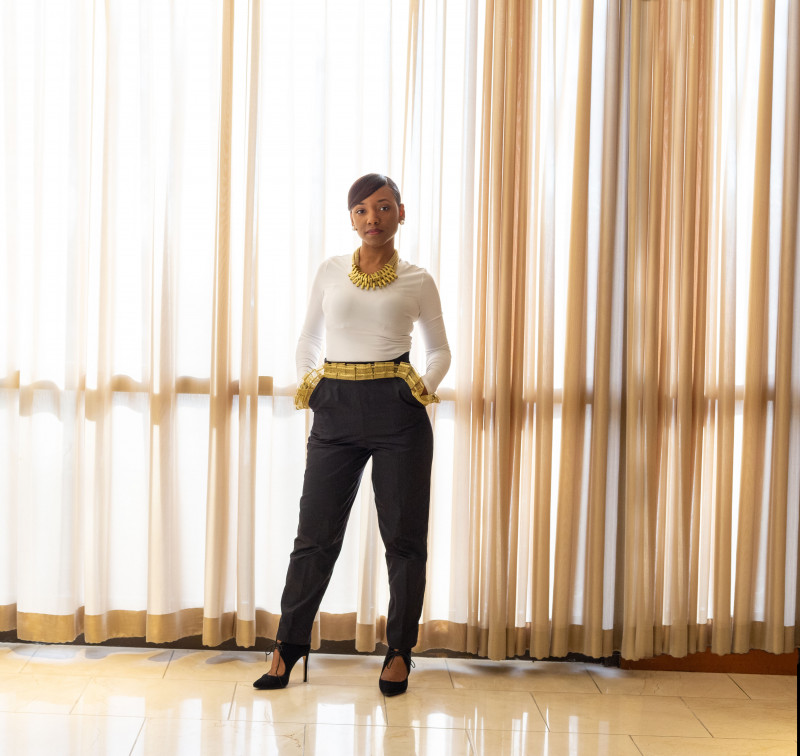
How often do you try something new and exciting with fashion? I almost always play it safe when it comes to my personal style, but I find that adding statement pieces a little at a time seems to work for me. Start with a familiar silhouette then add unique details to help you step out of your comfort zone. The Douglas Pants free sewing pattern is the perfect example! Here we have a lovely fitted high-waisted dress pant that would be flattering on anyone! What makes it a statement piece is the ruffle trim sewn almost seamlessly into the pockets and waist! Talk about making an entrance! Sometimes you just have to go for it! All you need is a classic fitted white shirt, either a crisp cotton button-up or knit to complete the look! We’d love to hear how you style your Douglas Pants!


Fabrics & materials used:
- 2.5 yards of Black Sea Island Cotton Sateen
- 2 yards of European Metallic Gold Lace Trim
- 1 spool of 10 Black 1000m Gutermann Sew All Thread
- 1 pack of Dritz Regular Stitch Witchery
- 1 580 Black 9″ Regular Zipper
- MDF102 – The Douglas Pants Sewing Pattern (free download below!)
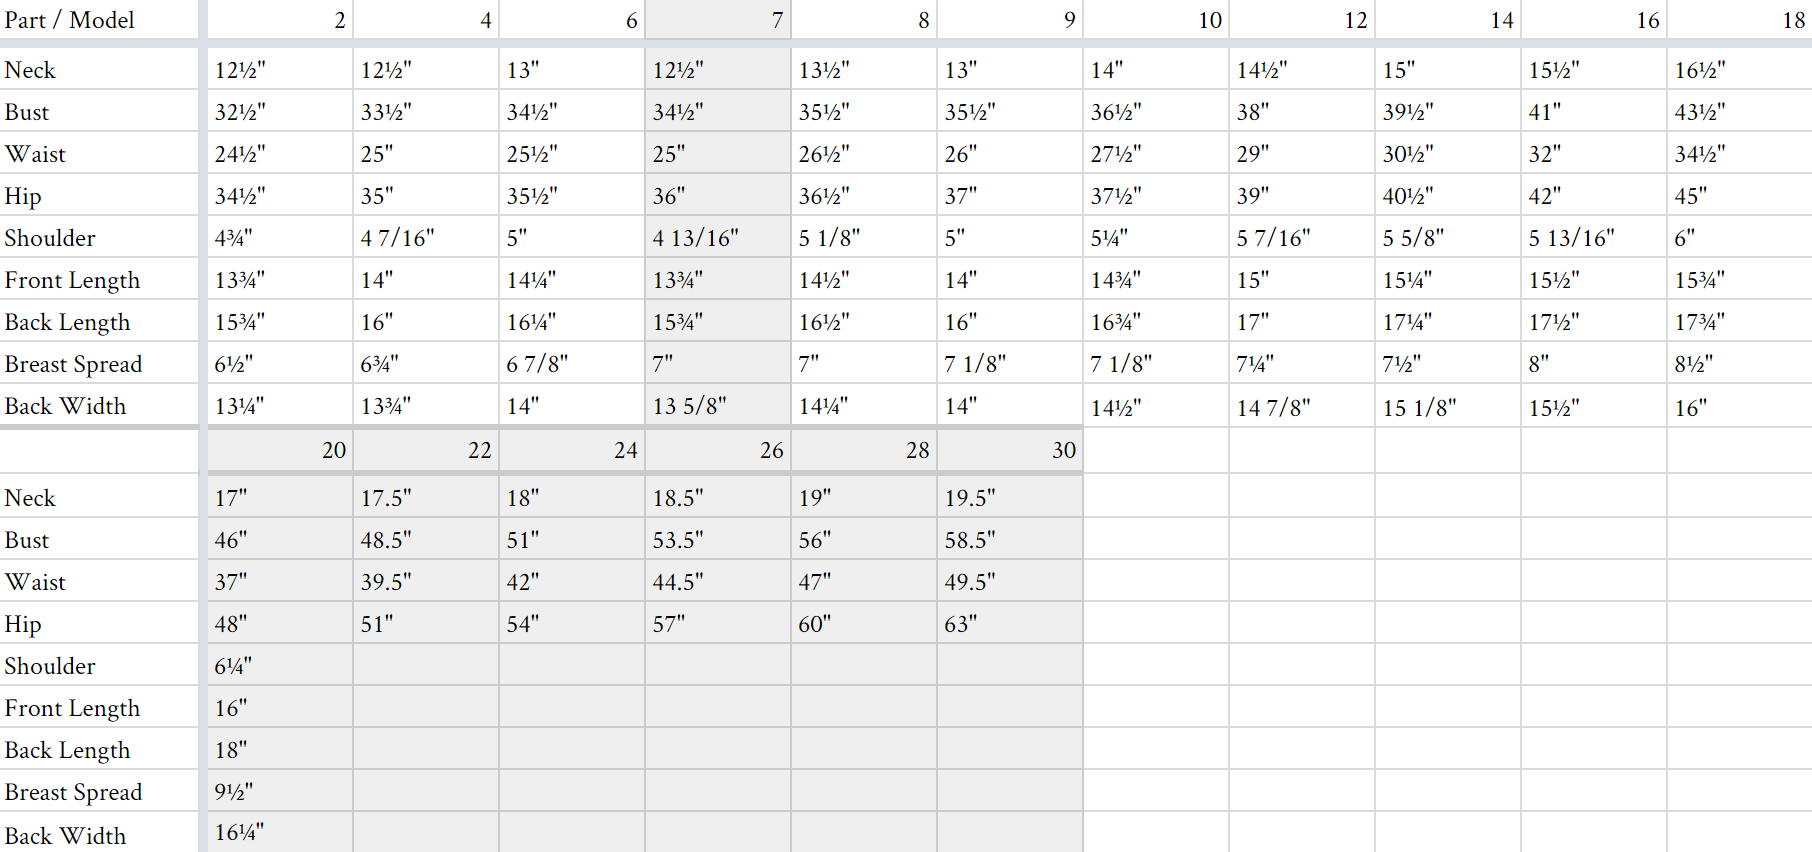
All seam allowances are 1/2″ unless otherwise stated. See chart below for sizing specifications. Note, this specific pattern is available up to a size 30.
Here’s how to sew:
- Sew the darts at back then press toward the sides seams. Pin backs together at center back seam then stitch. Press center back seam.
- Pin fronts together at center front seam then stitch. Press seams open.
3. Now we are going to sandwich our ruffle trim along the top of the pant in between the pocket seam and waistband seam. Starting at the pocket, pin the trim creating box pleats and go all the way across the top.
4. Use a basting stitch and secure the ruffle in place. Use a pressing cloth and press the ruffle inward.
5. Pin pocket facing to the front of pant. Stitch in place. Now turn pocket inward and press. Pin the pocket to the pocket facing and stitch. Pin the side of the pocket to the side of the pant to keep it from shifting.
6. Pin pant front to back at side seams. Make sure pocket edge lines up with the side seam. Stitch along the sides and press seam
7. Pin pant along inseam matching front and back seams at center. Stitch and press seams.
8. Prepare waistband. Pin waistband to pant and stitch in place. Trim seam allowance and press waistband facing to inside.
9. Pin zipper to side seam opening. Fold waistband facing over zipper and stitch zipper place. Press under seam allowance on waistband facing and press. Slip stitch waistband on the inside. Press.
10. Hem the pant legs by using the stitch witchery and that’s it’s you’re done!


16 comments
The Seam allowance is in the pattern? Or i need to add this? Thank you.
1/2″ seam allowance is already included. 🙂
Are the sizes printed on the pattern dress sizes or pattern sizes?
Hi Jewel, we have a size chart with body measurements below the submission form for you to check your size. 🙂
Can I made the pants without the fringe using the same pattern?
Yes, for sure! 🙂
Are the pattern measurements true to size or is there a lot of ease in them?
Good morning, Shari! Our patterns include a fair amount of wearing ease. 🙂
Hi, my mother always taught me to sew the centre-back and centre-front seams in one unbroken line. Not separate as shown here. That way, the centre-back crotch seam doesn’t ride up into your butt and you keep a nice line. Its a very pretty pattern though and I would like to make it. 🙂
thank you
.Gorgeous
What does ‘prepare the waistband’ mean?
Hello Sarah!
Thanks for visiting the Mood Sewciety Blog! We’re proud to have released over 350 free sewing patterns, and we hope you’re enjoying them.
Behind the scenes we’re a dedicated team of three, and we want to be able to offer top notch support. We have exciting plans for our patterns on the horizon, and as we continue to grow, we’ve decided to focus our sewist support on patterns from the last 2 years. If this pattern hasn’t been recently reduxed or updated, we won’t be able to respond to technical questions on these older posts.
If you come across any pattern errors, rest assured our team is on it – just let us know!
Don’t miss out on our Mood Sewciety Facebook Group – a fantastic space for fellow sewists to connect, share wins, and tackle challenges together.
Thank you for your understanding and happy sewing!
I think they mean to add interfacing, if your fabric needs it.
I take it these are pdf patterns, is there a way to print cheaply..
I am a new sewer, education about fabrics is much appreciated..I felt a fabric that was soft, medium weight flowy once. I am wondering what it might have been. It was not stretchy. It was used in expensive pants, dresses and flowed..not too lightweight like silk, not see through like chiffon..i think it was medium weight, soft…very expensive feel
I know this sounds odd but if you have any suggestions..the mood is walk into a room with flow and sophistication. Also comfort
Hello Sharon, you can try looking at sophisticated fabrics like satin, velvet, georgette, or mikado.